Learn how to build a AI conversational bot with Microsoft bot framework
- Posted in:
- Azure Bot
- Microsoft bot framework
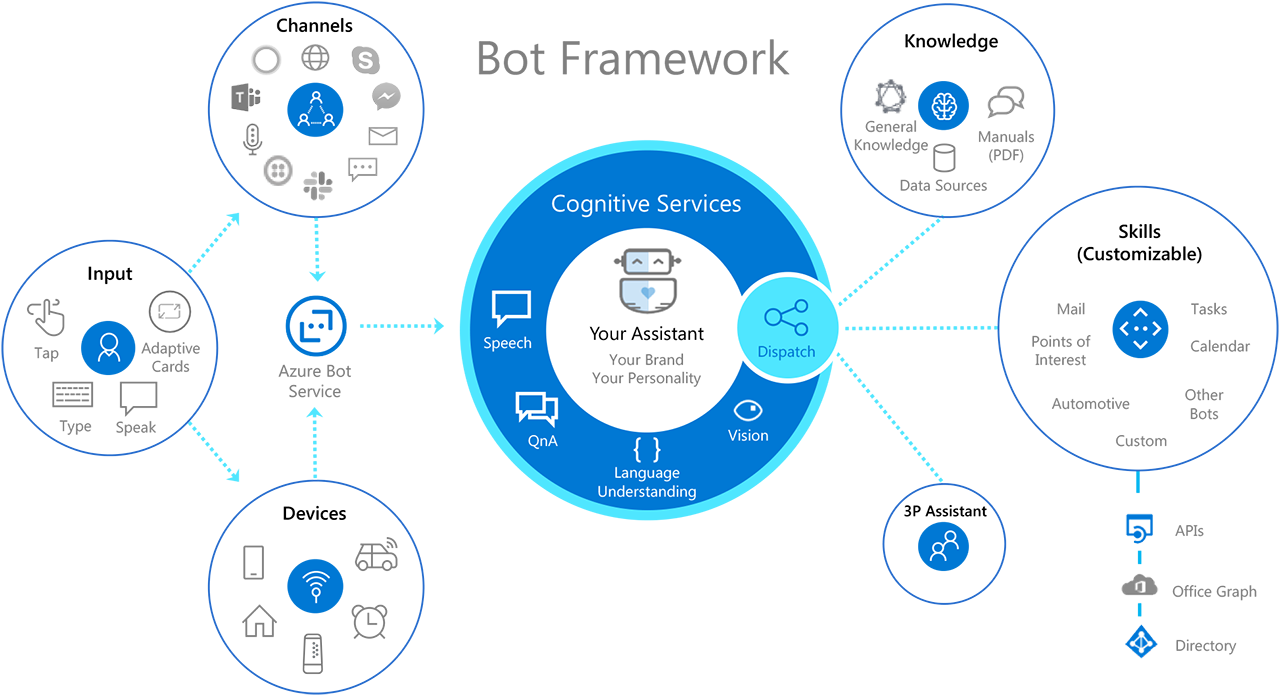
Recently I’m building a bot for prototyping with Microsoft bot framework by integrating with new Azure cognitive services (cognitive service for language & question answering). Frankly speaking, Microsoft bot framework is really easy to use and does not require steep learning curve. Today, I would like to share some of my experiences of building a bot, so you can build yours more effectively.
In the following article, I’m going to explain the tools I used and how to you can use them during the building life cycle as shown below.

Design Build Test Publish Connect Evaluate
Design Phase
Microsoft Whiteboard
Brainstorming the goal of the bot by asking below questions
- why you need a bot?
- what problem you are trying to resolve?
- how to measure the success of your bot?
- …etc.
Microsoft OneNote
Design a conversational flow for your chatbot and try to analyze an example chatbot flowchart.

Build Phase
Microsoft Visual Studio 2022
Microsoft bot framework supports both Node.js and c#. In my case, I’m using c#. I would suggest to start getting familiar with the framework SDK. It is well documented with code examples. In my case, I started project with echo bot, which is a very simple template. It helps you understand the events lifecycle in the bot, before starting to build the complicated business logic.
The Echobot template is a .net core project. If you are familiar with c# code. you will find the bot endpoint is an API controller. By default, the .net core application is running on IIS Express in which anonymous authentication is enabled. That’s why when you are not providing the username and password in bot framework emulator, it will still work.

MS Teams dev Tool
Microsoft provides a great tool for designing and building dialog cards. you can drag and drop the element into the canvas which will automatically generate the json with styling data.

Azure Cognitive Service for Language
Azure cognitive service for language is a managed service to add high-quality natural language capabilities, from sentiment analysis and entity extraction to automated question answering.
With Azure bot framework SDK, it makes easier to call the Cognitive Service. Here is an example in c#.

Azure Cognitive Service for Question Answering
Azure Question answering provides cloud-based Natural Language Processing (NLP) that allows you to create a natural conversational layer over your data. It is used to find the most appropriate answer for any input from your custom knowledge base of information. Here is an example in c# with Azure bot framework SDK.

Test Phase
Bot Framework Emulator v4
Microsoft provides bot Framework Emulator so that you can test or debug your bot locally. For testing your bot in the Emulator, you only need to configure the endpoint. In my case, it’s the default http://localhost:3897/api/messages. you can leave Microsoft API ID and Microsoft App password empty, if they are empty in you appsettings.json.

Once you completed, then click “save and connect”, you are ready to debug.

Publish Phase
Github
There are many tools you can use for your CI/CD process. i.e. Azure devOps. In my case, I’m using Github. I’m hosting my bot in Azure app service, in which it could natively connect with Github by a few configuration in deployment center.

In addition, it’s important to keep you credentials secure. DON’T put into appsettings.json, you should use github actions secrets instead.

On your local, you should leverage environment variable for appsettings.json.

Now, you are ready to deploy your bot into Azure.
Connect Phase
MS Teams
Azure bot supports different channels, Web chat, Microsoft Teams, Alex, Email, Facebook, Slack etc. The good news is that Microsoft have already done the hard job for you, so that you don’t need to worry about the message formatting from different channels. It will automatically convert into the conversational json required by your message endpoint. All you need to do in just register your channel. In my case, I have registered for MS Teams.

After you registered the Teams channel in azure, you will need to create a Teams App package (manifest.zip) for the bot. It will need to be uploaded and installed in Teams.
Ngrok
Another tool i’m using here is Ngrok for debugging remotely. Ngrok secure tunnels allow you to instantly open access to remote systems without touching any of your network settings or opening any ports on your router. You can find more details here for configuring ngrok.
Evaluate Phase
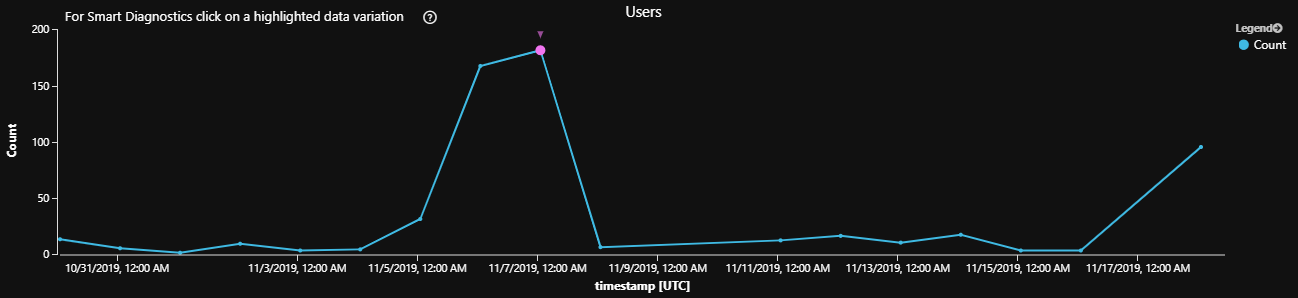
Azure Monitor Log Analytics
Enabling Azure logs for analyzing bot behavior with Kusto queries like below samples. there are more samples you can find here.
Number of users per specific period

Activity per period

Power BI
Lastly, you can use Power BI to build a dashboard.
Summary
Microsoft bot framework is a comprehensive framework for building enterprise-grade conversational AI experiences. It makes easy to integrate with Azure Cognitive Services for creating a bot with the ability to speak, listen, understand, and learn. It allows you to create an AI experience that can extend your brand and keep you in control of your own data. Most importantly, Microsoft have already provided a full list of tools to smooth the process of your building experience.
yay! here is my bot, his name is Eric. Compose a bot today so as to boost your customers’ experience.


