0 Comments

This article is aiming to provide a comprehensive guideline for whom is interested in upgrading their Sitecore instance (version 8) to Sitecore 9.

Image result for upgrading Sitecore

[Step 1] Preparing to Upgrade from Sitecore XP 8.1 – Sitecore XP 8.2.7

TasksSteps
Restore Deleted Marketing Taxonomies and Marketing Definitions

If you are using the Sitecore Experience Database (xDB) functionality, (when the Xdb.enabled setting is set to true, and xDB is enabled in the license), before you install the upgrade package, you must restore any of the standard marketing taxonomies and marketing definitions that you have deleted from your Sitecore installation.

To restore deleted marketing taxonomy items:

  1. Unpack the MarketingDefinitionsUpgrade.zip file
  2. Copy the RestoreDeletedMarketingTaxonomies.aspx page to the \sitecore\admin folder of your website
  3. To open the Restore Deleted Marketing Taxonomies page, enter the following URL in your web browser:http:///sitecore/admin/RestoreDeletedMarketingTaxonomies.aspx
    (warning) Important: This page requires direct access to the Reporting database. Ensure that the current Sitecore instance has the appropriate connection string in the \App_Config\ConnectionStrings.config file and that the database is accessible
  4. Click Restore deleted taxonomy items.
    At this point, all the default marketing taxonomy items are restored to the Master database. A file called RestoredTaxonomies_{timestamp}.dat is created in the \App_Data folder. This file lists all of the restored items. When the upgrade is completed, if you want to delete these unwanted marketing taxonomies again, you can use this file to identify them.

To restore deleted marketing definition items:

  1. Unpack the MarketingDefinitionsUpgrade.zip file.
  2. Copy the RestoreDeletedMarketingDefinitions.aspx file to the sitecore/admin folder of your website.
  3. To open the Restore Deleted Marketing Definitions page, enter the following URL in your web browser:http:///sitecore/admin/RestoreDeletedMarketingDefinitions.aspx
    (warning)Important This page uses the Marketing Operations repository in the Reporting database. The current Sitecore instance must therefore have access to the Reporting database.
  4. Click Restore deleted definition items
    At this point, all the default marketing definition items are restored from the Reporting database to the Master database. A file called RestoredDefinitions_{timestamp}.dat is created in the \App_Data folder. This file lists all of the restored items. When the upgrade is completed, if you want to remove these marketing definitions again, you can use this file to identify them.
Validate the Names of the Marketing Definition Items

(warning)If you are using the Sitecore Experience Database (xDB) functionality or if you are using the tracking functionality (the Xdb.Tracking.Enabled setting is set to true), you must validate the names of the marketing definition items and address any errors.

To validate the names of the marketing definition items:

  1. Unpack the MarketingDefinitionsUpgrade.zip file
  2. Copy the DefinitionItemsNameValidator.aspx page to the \sitecore\admin folder of your website.
  3. To open the Definition Items Name Validator page, enter the following URL in your web browser:http:///sitecore/admin/DefinitionItemsNameValidator.aspx
  4. Click Validate
    The names of the definition items are validated, and a report called DefinitionItemsNameValidationErrors_{timestamp}.dat is saved in the \App_Data folder. This report lists any validation errors that occurred.
  5. Ensure you manually fix all the issues that were found, and then validate the names again. Repeat this procedure until all the names have been validated.
Disable the Email Experience Manager Module

To disable the Email Experience Manager module:

  1. Delete the following folders:
    1. \App_Config\Include\EmailExperience
    2. \App_Config\Include\Z.EmailExperience
  2. Delete the following file:
    1. \App_Config\Include\ExperienceProfile\Sitecore.ExperienceProfile.R eporting.Sitecore.EmailExperience.ExperienceProfile.config
  3. In the \bin folder of your website, delete all the files that begin with
    1. Sitecore.EmailCampaign, Sitecore.EDS, or Sitecore.ExM.
Upgrade the Databases

To upgrade the databases:

  1. Execute the CMS9.0_BeforeInstall.sql script for the Core, Master, and Web databases.
  2. Execute the CMS90_db_core_BeforeInstall.sql script for the Core database only.
  3. If you are using the xDB functionality, you must execute the SXP90_BeforeInstall.sql script for the Reporting database.

Deploy the New Databases

To use Email Experience Manager (EXM), you must add the new connection strings

To enable EXM:

In the \App_Config folder, in the ConnectionStrings.config file, add the connection string for the Sitecore.Exm.master database.

For example:

<add name="exm.master" connectionString="user id=user;password=password;Data Source=(server);Database=Sitecore.Exm.master" />

Add the following three connection strings:

  • EXM.InternalApiKey: You only need to add this connection string if you want to add a dedicated email dispatch server.
  • EXM.CryptographicKey
  • EXM.AuthenticationKey

The keys must be represented in hexadecimal format by 64 characters and you can only use the symbols 0-9 and A-F.

<add name="EXM.CryptographicKey" connectionString="E040C938FC9E4EBC3E93330B0F7837F284207B8180DB64CB5B6ABEB1AFBF6F5B" />

(warning) NOTE: The exm.master connection string is only required on content management servers.


[Step 2]Final Preparations for Upgrading from All Versions

TasksSteps
Content TestingBefore you upgrade your Sitecore installation, you must stop any content tests that are currently running. This prevents the start date of the tests from being overwritten with the upgrade date
Disable the Web Forms for Marketers Module

To disable the Web Forms for Marketers module:

Disable the following Web Forms for Marketers configuration files by adding .disabled to the file extension.

  • \App_Config\Include\Sitecore.WFFM.Speak.config
  • \App_Config\Include\Sitecore.WFFM.Services.config
  • \App_Config\Include\Sitecore.WFFM.Dependencies.config
  • \App_Config\Include\Sitecore.WFFM.Analytics.config
  • \App_Config\Include\Sitecore.Forms.config
  • \App_Config\Include\Sitecore.MvcForms.config

SXA

  • Sitecore.Foundation.Forms.config.disabled
  • Sitecore.XA.Feature.Forms.config.disabled


(warning) Important
After the upgrade of Sitecore Experience Platform is completed, you must also upgrade the modules. For
more information, see the section Upgrade Web Forms for Marketers in this guide.

Enable Email Experience Manager

To use Email Experience Manager (EXM), you must add the new connection strings

To enable EXM:

In the \App_Config folder, in the ConnectionStrings.config file, add the connection string for the Sitecore.Exm.master database.

For example:

<add name="exm.master" connectionString="user id=user;password=password;Data Source=(server);Database=Sitecore.Exm.master" />

Add the following three connection strings:

  • EXM.InternalApiKey: You only need to add this connection string if you want to add a dedicated email dispatch server.
  • EXM.CryptographicKey
  • EXM.AuthenticationKey

The keys must be represented in hexadecimal format by 64 characters and you can only use the symbols 0-9 and A-F.

<add name="EXM.CryptographicKey" connectionString="E040C938FC9E4EBC3E93330B0F7837F284207B8180DB64CB5B6ABEB1AFBF6F5B" />

(warning) NOTE: The exm.master connection string is only required on content management servers.

Indexing and Performance

Indexing is performed during the upgrade. Depending on the version of Sitecore you are upgrading from, a number of items can be changed by the update, and this can cause the upgrade to take a long time.

To speed up the upgrade process, you can disable indexing by removing the following processor from the Sitecore.ContentSearch.config file:

<handler type="Sitecore.ContentSearch.Events.PackagingEventHandler, Sitecore.ContentSearch"
method="OnPackageInstallItemsEndRemoteHandler"/>

Disable the Sitecore Experience Database

To disable xDB:

  • Unpack the Sitecore 9.0.2 rev. 180604 (upgrade files).zip file and the Disable xDB.zip file.
  • In the \App_Config\Include folder, create a new \Z.Custom folder and copy the Disable.xDB.config file to the \App_Config\Include\Z.Custom folder.

(warning) Important
When the upgrade is finished, you must re-enable xDB by removing the Disable.xDB.config
file from the \App_Config\Include\Z.Custom folder.


[Step 3] Install the Upgrade Package

TasksSteps
Use the Update Installation Wizard to Install the Upgrade Package
  1. On the Sitecore Launchpad, click Control Panel, and in the Administration section, click Install a package.
  2. Install the Sitecore Update Installation Wizard 3.1.2 rev.180406.zip package
  3. On the Sitecore Launchpad, click Control Panel, and in the Administration section, click Install an update.
  4. On the Welcome to Sitecore update installation wizard page, click Select a package.
  5. On the Select a package page, click Choose File and navigate to the folder where you saved the update file forSitecore 9.0.2 rev. 180604. Select the update file for the Sitecore version that you are upgrading from, and then click Open.
  6. Click Package information
    If the Update Installation Wizard cannot detect your current Sitecore version automatically, on the Select an upgrade path page, you must manually select the Sitecore version and revision number that your solution is based on, and then click View package information.
  7. On the Package information page, review the information about the package, and then click Analyze the package.
  8. On the Analyze the package page, click Advanced options, review the installation options, and then click Analyze.
    In the Advanced options section, you must select the Execute post-steps check box, regardless of the other check boxes you may have selected. The post-steps are performed at the end of the upgrade process. These steps can include items or file operations that are executed by the Sitecore API, and can vary according to the Sitecore version that you are upgrading from. During the analysis, the installation wizard identifies any potential conflicts in the configuration files being upgraded and any breaking changes in custom code.
  9. After the analysis process is complete, click Analysis result.
  10. If the Update Installation Wizard does not find any conflicts, click Install the package, and skip to section Configure.
The Upgrade Package Analysis

(warning) While the majority of the actions ensure the best upgrade experience, if the analysis identifies custom code that must be recompiled or configuration file conflicts that must be resolved, you must address these manually

  1. Upgrade Sitecore Powershell to 4.7.2
  2. Disable Sitecore Ppowershell
    1. z.Cognifide.PowerShell.config
    2. Cognifide.PowerShell.config.disabled
    3. Cognifide.PowerShell.VersionSpecific.dll
    4. Cognifide.PowerShell.Package.dll
    5. Cognifide.PowerShell.dll
Resolve Configuration File ConflictsResolve all conflicts in your solution


[Step 4] Configure Sitecore

TasksSteps
Review Custom Changes in Configuration Files

The patch files are created and stored in the same folder as the original configuration files. They are saved in the following file format: .patch.config.disabled.

To facilitate traceability and debugging, the wizard also saves the original file with your customizations in the following file format: .custom.config.disabled.

For example, if you customized the Sitecore.Mvc.config file, during the analysis, the Update Installation Wizard creates:

  • Sitecore.Mvc.patch.config.disabled

A patch file with your customizations.

  • Sitecore.Mvc.custom.config.disabled.

A backup of the customized configuration file. Both files are disabled

To enable the patch files with the customizations that were generated by the Update Installation Wizard, remove the .disabled extension from the file name.

Specify the Server Role and the Search Provider

To specify the server role:

  • In the \Website\web.config file, in the section, specify the relevant server role:

    <AppSettings>
    <add key="role:define" value="[server role]"/>
    </AppSettings>

  • The following server roles are supported:
    • ContentDelivery
    • ContentManagement
    • Processing o Reporting
    • Standalone

    The default value is Standalone, which means that one Sitecore instance performs all the Sitecore server roles

To specify the search provider:

  • In the \Website\Web.config file, in the <AppSettings> section, specify the search provider:
    • <add key="search:define" value="Solr" />

The following values are supported:

  • Lucene
  • Solr
  • Azure

The default value is Lucene.
The Azure Search provider is only supported for Azure Cloud PaaS deployments.

Remove Deprecated Indexes

You must remove the following deprecated indexes from your search provider:

  • social_messages_master
  • social_messages_web
  • sitecore_list_index
  • sitecore_analytics_index

To remove the indexes in Lucene:

  • Navigate to C:\inetpub\wwwroot\<SitecoreInstanceName>\Data\indexes
  • Delete any folder named after any of the deprecated search indexes listed at the beginning of this
    section


[Step 5] Update Solr

TasksSteps
Specify the Solr connecting string

In Sitecore XP 9.0 Update 2, the Solr connection string was moved to the ConnectionStrings.config file.

To continue using Solr after you upgrade to Sitecore XP 9.0 Update-2, you must:

  • Locate the connection string for Solr. 
  • Add following connection string to Website/App_Config/ConnectionStrings.config file:
  • Remove the connection string from the old location.
Configure Managed SchemaSince Sitecore XP 9.0, Sitecore supports the Managed Schema approach. Therefore, it is no longer necessary to set up Solr Server to run the Classic Schema.
Populate the Solr Managed Schema
  1. Rename index name before rebuild index


[Step 6] Install xConnect

TasksSteps
Install and Configure Sitecore xConnect
  1. Download Sitecore 9.1.2
  2. Install xConnect
Configure xConnect
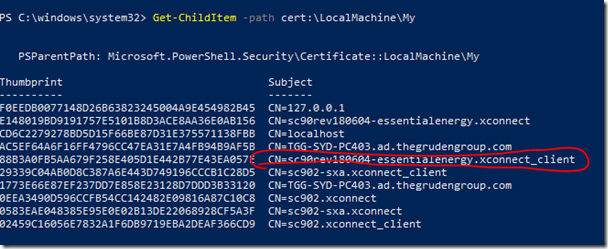
  1. Find certificate Thumbprint with powershell script
    Get-ChildItem -path cert:\LocalMachine\My
  2. Find theThumbprint of *_client

image2018-11-1_20-9-1

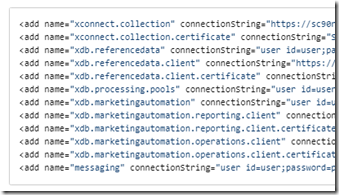
   3. Adding the following connections into Sitecore connectionStrings.config

Capture

  • (warning) NOTE:These connection strings are for a single instance Sitecore solution only. For a scaled environment, see the Sitecore server role configuration reference documentation

  • Open certificate management
    1. Run certlm.msc
    2. Select the *.certificate_client and set permission
      1. To open the Certificate Management console, in the Windows command prompt, enter certlm.msc and press Enter.

      2. In the left pane, in the tree, expand the Personal node and select Certificates.

      3. In the right pane, right-click the relevant xConnect certificate, select All Tasks, and then select Manage Private Keys.

      4. In the Permissions dialog box, in the Security section, ensure that you grant read permissions to the
        relevant Sitecore instance Application Pool Identity.

        For example: IIS AppPool\<YourSitecoreAppPoolName>.

      5. Restart IIS.


[Step 7] Post-upgrade Steps

TasksSteps

Tasks

Steps

Project-EE

General Maintenance

xDB Maintenance

To enable xDB and Experience Analytics:
In the \App_Config\Include\Z.Custom folder, remove the following files:

  • Disable.xDB.config
  • Disable.xAnalytics.config

Redeploy the Marketing Definitions

To redeploy the marketing definitions:

  1. On the Sitecore Launchpad, click Control Panel, Analytics, and then click Deploy Marketing Definitions.
  2. In the Deploy marketing definitions dialog box, select all the definitions and taxonomies and click Deploy.
Upgrading from Sitecore XP 8.1 - Sitecore XP 8.2.7

Delete Unwanted Marketing Definitions and Marketing Taxonomies

Now that the upgrade and installation is complete, you can delete these same marketing definitions and
marketing taxonomies again.

To see a list of the marketing definitions that were previously deleted:

  • In a text editor, in the \App_Data folder, open the

RestoredDefinitions_{timestamp}.dat file.

To see a list of the marketing taxonomies that were previously deleted:

  • In a text editor, in the \App_Data folder, open the

RestoredTaxonomies_{timestamp}.dat file.

To delete the unwanted marketing definition items from the Master database:

  1. 1. To open the Restore Deleted Marketing Definitions page, enter the following URL in your web browser:
  2. http://<hostname>/sitecore/admin/RestoreDeletedMarketingDefinitions.aspx
  3. At the bottom of the page, next to the name of the file that contains data about the restored items,
  4. click Remove restored definition items.

To delete unwanted marketing taxonomy items from the Master database

  1. To open the Restore Deleted Marketing Taxonomies page, enter the following URL in your web browser: http://<hostname>/sitecore/admin/RestoreDeletedMarketingTaxonomies.aspx

Update Customizations for Reporting

In Sitecore XP 9.0, the rule set has been redesigned. If you are upgrading to
the latest version of Sitecore from any Sitecore XP 8.x version, you must therefore update all of your custom
filters and custom maps by setting and configuringnew rules in the Rule Set Editor.

If you customized Experience Analytics or created any custom segments, reports, or dashboards, you must update these. If you have created any custom maps in the Path Analyzer, you must also update them

Upgrade Experience Analytics

In Sitecore 9.0 or later, some subsystems that affect Experience Analytics have been changed. If you are
upgrading from Sitecore XP 8.x and have customized Experience Analytics, you must update these
customizations to support the updated subsystems

  1. Custom Segments
    The Rule Set Editor has been updated and the rules that it contains have also been changed.
      1. Reconfigure any filters that use these custom segments and then redeploy the custom segments.
      2. Rebuild any custom filters that you have created so that they are compatible with the new subsystems.
  2. Custom Reports
    In Sitecore XP 9.0 or later, you can collect specific metrics for each dimension. If you created any custom reports or dashboards, you must update these manually, change the dimension/segment that it uses, and select the new version of the metrics that you want to use in the reports or dashboards.

Upgrade Path Analyzer

In the Path Analyzer, you must reconfigure any custom maps that you have created and redeploy all the Path Analyzer maps.

  1. Update Custom Maps

    The filter rules have changed. As a result, if you have created any custom maps, you must map these to the
    new filter rules

  2. Redeploy the Path Analyzer Maps

    In Sitecore XP 9.0 or later, the deployed Path Analyzer maps are stored in a different format. You must therefore redeploy the Path Analyzer maps.

    1. In SQL Server Management Studio, in the Reporting database, to remove all the data from the TreeDefinitions table, execute the following command: Delete from TreeDefinitions.

    2. In Sitecore, open the admin page of the Path Analyzer – /sitecore/admin/pathanalyzer.aspx.

    3. In the Maps Manager section, click Deploy all maps that are not deployed.


[Step 8] Upgrade Multiple Instances

Upgrade a Scaled Environment With Multiple Instances

  • Content Delivery, Processing, and Reporting
  • Session State Provider
  • Scaled XConnect Environment


[Step 9] Migrate xDB data

To use the xDB Data Migration Tool to Migrate xDB data.

NOTE: Before you run the xDB Data Migration tool, you must deploy the new Reporting database to SQL Server.

To deploy the new Reporting database:

  1. Deploy the Sitecore.Analytics.dacpac. This file is located in the Sitecore 9.0.2 rev. 180604 (upgrade files).zip package, in the \Databases folder.
  2. In the ConnectionStrings.config file of your Sitecore instance, replace the name of old reporting database with the name of the new one. For example:

    <add name="reporting" connectionString="user id=user;password=password;Data
    Source=(server);Database=Sitecore.Reporting.New" />


[Step 10] Breaking Changes from EXM 3.5

If you are currently using EXM previous version and willing to upgrade, you will have to be aware of the breaking changes in EXM 3.5.

ChangesDetails
Factories Replaced

The following factories have been removed:

  • Sitecore.Modules.EmailCampaign.Factories.BusinessLogicFactory
  • Sitecore.Modules.EmailCampaign.Factories.EcmFactory
  • Sitecore.Modules.EmailCampaign.Factories.IoFactory
  • Sitecore.Modules.EmailCampaign.Factories.GateWayFactory
  • Sitecore.Modules.EmailCampaign.Factory

They have been replaced with smaller factories that are responsible for creating only a single type. You can find most of the new factories in:

  • Sitecore.Modules.EmailCampaign.Factories
  • Sitecore.EmailCampaign.Cm.Factories

These factories are registered in the IoC container. You can customize most of the factories by patching the relevant configuration element.

Breaking Changes

There are over 1,000 breaking changes, including:

  • Approximately 600 changed public methods
  • Over 400 removed types
  • Approximately 50 public field changes
  • Approximately 20 interface changes
Client API and Messaging Bus

The following files have been removed:

  • Sitecore.Modules.EmailCampaign.Core.ClientApiBase
  • Sitecore.Modules.EmailCampaign.ClientApi and ECMClientService.asmx

The new messaging bus, shipped with 9.0.1, eliminates the need for an http endpoint (ECMClientService.asmx) on the content management server.

The new Sitecore.EmailCampaign.Cd.Services.ClientApiService class replaces the old ClientApi class and lets you send automated messages (with custom tokens and/or target languages), subscribing and unsubscribing. When the ClientApiService receives a request, a message is submitted to the messaging bus, and then picked up by a registered handler.


[Step 11] Upgrade Solution

Upgrade .net Framework to 4.6.2.

  1. Update framework to 4.6.2
  2. Update all nugget packages to Sitecore 9 update 2
  3. Update Newtonsoft.Json 9.0,0
  4. Configure Solr by following the steps here
    1. Enable Solr search provider
      1. <add key="search:define" value="Solr" />
    2. Copy the Solr provided configuration example from the configsets folder into [SOLR_DIR]/server/solr and rename it to the appropriate index name
  5. Rebuild index