0 Comments

Import data from Azure blob storage into Databricks

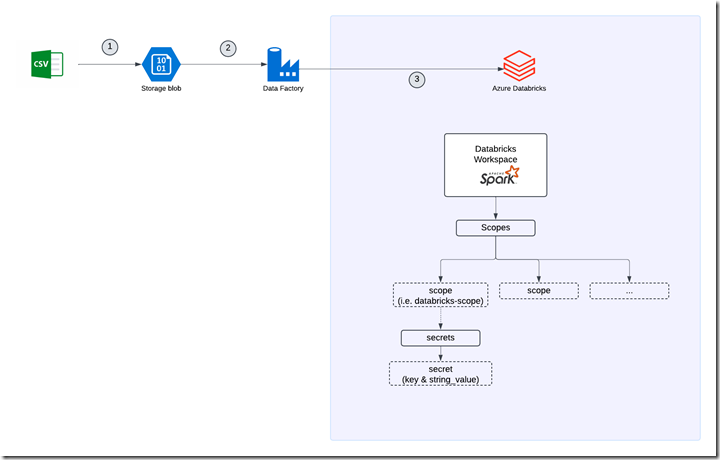
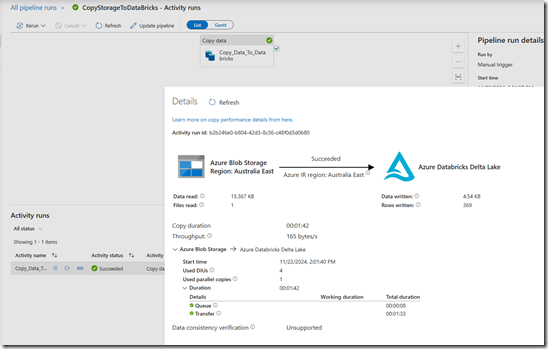
Data pipelines are essential for modern data solutions, and Azure Data Factory (ADF) provides a robust platform for building them. In this blog, we’ll walk through the process of setting up a pipeline in Azure Data Factory to import data from Azure Blob Storage into Databricks for processing.


Step 1: Prerequisites

Before setting up the pipeline, ensure the following prerequisites are met:

  1. Azure Blob Storage: Your source data should be stored in an Azure Blob Storage container.
  2. Azure Databricks Workspace: A Databricks workspace and cluster should be set up for data processing.
  3. Azure Data Factory Instance: Have an ADF instance provisioned in your Azure subscription.
  4. Linked Services Configuration:
    • Azure Blob Storage Linked Service: This enables ADF to connect to your data source.
    • Azure Databricks Linked Service: This enables ADF to connect to the target Databricks Delta Lake.

Both linked services are critical for establishing connections and configuring data pipelines between Blob Storage and Databricks.

1

  1. Access Permissions:
    • ADF needs Contributor access to Blob Storage and Databricks.
    • Ensure you have access to generate a Databricks personal access token.

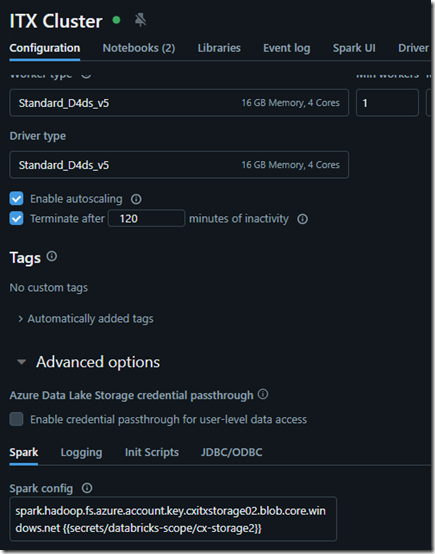
You will also need to configure the Blob Storage access token in Databricks. This ensures the underlying Spark cluster can connect to the source data seamlessly. Without proper configuration, you may encounter errors like the one shown below.

ErrorCode=AzureDatabricksCommandError,Hit an error when running the command in Azure Databricks. Error details: <span class='ansi-red-fg'>Py4JJavaError</span>: An error occurred while calling o421.load.
: shaded.databricks.org.apache.hadoop.fs.azure.AzureException: shaded.databricks.org.apache.hadoop.fs.azure.AzureException: Container salesdata in account cxitxstorage.blob.core.windows.net not found, and we can't create it using anoynomous credentials, and no credentials found for them in the configuration.
Caused by: shaded.databricks.org.apache.hadoop.fs.azure.AzureException: Container salesdata in account cxitxstorage.blob.core.windows.net not found, and we can't create it using anoynomous credentials, and no credentials found for them in the configuration.
Caused by: shaded.databricks.org.apache.hadoop.fs.azure.AzureException: Container salesdata in account cxitxstorage.blob.core.windows.net not found, and we can't create it using anoynomous credentials, and no credentials found for them in the configuration..


2

In the Cluster Configuration you will need the following:

spark.hadoop.fs.azure.account.key.<account_name>.blob.core.windows.net {{secrets/<secret-scope-name>/<secret-name>}}

You can use Databricks CLI to create scope and secret with the below commands

  • databricks secrets create-scope <scope name>
  • databricks secrets put-secret --json '{                                                             "scope": "<scope name>",
         "key": "<secret-name>",
         "string_value": "<storage account key value>",
    }


Step 2: Create an ADF Pipeline

  1. Add a Copy Data Activity:

    • Add the Copy Data activity into the pipeline.
    • Set the Source to use the Blob Storage dataset and the Sink to use the Databricks Delta Lake dataset.
  2. Add Data Transformation (Optional):

    • Use a Databricks Notebook activity to run transformation scripts.
    • Link the notebook to your Databricks cluster and specify the notebook path.

Step 3: Test and Schedule the Pipeline

  1. Test the Pipeline:

    • Use the Debug feature in ADF to run the pipeline and verify its functionality.
  2. Schedule the Pipeline:

    • Add a time-based or event-based trigger to automate pipeline runs.

3

0 Comments

Harnessing Data Insights with AI


In the fast-evolving landscape of artificial intelligence, GPT-4 Omni stands at the forefront, promising not just advanced language processing capabilities, but also the potential to revolutionize how businesses derive insights from their data. Imagine a scenario where your finance team or C-level managers can seamlessly interact with your organization's data using natural language, thanks to the integration of GPT-4 Omni into your systems.


The Power of GPT-4 Omni in Data Analysis
GPT-4 Omni, developed by OpenAI, represents a significant leap forward in AI technology. Unlike its predecessors, GPT-4 Omni is designed to handle a broader range of tasks, including complex data analysis and generation of insights. This capability makes it an ideal candidate for businesses looking to democratize data access and empower non-technical users to explore and understand data in real-time.

Addressing Ad-Hoc Requests with Azure OpenAI Chatbot
Imagine a typical scenario: your finance team needs immediate insights into recent sales trends, or a C-level manager requires a quick analysis of profitability drivers. With an Azure OpenAI chatbot powered by GPT-4 Omni, these ad-hoc requests can be addressed swiftly and effectively. The chatbot can interact with users in natural language, understanding nuanced queries and providing meaningful responses based on the data at hand.


Demo Application: Bringing Data Insights to Life
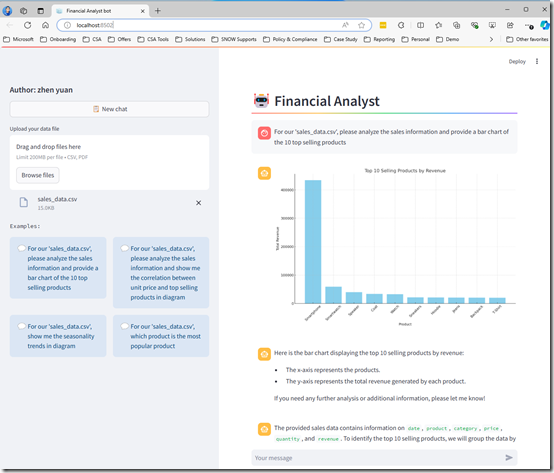
Recently, I developed a demo application to showcase the capabilities of GPT-4 Omni in the realm of data analytics. In this demo, I uploaded a CSV file containing a sample sales dataset, complete with sales dates, products, categories, and revenue figures. The goal was to demonstrate how GPT-4 Omni can transform raw data into actionable insights through simple conversational queries.

Screenshot 2024-06-26 160337


How It Works: From Data Upload to Insights

You can watch the video here

  • Data Upload and Integration: The CSV file was uploaded into the demo application, which then processed and integrated the data into a format accessible to GPT-4 Omni.
  • Conversational Queries: Users interacted with the chatbot by asking questions such as:
    • "What are the top-selling products in the sales data?"
    • "Is there any correlation between unit price and quantity sold?"
    • "Are there any seasonal trends in the sales data?"


Natural Language Processing: GPT-4 Omni processed these queries, utilizing its advanced natural language understanding capabilities to interpret the intent behind each question.

Insight Generation: Based on the data provided, GPT-4 Omni generated insightful responses, presenting trends, correlations, and summaries in a clear and understandable manner.

The Role of Assistants API
The Assistants API plays a pivotal role in enhancing functionality and integration capabilities. It empowers developers to create AI assistants within their applications, enabling these assistants to intelligently respond to user queries using a variety of models, tools, and files. Currently, the Assistants API supports three key functionalities: Code Interpretation, File Search, and Function Calling. For more detailed information, refer to Quickstart - Getting started with Azure OpenAI Assistants (Preview) - Azure OpenAI | Microsoft Learn


Conclusion
As AI continues to advance, tools like GPT-4 Omni and the Assistants API are reshaping the business landscape, particularly in the realm of data analytics. The ability to leverage AI-driven insights from your own data, through intuitive and conversational interfaces, represents a significant competitive advantage. Whether it's optimizing operations, identifying new market opportunities, or improving financial forecasting, GPT-4 Omni and the Assistants API open doors to a more data-driven and agile business environment.

In conclusion, integrating GPT-4 Omni and leveraging the Assistants API into your data strategy not only enhances operational efficiency but also fosters a culture of data-driven decision-making across your organization. Embrace the future of AI-powered data insights and unlock new possibilities for growth and innovation.

0 Comments
  •   Posted in: 
  • ML

In today's data-driven world, businesses are constantly seeking ways to leverage their data for insights that can drive better decision-making and outcomes. Predictive modelling has emerged as a powerful tool for extracting actionable insights from data, enabling organizations to anticipate trends, forecast outcomes, and make informed decisions. Azure Machine Learning (Azure ML), a cloud-based platform, offers a suite of tools and services designed to simplify the process of building, training, and deploying predictive models. In this blog post, I’ll explore how to harness the capabilities of Azure ML to build a predictive model, focusing on Automated ML, Designer, feature selection, and propensity modelling with two-class classification regression.

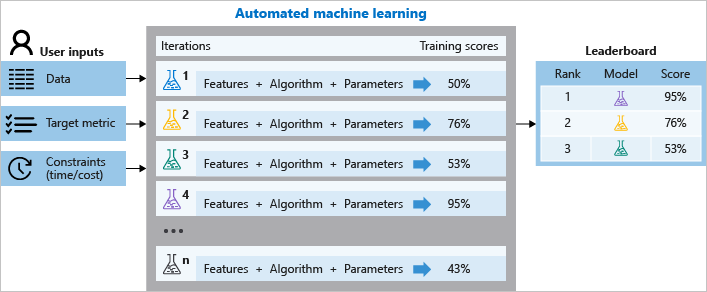
Automated ML: Automated ML is a powerful feature of Azure ML that automates the process of building machine learning models. With Automated ML, you can quickly experiment with different algorithms, hyperparameters, and feature transformations to find the best-performing model for your dataset. By leveraging Automated ML, data scientists can save time and resources while still achieving high-quality results. In our predictive modelling journey, we'll start by utilizing Automated ML to explore various model configurations and identify the most promising candidates for further optimization.

Automated Machine learning

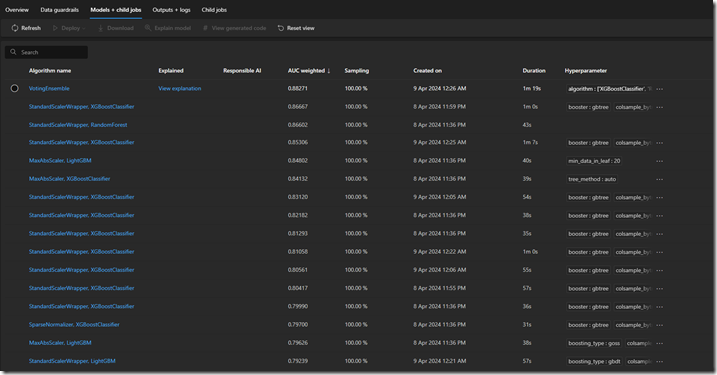
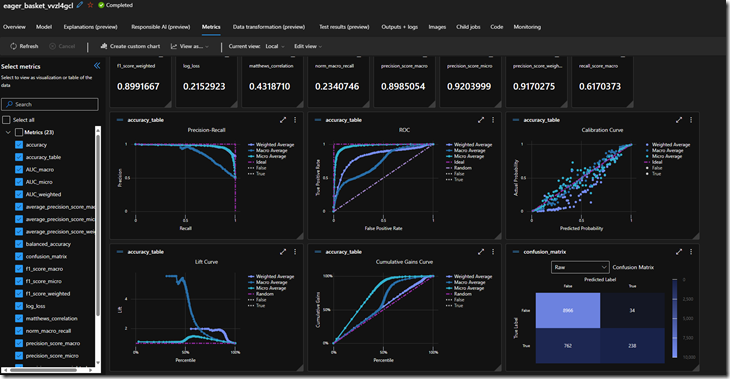
By default, the models are ordered by metric score as they complete. For this tutorial, the model that scores the highest based on the chosen AUC_weighted metric is at the top of the list.

111

navigates through the Details and the Metrics tabs to view the selected model's properties, metrics, and performance charts.

222


Feature Selection: Feature selection plays a crucial role in building predictive models by identifying the most relevant variables that contribute to the model's performance. Azure ML offers several feature selection techniques, ranging from univariate methods to more advanced algorithms. I'll employ these techniques to identify the most informative features in our dataset, reducing dimensionality and improving the interpretability of our model.

The screenshots below display the top four features ranked by their importance, as automatically determined by Automated ML. In this example, the decision to purchase a bike is influenced significantly by factors such as car ownership, age, marital status, and commute distance. These features emerge as key determinants in predicting the outcome, providing valuable insights into the underlying patterns driving consumer behaviour.

333


Designer: Azure ML Designer is a drag-and-drop interface that allows users to visually create, edit, and execute machine learning pipelines. With Designer, even users without extensive programming experience can easily build sophisticated machine learning workflows. We'll leverage Designer to construct our predictive modelling pipeline, incorporating data pre-processing steps, feature engineering techniques, and model training algorithms. By using Designer, we can streamline the development process and gain valuable insights into our data.


Propensity Modelling with Two-Class Classification Regression: Propensity modelling is a specialized form of predictive modelling that aims to predict the likelihood of a binary outcome, such as whether a customer will purchase a product or churn from a service. In our case, I’ll focus on building a propensity model using two-class classification regression techniques with designer. By training our model on historical data with known outcomes, we can predict the propensity of future observations to belong to a particular class. This information can then be used to target interventions or marketing campaigns effectively.

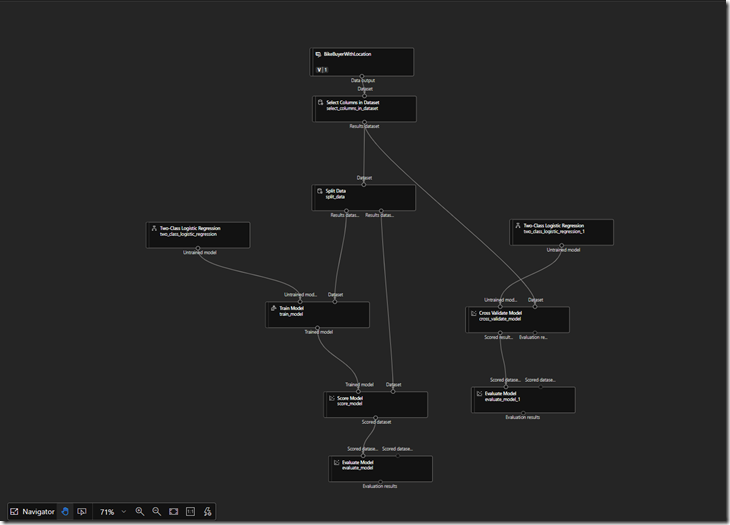
The diagram below illustrates the pipeline designed for training the propensity model using two-class logistic regression. This pipeline encapsulates the sequence of steps involved in preparing the data, selecting features, and training the model to predict binary outcomes. With each component carefully orchestrated, the pipeline ensures a systematic and effective approach to building the propensity model, empowering organizations to make informed decisions based on predictive insights.

444


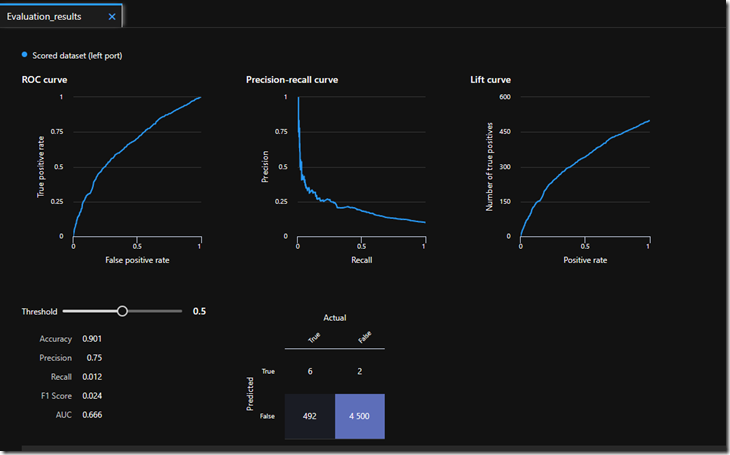
The screenshot below presents the evaluation results, highlighting that the dataset is imbalanced, which corroborates with the findings detected by Automated ML. This imbalance in the dataset indicates a discrepancy in the distribution of classes, which could potentially impact the model's performance. Understanding and addressing this imbalance is crucial for ensuring the model's accuracy and reliability in real-world applications.

555

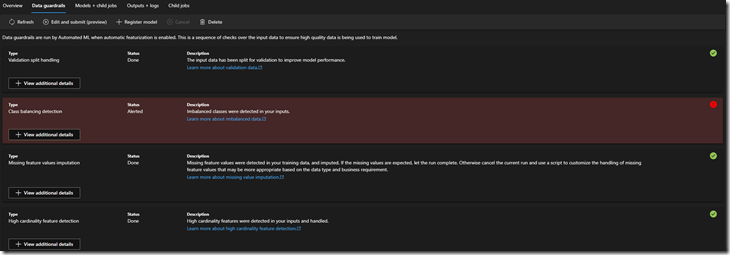
Below screenshot shows the data guardrails are run by Automated ML when automatic featurization is enabled. This is a sequence of checks over the input data to ensure high quality data is being used to train model.

666


Conclusion: In this blog post, we've explored how to build a predictive model with Azure ML, leveraging Automated ML, Designer, feature selection, and propensity modelling techniques. By harnessing the power of Azure ML, organizations can unlock valuable insights from their data and make data-driven decisions with confidence. Whether you're a seasoned data scientist or a novice analyst, Azure ML provides the tools and capabilities you need to succeed in the era of predictive analytics. So why wait? Start building your predictive models with Azure ML today and unlock the full potential of your data.

0 Comments


Diagram explaining the components of a conversation AI experience


Recently I’m building a bot for prototyping with Microsoft bot framework by integrating with new Azure cognitive services (cognitive service for language  & question answering). Frankly speaking, Microsoft bot framework is really easy to use and does not require steep learning curve.   Today, I would like to share some of my experiences of building a bot, so you can build yours more effectively.

In the following article, I’m going to explain the tools I used and how to you can use them during the building life cycle as shown below.


Design timeline of a bot

Design             Build                Test                  Publish           Connect           Evaluate


Design Phase    

Microsoft Whiteboard

Brainstorming the goal of the bot by asking below questions

  • why you need a bot?
  • what problem you are trying to resolve?
  • how to measure the success of your bot?
  • …etc.

Microsoft OneNote

Design a conversational flow for your chatbot and try to analyze an example chatbot flowchart.

image


Build Phase

Microsoft Visual Studio 2022

Microsoft bot framework supports both Node.js and c#. In my case, I’m using c#.  I would suggest to start getting familiar with the framework SDK. It is well documented with code examples.  In my case, I started project with echo bot, which is a very simple template. It helps you understand the events lifecycle in the bot, before starting to build the complicated business logic.

The Echobot template is a .net core project.  If you are familiar with c# code.  you will find the bot endpoint is an API controller.  By default,  the .net core application is running on IIS Express in which anonymous authentication is enabled.  That’s why when you are not providing the username and password in bot framework emulator, it will still work.

image


MS Teams dev Tool

Microsoft provides a great tool for designing and building dialog cards. you can drag and drop the element into the canvas which will automatically generate the json with styling data.

image


Azure Cognitive Service for Language

Azure cognitive service for language is a managed service to add high-quality natural language capabilities, from sentiment analysis and entity extraction to automated question answering. 

With Azure bot framework SDK, it makes easier to call the Cognitive Service. Here is an example in c#.

image

Azure Cognitive Service for Question Answering

Azure Question answering provides cloud-based Natural Language Processing (NLP) that allows you to create a natural conversational layer over your data.  It is used to find the most appropriate answer for any input from your custom knowledge base of information. Here is an example in c# with Azure bot framework SDK.

image


Test Phase

Bot Framework Emulator v4

Microsoft provides bot Framework Emulator so that you can test or debug your bot locally. For testing your bot in the Emulator, you only need to configure the endpoint.  In my case, it’s the default http://localhost:3897/api/messages. you can leave Microsoft API ID and Microsoft App password empty, if they are empty in you appsettings.json.

image

Once you completed, then click “save and connect”, you are ready to debug.

image


Publish Phase

Github

There are many tools you can use for your CI/CD process. i.e. Azure devOps.  In my case, I’m using Github.  I’m hosting my bot in Azure app service, in which it could natively connect with Github by a few configuration in deployment center.

image


In addition, it’s important to keep you credentials secure. DON’T put into appsettings.json, you should use github actions secrets instead.

image

On your local, you should leverage environment variable for appsettings.json.

image

Now, you are ready to deploy your bot into Azure.


Connect Phase

MS Teams

Azure bot supports different channels, Web chat, Microsoft Teams, Alex, Email, Facebook, Slack etc. The good news is that Microsoft have already done the hard job for you, so that you don’t need to worry about the message formatting from different channels.  It will automatically convert into the conversational json required by your message endpoint. All you need to do in just register your channel.  In my case, I have registered for MS Teams.

image


After you registered the Teams channel in azure, you will need to create a Teams App package (manifest.zip) for the bot. It will need to be uploaded and installed in Teams.


Ngrok

Another tool i’m using here is Ngrok for debugging remotely.  Ngrok secure tunnels allow you to instantly open access to remote systems without touching any of your network settings or opening any ports on your router.  You can find more details here for configuring ngrok.


Evaluate Phase

Azure Monitor Log Analytics

Enabling Azure logs for analyzing bot behavior with Kusto queries like below samples. there are more samples you can find here.

Number of users per specific period

Sample chart of number of users per period.

image

Activity per period

image

Power BI

Lastly, you can use Power BI  to build a dashboard.


Summary

Microsoft bot framework is a comprehensive framework for building enterprise-grade conversational AI experiences.  It makes easy to integrate with Azure Cognitive Services for creating a bot with the ability to speak, listen, understand, and learn.  It allows you to create an AI experience that can extend your brand and keep you in control of your own data.    Most importantly, Microsoft have already provided a full list of tools to smooth the process of your building experience. 

yay! here is my bot, his name is Eric.  Compose a bot today so as to boost your customers’ experience.

image

0 Comments

Running performance audits on a public-facing website is essential, in the past the audits was conducted manually. Recently, I have been asked to propose a solution for generating the Google Lighthouse report automatically. 


What is lighthouse?

Lighthouse is an open-source tool that analyzes web apps and web pages, collecting modern performance metrics and insights on developer best practices. you can find the repo here.

It mentioned in its document that you can run the report automatically with Node CLI.  Great start!  Yet,  I can run it on my machine, but how I share the reports with other people i.e. business as well as integrating with powerBI for reporting purpose?


After googling around, I didn’t find anything useful. so I decided to come up with my own solution. 


Proposed solution

Boom! here is the proposed solution.

Building the report on azure build agent, and publishing the report into blob storage. Simple right?!  With this approach, there is no dedicated node server required. In addition, storing report in blob can be simply shared with stakeholders and integrated with PowerBI. 

Brilliant, the completed architectural diagram as shown below. it’s a small implementation, but it still follows Well-Architected framework. 


image


Operationally Excellence

To trigger generating the reports via Azure devOps allows me to setup a scheduled pipeline.  it provides insight about when pipeline is being triggered and sent notification if it fails.  with code as infrastructure mindset, all code are managed in Azure git and deployed via CI/CD pipeline.


Security

Integrating with Azure AD for authentication, and using RBAC for segregating duties within the team for performing the jobs i.e. update pipeline, setup scheduling.


Reliability

Microsoft guarantee at least 99.9% availability for Azure devOps service and using self-hosted agent as failover plan for high availability.


Performance Efficiency

A single blob supports up to 500 requests per second. Since there will not have massively requests for my project, so I’m not worry about the performance at all.  Yet, if you want to tuning the performance for your project, you can always use CDN (content delivery network) to distribute operations on the blob. or you can even use block storage account, which provides a higher request rate, or IOPS.


Cost Optimization

Comparing with VM solution, I believe this solution deliver at scale with the lowest price. Storage only costs AUD $0.31 per GB.


Hopefully you like this solution or share your thoughts if you have better options. All comments/suggests are welcomed.