0 Comments

Harnessing Data Insights with AI


In the fast-evolving landscape of artificial intelligence, GPT-4 Omni stands at the forefront, promising not just advanced language processing capabilities, but also the potential to revolutionize how businesses derive insights from their data. Imagine a scenario where your finance team or C-level managers can seamlessly interact with your organization's data using natural language, thanks to the integration of GPT-4 Omni into your systems.


The Power of GPT-4 Omni in Data Analysis
GPT-4 Omni, developed by OpenAI, represents a significant leap forward in AI technology. Unlike its predecessors, GPT-4 Omni is designed to handle a broader range of tasks, including complex data analysis and generation of insights. This capability makes it an ideal candidate for businesses looking to democratize data access and empower non-technical users to explore and understand data in real-time.

Addressing Ad-Hoc Requests with Azure OpenAI Chatbot
Imagine a typical scenario: your finance team needs immediate insights into recent sales trends, or a C-level manager requires a quick analysis of profitability drivers. With an Azure OpenAI chatbot powered by GPT-4 Omni, these ad-hoc requests can be addressed swiftly and effectively. The chatbot can interact with users in natural language, understanding nuanced queries and providing meaningful responses based on the data at hand.


Demo Application: Bringing Data Insights to Life
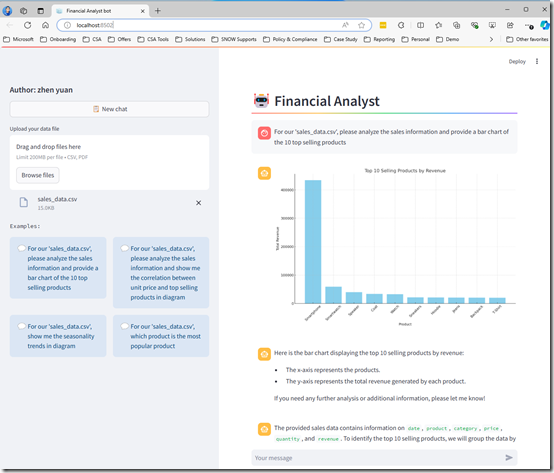
Recently, I developed a demo application to showcase the capabilities of GPT-4 Omni in the realm of data analytics. In this demo, I uploaded a CSV file containing a sample sales dataset, complete with sales dates, products, categories, and revenue figures. The goal was to demonstrate how GPT-4 Omni can transform raw data into actionable insights through simple conversational queries.

Screenshot 2024-06-26 160337


How It Works: From Data Upload to Insights

You can watch the video here

  • Data Upload and Integration: The CSV file was uploaded into the demo application, which then processed and integrated the data into a format accessible to GPT-4 Omni.
  • Conversational Queries: Users interacted with the chatbot by asking questions such as:
    • "What are the top-selling products in the sales data?"
    • "Is there any correlation between unit price and quantity sold?"
    • "Are there any seasonal trends in the sales data?"


Natural Language Processing: GPT-4 Omni processed these queries, utilizing its advanced natural language understanding capabilities to interpret the intent behind each question.

Insight Generation: Based on the data provided, GPT-4 Omni generated insightful responses, presenting trends, correlations, and summaries in a clear and understandable manner.

The Role of Assistants API
The Assistants API plays a pivotal role in enhancing functionality and integration capabilities. It empowers developers to create AI assistants within their applications, enabling these assistants to intelligently respond to user queries using a variety of models, tools, and files. Currently, the Assistants API supports three key functionalities: Code Interpretation, File Search, and Function Calling. For more detailed information, refer to Quickstart - Getting started with Azure OpenAI Assistants (Preview) - Azure OpenAI | Microsoft Learn


Conclusion
As AI continues to advance, tools like GPT-4 Omni and the Assistants API are reshaping the business landscape, particularly in the realm of data analytics. The ability to leverage AI-driven insights from your own data, through intuitive and conversational interfaces, represents a significant competitive advantage. Whether it's optimizing operations, identifying new market opportunities, or improving financial forecasting, GPT-4 Omni and the Assistants API open doors to a more data-driven and agile business environment.

In conclusion, integrating GPT-4 Omni and leveraging the Assistants API into your data strategy not only enhances operational efficiency but also fosters a culture of data-driven decision-making across your organization. Embrace the future of AI-powered data insights and unlock new possibilities for growth and innovation.
0 Comments

Running performance audits on a public-facing website is essential, in the past the audits was conducted manually. Recently, I have been asked to propose a solution for generating the Google Lighthouse report automatically. 


What is lighthouse?

Lighthouse is an open-source tool that analyzes web apps and web pages, collecting modern performance metrics and insights on developer best practices. you can find the repo here.

It mentioned in its document that you can run the report automatically with Node CLI.  Great start!  Yet,  I can run it on my machine, but how I share the reports with other people i.e. business as well as integrating with powerBI for reporting purpose?


After googling around, I didn’t find anything useful. so I decided to come up with my own solution. 


Proposed solution

Boom! here is the proposed solution.

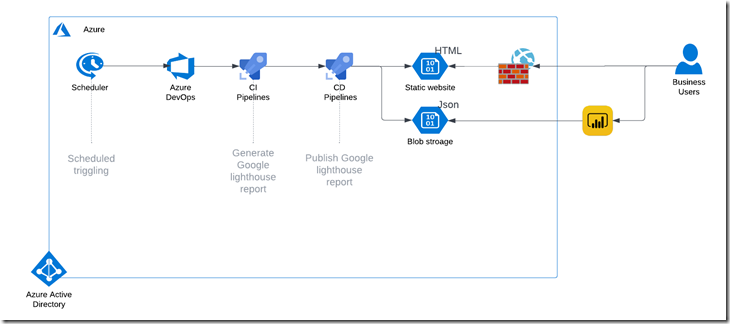
Building the report on azure build agent, and publishing the report into blob storage. Simple right?!  With this approach, there is no dedicated node server required. In addition, storing report in blob can be simply shared with stakeholders and integrated with PowerBI. 

Brilliant, the completed architectural diagram as shown below. it’s a small implementation, but it still follows Well-Architected framework. 


image


Operationally Excellence

To trigger generating the reports via Azure devOps allows me to setup a scheduled pipeline.  it provides insight about when pipeline is being triggered and sent notification if it fails.  with code as infrastructure mindset, all code are managed in Azure git and deployed via CI/CD pipeline.


Security

Integrating with Azure AD for authentication, and using RBAC for segregating duties within the team for performing the jobs i.e. update pipeline, setup scheduling.


Reliability

Microsoft guarantee at least 99.9% availability for Azure devOps service and using self-hosted agent as failover plan for high availability.


Performance Efficiency

A single blob supports up to 500 requests per second. Since there will not have massively requests for my project, so I’m not worry about the performance at all.  Yet, if you want to tuning the performance for your project, you can always use CDN (content delivery network) to distribute operations on the blob. or you can even use block storage account, which provides a higher request rate, or IOPS.


Cost Optimization

Comparing with VM solution, I believe this solution deliver at scale with the lowest price. Storage only costs AUD $0.31 per GB.


Hopefully you like this solution or share your thoughts if you have better options. All comments/suggests are welcomed.

0 Comments

The challenge in the past is that every time you are developing a new webapp or bot which requires authentication you will go through all the steps i.e. creating service principle, grant permissions, set credentials, store credentials on resources, rotate credentials, and etc..   Now there is a better solution: Managed identities for Azure resources.


One of the examples where you can adopt the managed identities when you want to build an application using web application that accesses Azure blob storage without having to manage any credentials.


How to create

Managed identities is using service principle under the hook. Once you created the user assigned identity in Azure portal the same way as you creating other Azure resources,  you can now going to the target resources i..e blob storage and assign the permission i.e. contributor role to the user assigned identity you just created.   Now, last step is to go to the Azure resource where you want to access the target blob storage, i.e. azure function, and in Identity blade, you can add the user assigned identity that you just have created.


Below is the example demonstrates authenticating the BlobClient from the Azure.Storage.Blobs client library using the DefaultAzureCredential with a user assigned managed identity configured.

DefaultAzureCredential discovery mechanism allows you to run the code with your signed in account when you are using the code locally and automatically switching to use the user assigned identity when the code is deployed in azure. Please be noted that your local account will require to have the same permission as the user assigned identity in Azure.

Managed identities for Azure resources provide Azure services with an automatically managed identity in Azure Active Directory. Using a managed identity, you can authenticate to any service that supports Azure AD authentication without managing credentials. You can find the list of available services here.

0 Comments

If you are learning AZ-303, and changes are you will encounter the same error when following the Exercise – Create an NVA and virtual machines (unit 5-7) by the time i’m writing this document (11/07/2021).


I have reported this issue with the Exercise, but it might not be fixed anytime soon.  so just in case you need help with completing your Exercise. I tried to document the issue in Exercise, and the solution how you can resolve them.

 image

What’s the issue

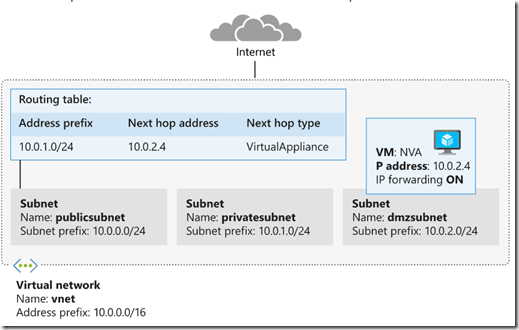
The requirement is to create vnent with 3 subnets

  • 10.0.0.0/24
  • 10.0.1.0/24
  • 10.0.2.0/24

image


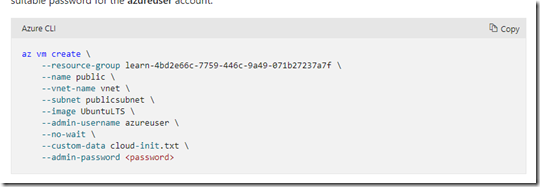
in Unit 5 of 7 , it provides the code as below for creating the 1st VM in subnet dmzsubnet.  The problem with the below command is it doesn’t specify the subnet address prefix, therefor by default, it will be 10.0.0.24.  You won’t yet get any error at this stage, as it’s the first subnet. Although it’s already not matching the design.

image

You will then get an error when you are following the Exercise along the way in Unit 6 of 7 with below code.  you can’t create subnet with conflict address.

image

What’s the Solution

Adding  “--subnet-address-prefix” when you create VMs. There are more optional parameters for creating VM you can find here.

here is the example code you can use

az vm create \
     --resource-group learn-4bd2e66c-7759-446c-9a49-071b27237a7f \
     --name public \
     --vnet-name vnet \
     --subnet publicsubnet \
     --image UbuntuLTS \
     --admin-username azureuser \
     --no-wait \
     --custom-data cloud-init.txt \
     --subnet-address-prefix 10.0.2.0/24 \
     --admin-password <changeme123>