0 Comments

Sitecore_MVP_logo

Yesterday, Sitecore announced their MVP Awards for 2018 awards, and I think you would be happy to know, that I have been awarded as Sitecore MVP this year.

I want to express my sincere appreciation and thanks to Sitecore for awarding me Technology Most Valuable Professional. It means a lot to me! Thanks to Azadeh Khojandi, James Hirka, Mike Bray, Nick JonesRichard Hauer, Michael Reynolds, Steve Nelson who always supports and encourages me. This list is by no means a complete, and without you this wouldn’t happen.

Also, I would like to thank all of Sitecore MVPs who nominated me and Sitecore judges who chose me from the list of nominees and I am truly humbled and honoured to receive it. 

A big thanks to the Sitecore community, thanks for reading the posts, commenting on it, following the blogs, listening the presentation, giving feedback and in the end, encouraging me to do more for the community. So, thank you!

Its a huge honour and privilege to get this award and I'm looking forward to an exciting year with Sitecore! And I promise I would do more and try to help the community as much as possible. 

Finally, I would like to congratulate to all of you who has been named as MVP in 2018.

40094815-congratulations-wallpapers

0 Comments

Best-WordPress-Search-Plugins-shutterstock_204851350

Sitecore SXA search features are really flexible and everything is content manageable.  While SXA search will often meet the client search requirements, there are some limitations with the out-of-box implementation i.e. the rendering template is hard-coded in the JavaScript, which can present difficulties to when the front-end developers want to work with these. 

Therefore, we want to extend the search results rendering so as to provide front-end flexibility, allowing for changing the mark-up, and also make sure the results mark-up is scalable and re-usable.

If you are already familiar with the SXA search result rendering, please feel free to skip the next paragraph.


How does SXA search result rendering work?

Search results rendering is one of the SXA search components, it’s utilizing the global scope for sharing the settings between each of the search components i.e. search box, search filter, load more button etc.. After the initial load of a page, the search results rendering will make an Ajax call to the search service API by passing the search scope and query.  Once it gets the results from server,  it will then render them on the page with the pre-defined template.  This is how the out-of-box search results rendering work. The approach is good, as it modularizes the feature into small individual features i.e. pagination, search box, filter etc., which has great maintainability and reusability.


Custom search results rendering

The custom search results rendering described below is built on top of the out-of-box search results rendering,but adds some enhancements.

We are going to:

  • Move the template into cshtml view (New)
  • Allowing randomly order (New)
  • Server side return results (New)
  • Enable experience editor for the result items (New)
  • Use variants for search results
  • Make use of the global scope


We are going to do this, using the following steps:

Step One –Create SXA rendering controller

As when creating other custom SXA controller, you will need to create a custom search results controller.  If you are unsure how to a custom custom rendering, please refer to my previous post here.

Step Two–Create custom search results repository

In order to use the variant for rendering the search results, the custom repository needs to inherit from VariantsRepository, which is the Sitecore.XA.Foundation.RenderingVariants.Repositorie namespace.

Also, we will need to inject IScopeService for utilizing the global scope in the custom repository constructor as shown below.

public CustomRepository(IVariantsRepository variantsRepository, IScopeService scopeService)
    {
        this.VariantsRepository = variantsRepository;
        this.ScopeService = scopeService;
    }

Next we need to create a custom method for retrieving the results.

public IEnumerable<ContentPage> GetItems()
        {
            var searchService = ServiceLocator.Current.Resolve<ISearchService>();

            string indexName;

            var query = searchService.GetQuery("", this.JsonDataPropertiesObject.S, this.JsonDataPropertiesObject.L, null, out indexName);

            …
        }

Step Three–Create custom search results View

<div @Html.Sxa().Component("custom-search-results", Model.Attributes)>
    <div class="component-content">
        @if (!Model.ChildrenItems.Any())
        {
            return;
        }

        <ul class="search-result-list">
            @foreach (var contentPage in Model.ChildrenItems)
            {
                <li>
                    @foreach (var variantField in Model.VariantFields)
                    {
                        @Html.RenderingVariants().RenderVariant(variantField, contentPage.GetItem(), Model.RenderingWebEditingParams)
                    }
                </li>
            }
        </ul>
        <div class="search-result-overlay"></div>
    </div>
</div>

This is what it looked like in Experience Editor, content editor can see the search results.

image

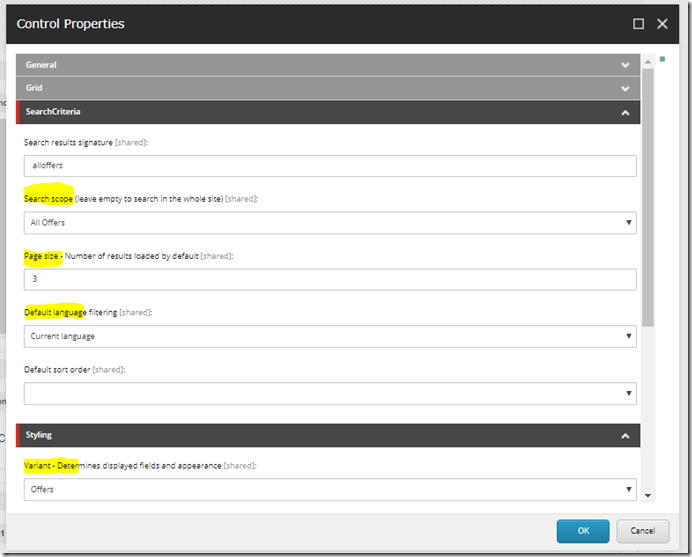
And all the settings are CMS-configurable
image

Hope you enjoyed the post and found it’s useful.

0 Comments

image

Sitecore 9 has been just released recently and one of the biggest changes is that Lucence is no longer the default search index provider.  Sitecore 9 still supports Solr, Lucene, and Azure search as providers. However,  if you want to use a search index that work in both Analytics and contentSearch, Solr is the best option.

The article below is about to provide a step-by-step guideline, so that you can quickly spin up Sitecore 9 instance locally.

The prerequisites for Sitecore 9 includes SQL 2016, IIS 8.5+ and Solr etc. By default, Sitecore XP is secure, therefore it requires SSL enabled for Solr.

Let’s start with installing Solr with SSL enabled

image


Step one – Download and Install Solr

You can download from here. The Solr version is 6.6.2 (as there is a bug in Sitecore 6.6.1 as mentioned here).

Step two – generate trusted self signed certificate

Thanks to Kam Figy, who create an easy to use powershell script for automating the complete setup process of adding SSL to Solr with a self-signed certificate, and trusting that self-signed certificate. You can get the script here. Save the solrssl.ps1 onto your local. You can also find the official instruction for enabling SSL on Solr here.

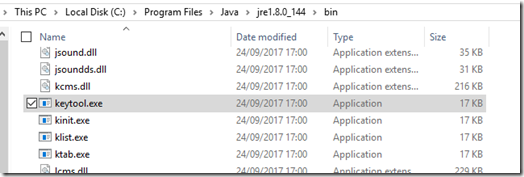
In order to generate a self-signed certificate and a kay, keytool needs to be installed. If you have Java runtime environment installed, you can find the keytool under the bin folder of java installation folder.

image

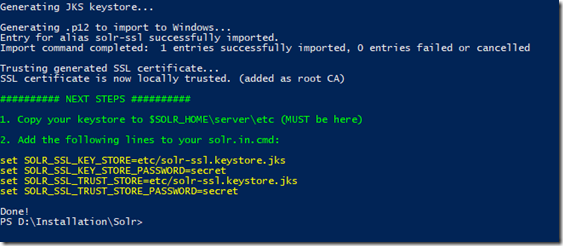
Before you run the script, it’s assumed that you  have the keytool utility on your PATH system environment variable. You should be see the successful message, once the certificate has been generated and added into CA.

 image

Don’t forget to uncomment in bin/solr.in.cmd file, before restarting solr server.

SOLR_SSL_KEY_STORE=etc/solr-ssl.keystore.jks
SOLR_SSL_KEY_STORE_PASSWORD=secret
SOLR_SSL_TRUST_STORE=etc/solr-ssl.keystore.jks
SOLR_SSL_TRUST_STORE_PASSWORD=secret

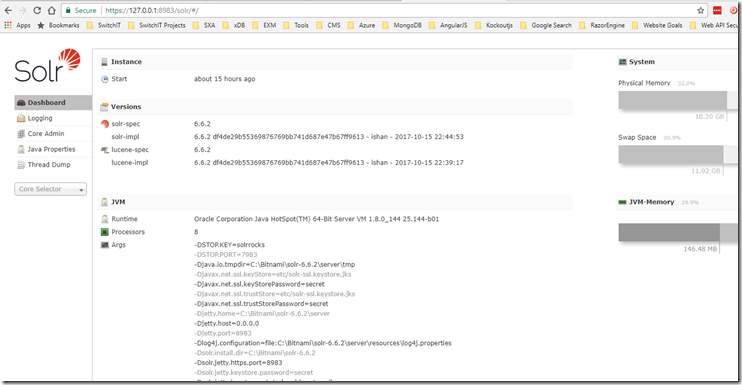
After you restarted the Solr, you should be able to run Solr on HTTPs protocol as shown in the screenshot below.

image

Okay, let’s kick off installing Sitecore

Step one – download Sitecore 9 package

You can download the package here. The package used for this article is the XP single package - (Packages for XP single (XP) instance configuration. Sitecore 9.0.0 rev. 171002 (WDP XP0 packages).zip).


Unzip the package, there are three packages included in the zip. 

image


Unzip the “XP0 Configuration files rev.171002.zip”, in which it contains the environment configuration files (XPo topologies).

  • sitecore-solr.json
  • xconnect-solr.json
  • xconnect-createcert.json (for developer environments)
  • sitecore-XP0.json
  • xconnect-xp0.json

Step Two – Install Sitecore Install Framework

Sitecore provides the Sitecore installation framework module, a Microsoft PowerShell module that supports local and remote installations of Sitecore, and it’s fully extensible.

Once you installed the Sitecore Fundamentals and SitecoreInstallFramework module. You can then use the PowerShell script below for installing Sitecore (Thanks to the community who created the script, it's really handy).

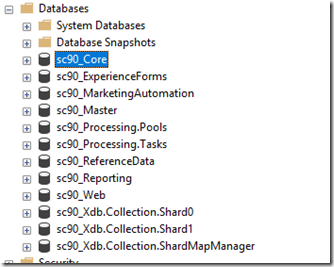
After the script successfully run, you should be able to see:

  • Databases

image

  • Two sites

image

Congras! Your Sitecore 9 has been successfully installed.

image

0 Comments

Recently, I’m having an issue with SXA as summarized below.  It took me quite a while for investigating and thanks to Sitecore support, it has been resolved. Therefore, I think it’s better to share it, as others may have the same issue.

Apparently it’s a bug and to track the future status of the bug report, you can use the reference number 95437

Here is the issue:

If the link field is used to wrap other fields as an example below, after user insert an link the image will disappear.

@Html.Sitecore().BeginField("Link")
  @Html.Sitecore().Field("Header Image")
@Html.Sitecore().EndField()


In order to get ride of the issue, you can render links with child images like:

@Html.Sitecore().BeginField("Link",new {haschildren=true})
  @Html.Sitecore().Field("Header Image")
@Html.Sitecore().EndField()

0 Comments

A few days ago, a colleague asked me about why he couldn’t access the page with preview mode, and I realized that when he was previewing the page, by default Sitecore is using the anonymous user account.  It also described here .   Apparently the bug has been resolved in Sitecore 7.2+  and to resolve this issue the new settings “Preview.AsAnonymous” has been introduced, the default value is true:

<setting name="Preview.AsAnonymous" value="true" />

So, if the value is true, Sitecore uses the Anonymous user when one previews an item, otherwise, Sitecore uses the current user account.