0 Comments

Sitecore provides many recommendation and tips about optimization of CD/CM.  For sure, you can find some of them online by googling them.  However, they are separated and it’s time consumed to search and read all the documentation.  So, I think it would be handy, if I can summarize them into one big checklist.

Security

  Protect Admins Pages

  1. Cache (/Sitecore/admin/cache.aspx)
  2. Database Browser (/stecore/admin/dbbrowser.aspx)
  3. Serialization (/stecore/admin/serialization.aspx)
  4. Show Config (/sitecore/admin/showconfig.aspx)
  5. Size Status (/sitecore/admin/sizestatus.aspx)
  6. Stats (/sitecore/admin/stats.aspx)
  7. Unlock Admin (/sitecore/admin/unlock_admin.aspx)
  8. Installation wizard (/sitecore/admin/UpdateInstallationWizard.aspx)

  Turn on custom Errors

Update production web.config

<customErrors mode="RemoteOnly" />
  Reset admin password.
    It would be embarrassing to go live with password "b" =)
  Ensure replace develop license file before going live

Performance

  Configure Keep-Alive

<agent type="Sitecore.Tasks.UrlAgent" method="Run" interval="00:15:00">
        <param desc="url">/sitecore/service/keepalive.aspx</param>
        <LogActivity>true</LogActivity>
</agent>

  Disable WebDAV

Sitecore recommends disabling WebDAV on the production content delivery servers to reduce the number of log files being created. Also, Sitecore recommends disabling WebDAV on the content management servers if the WebDAV functionality is not being used.

  1. Disable logging

    <!--<appender name="WebDAVLogFileAppender" type="log4net.Appender.SitecoreLogFileAppender,
    Sitecore.Logging">
     <file value="$(dataFolder)/logs/WebDAV.log.{date}.txt" />
     <appendToFile value="true" />
     <layout type="log4net.Layout.PatternLayout">
     <conversionPattern value="%4t %d{ABSOLUTE} %-5p %m%n" />
     </layout>
     </appender>--> 
      
    <!--<logger name="Sitecore.Diagnostics.WebDAV" additivity="false">
        <level value="INFO"/>
        <appender-ref ref="WebDAVLogFileAppender"/>
      </logger>-->
  2. Disable webserver

    <!--<remove name="WebDAVModule" />-->
     <!--
    <add name="WebDAVRoot" path="*" verb="OPTIONS,PROPFIND" modules="IsapiModule"
    scriptProcessor="%windir%\Microsoft.NET\Framework\v2.0.50727\aspnet_isapi.dll"
    resourceType="Unspecified" preCondition="classicMode,runtimeVersionv2.0,bitness32" />
     <add name="WebDAVRoot64" path="*" verb="OPTIONS,PROPFIND" modules="IsapiModule"
    scriptProcessor="%windir%\Microsoft.NET\Framework64\v2.0.50727\aspnet_isapi.dll"
    resourceType="Unspecified" preCondition="classicMode,runtimeVersionv2.0,bitness64" />
     <add verb="*" path="sitecore_webDAV.ashx"
    type="Sitecore.Resources.Media.WebDAVMediaRequestHandler, Sitecore.Kernel"
    name="Sitecore.WebDAVMediaRequestHandler" />
    -->
  3. Disable httphandler

     <!--
     <add verb="*" path="sitecore_webDAV.ashx"
    type="Sitecore.Resources.Media.WebDAVMediaRequestHandler, Sitecore.Kernel" />
     -->

  Disable Performance Counters

Performance counters create a minor overhead and is recommended to be enabled only when running in troubleshooting mode

 <setting name="Counters.Enabled" value="false" />

  Disable Memory Monitor

Sitecore recommends disabling the Memory Monitor in production environments, and only enabling it for troubleshooting memory related issues.

 <setting name="Counters.Enabled" value="false" />
<!--<hook type="Sitecore.Diagnostics.MemoryMonitorHook, Sitecore.Kernel">
 <param desc="Threshold">800MB</param>
 <param desc="Check interval">00:00:05</param>
 <param desc="Minimum time between log entries">00:01:00</param>
 <ClearCaches>false</ClearCaches>
 <GarbageCollect>false</GarbageCollect>
 <AdjustLoadFactor>false</AdjustLoadFactor>
 </hook>-->

  Ensure sufficient cache size

SEO

  Title Tag

The <strong>title</strong> tag is required in all HTML documents and it defines the title of the document. This tag displays the page title in browsers toolbar and in the search-engine results (SERPs). It also provides a title for the page when it is added to favorites. A descriptive <strong>title</strong> tag is important in helping search engines determine the web page's relevancy for certain keywords.

  Meta Description

The meta description tag is meant to be a short and accurate summary of your page content. This description can affect your search engine rankings and can also show up directly in search engine results (and affect whether or not the user clicks through to your site).


  <h1> Headings Status

This indicates if any H1 headings are used in your page. H1 headings are HTML tags than can help emphasize important topics and keywords within a page.

  <h2> Headings Status

This indicates if any H1 headings are used in your page. H1 headings are HTML tags than can help emphasize important topics and keywords within a page.


  Check Robots.txt

Check if your website is using a robots.txt file. Search engines send out tiny programs called spiders or robots to search your site and bring information back so that your pages can be indexed in the search results and found by web users. If there are files and directories you do not want indexed by search engines, you can use the "robots.txt" file to define where the robots should not go.

These files are very simple text files that are placed on the root folder of your website: www.yourwebsite.com/robots.txt.

There are two important considerations when using "robots.txt":

- the "robots.txt" file is a publicly available file, so anyone can see what sections of your server you don't want robots to use;

- robots can ignore your "robots.txt", especially malware robots that scan the web for security vulnerabilities;


  Check Sitemap

a sitemap is an XML file that lists URLs for a site along with additional metadata about each URL (when it was last updated, how often it usually changes, and how important it is, relative to other URLs <g class="gr_ gr_9 gr-alert gr_gramm undefined Grammar multiReplace" id="9" data-gr-id="9">in</g> the site) so that search engines can more intelligently crawl the site.

  Image Alt Test

Check images on your webpage for required alt attributes. If an image cannot be displayed (wrong source, slow connection, etc), the alt attribute provides alternative information. Using keywords and human-readable captions in the alt attributes is a good SEO practice because search engines cannot really see the images. For images with a decorative role (bullets, round corners, etc) you are advised to use an empty alt or a CSS background image.


0 Comments

Sitecore Azure Module provides an integrated user interface to manage the cloud delivery infrastructure and simplify the deployment of your website to the Microsoft Azure cloud.  It would be a good start to read “Getting started with Sitecore Azure”, before you install.  It gives you an overview about what is the Sitecore Azure and why you will need Sitecore Azure, and examples about how both the content editing and content delivery environments run in the Microsoft Azure cloud etc. There are quite many guidance on getting started with using Sitecore Azure Module, but not so much how it actually working.  This article will start with the introduction of Sitecore Azure, then will talk about how it actually work in the 2nd part.  If you already know what Sitecore Azure module is and how get it installed, you can probably jump into 2nd part.


Why Sitecore Azure

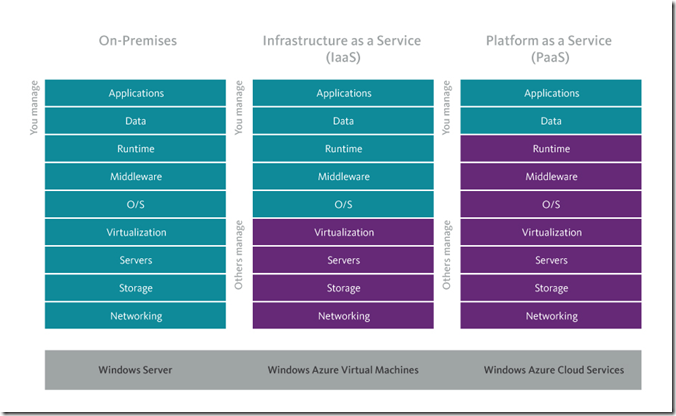
The traditional software development deploy web application on On-Premises, which requests companies to purchase all elements of infrastructure and operating system as well as teams to maintain and deploy. with the introduce of cloud and its natural advantages – less maintenance cost and running cost, it becomes more and more adoptable and acceptable. Here is the comparison between different type of services

image

Because of this, Sitecore introduced Sitecore Azure module which allows you to deploy and manage Sitecore powered websites on Microsoft Azure utilizing PaaS deployment in a matter of minutes. With out-of-the-box functionality, deployment of web servers and SQL databases to the cloud are automated based on set optimization structures simplifying any deployment headaches.


How to install Sitecore Azure Module

Following the following steps to install Sitecore Azure and Deploy to Azure:

Step One

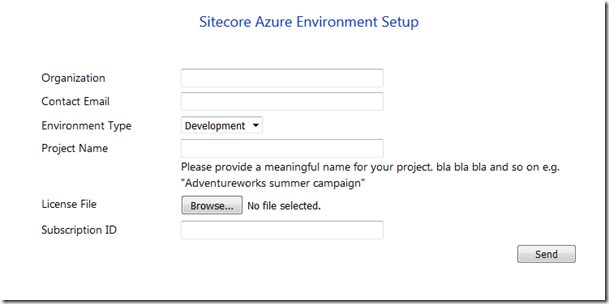
Apply Environment.xml file from http://scazureenvironments.trafficmanager.net/. It’s only taking 10 mins (initially it did take 1-2 business days to receive the Environment.xml, but nowadays they do it faster)


image


Step Two

There are two options for establishing to Azure Option A is a very fast and simple method offered by Microsoft. you can generate publishsettings from this link and then follow the instructions on the Microsoft site to get the file, then upload the file for Sitecore. Alternatively, for advanced users, you many choose Option B in which you either use an existing certificate or generate a self-certificate. Upload the .pfx for Sitecore. Once you have selected either a .publishsettings or .pfx file , you will have to provide a password for uploading to Sitecore.


Step Three

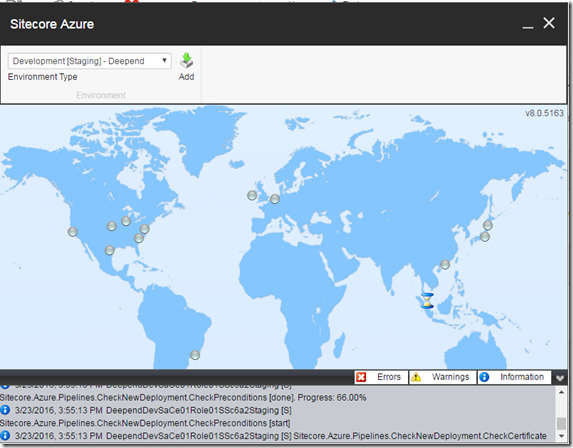
When deploying to azure, it allows you to monitor the real-time progress.

image

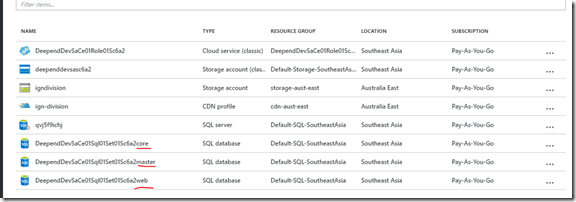
All you need to do now is to take a cup of tea and waiting for Sitecore to create all the webapp, database on Azure.

image


Troubleshoot

You might got 500 error after you first deploy to Azure, this is caused by oversize web.config.  For solving the error, you can update the web.cofing under AzurePackages folder by replacing Sitecore section with <sitecore configSource="App_config\Sitecore.config" />


References

https://doc.sitecore.net/cloud/azure/getting_started_with_sitecore_azure

0 Comments

Just a week ago, I attended Sitecore training.  Thanks to Deepend, my employer, for sending me to such an amazing course. Before the training, I have been working on Sitecore for nearly 5 years.  Always questioning, whether it’s still worth to attend. The answer is for sure with following reasons:

  • Sitecore certificate is prerequisite for many advanced courses, and for some of Sitecore partners, they provide free training to certified Sitecore developers.
  • To gain the best practices from Sitecore experts.
  • Certified developer can have access to Sitecore support portal.

The training took 4 days, and at the 4th day there was a certification exam. In total, there are 40 questions. To pass the exam, a minimum score of 70% is required.  I’m really happy that I passed the exam with a score of 95%. =P

David Newwman was our trainer. He talked through all the core functions and covered a lot of areas in both business and technical areas.   The training was absolutely legend, and it is a great step forward in the future career. I highly recommend to whom are interested in becoming Sitecore developer to take the course. 

Some improvement in Sitecore 8:

  • Versioned Layout

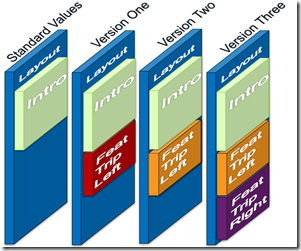
In the previous version, Sitecore doesn’t support version layout.  layout will be shared crossing different versions.  Now Sitecore added a new field called “Final Rendering Field” which allows presentation can be bersioned like content fro each item version (either numbered or language).

image

  • Federated experience manager

FXM is an application that allows you to track visitor interactions and generate analytics information on external, non-Sitecore websites with Sitecore

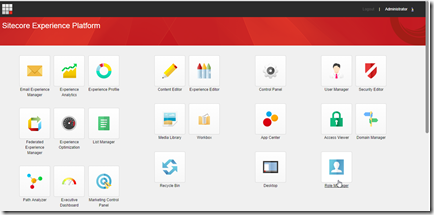
  • New UX & UI with a customizable dashboard

image

Also, here are some useful links for learning Sitecore:

https://doc.sitecore.net/

https://kb.sitecore.net/

https://dev.sitecore.net/

https://community.sitecore.net/

0 Comments

Some personal thoughts about CMS =P (Please don't get me wrong)


There is always some arguments around what's best CMS system, Umbraco or Sitecore? It's bit unfaired to pick the best just based on comparing the upfront prince by ignoring the facts that Sitecore has more advanced features =P.

It is not denying that both of CMS are pretty good and they are existing to fit different needs. Sitecore is more suitable for Enterprise organization, whereas Umbraco is mainly for small business. As Sitecore provides more advanced features.


Presonlization (Dynamic content)

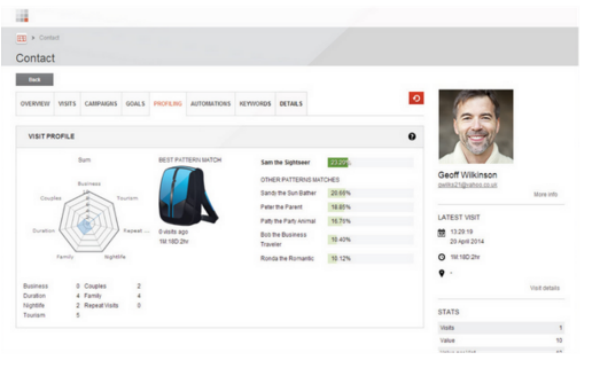
Sitecore comes with DMS (digital marketing system) which has various personlisation options built in. the rules-base segmentation is excellent, the dynamic persona generation is awesome, although Umbraco can achieve basic personlisation with 3rd party tool Spindoctor.


ECM (Email Campaign management)

ECM(email campaign management) has been fully implement in Sitecore as well. It allows user to share the content on the website in ECM which means less work for the Campaign manager. it also has the ability to perform A/B/N testing for message body. The most advanced feature for ECM is that it provide reporting dashbord which enable marketers to create and manage optimal email marketing campaigns.


Predictive Analytics by Machine learning (Forecasting)

This bringing together of the power of machine thinking combined with human context, to better understand customer behaviour and predict future trends. Using the Microsoft AzureML platform (a cloud-based service for predictive analytics), advanced business users can begin to mine the masses of data they have stored about their customers in the Sitecore Experience Database (xDB) and experiment with hypothesis against those big data sets using the power of cloud computing.


Now imagine that in the commercial world where you have millions of customer interactions that you simply can’t track or do anything with. This could be an answer; simply create the models, let the cloud do its thing and then monitor, action and test any predictions or trends that it suggests.


Workflow & version

Sitecore workflow enable the capability for use to approve the content before it goes to production. Empowered by versioning feature. content editor can create a new version of the content and publish the new version to production later on. By doing this, content editor can easily compare with the previous version and easily roll back with previous version.


Scalable

Sitecore has content database and website database separated which make it by nature easily to scale up. whereas umbraco has only one database, when handling large amount of data, it becomes a question in terms of the stability and performance

Please don't get me wrong, not saying Umbraco is not good. I like umbraco as well, as it's easy to implement. No doubt they are both great CMS and has their own values to the client. =)
0 Comments
This Date format issue I am going to talk about is in WebForm for marketers module 2.4. for Sitecore. Recently, a client reports the date format of datepicker is incorrect.

By looking into that, I found there literally has three different issues/things we need to understand, before we can make the datepicker formatting work.

First issue
Parameters for datepicker called "DateFormat" is always overwritten when it gets initial. For example, the parameter the client configured in the form is <DateFormat>dd-MM-yyyy</DateFormat>. and then it gets overwritten as "yy-mm-dd".

Second issue
It's related to the parameters, take the above example that <DateFormat>dd-MM-yyyy</DateFormat>. Initially I thought dd-MM-yyyyis the format. However, it is not. It is the Item Name of a Date Format item in sitecore. the the format that datepicker applied is the value of that Date Format Item.

Third issue
Due to the fact that the datepicker is using JQuey datepicker, the date format is different from the standard date and time format defined by Microsoft. the Jquery datepicker format is as below

$.datepicker.formatDate( format, date, options )

Format a date into a string value with a specified format.

The format can be combinations of the following:

  • d - day of month (no leading zero)
  • dd - day of month (two digit)
  • o - day of the year (no leading zeros)
  • oo - day of the year (three digit)
  • D - day name short
  • DD - day name long
  • m - month of year (no leading zero)
  • mm - month of year (two digit)
  • M - month name short
  • MM - month name long
  • y - year (two digit)
  • yy - year (four digit)
  • @ - Unix timestamp (ms since 01/01/1970)
  • ! - Windows ticks (100ns since 01/01/0001)
  • '...' - literal text
  • '' - single quote
  • anything else - literal text

Conclusion
So, to walk around the issue that the client is having. I just update the value of the Date Format Item (as explained above, it will be always "yy-mm-dd" item) with the Jquery date format. i.e. d-mm-yy


References
1. https://api.jqueryui.com/datepicker/