0 Comments

Image result for WFFM Sitecore

Have you ever seen “sitecore://web/{358B0E87-893A-45A8-A707-D19A32962DFF}?lang=en&ver=1” this value? If you are using WFFM with attachment field, you are most likely going to see this value in the Excel file downloaded from the form.  This is because WFFM doesn’t manipulate data during exporting data into Excel, which means data formatting will be the same as it’s stored in the database.  


Understand how it works

For solving the issue, let’s get understood how it works.  First of all, what’s the Guid in the URL?  It’s a media library item ID.  If you search the ID in Sitecore, you can find that item in media library.  The attachment will be created in Media Library Once the form is submitted.   By default,  it’s stored in Master database, however you are allowed to change to Web database with below settings.  In my case,  I don’t want to change this to store in web database, as the attachment is not mean to be accessible from public.    

<setting name="WFM.MasterDatabase" value="web" />

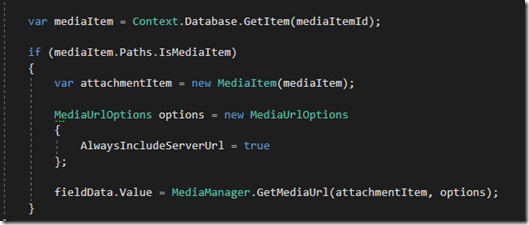
The attachment is just a media library item, which you use MediaManager.GetMediaUrl for getting the URL (As shown in screenshot below)

image


Solutions

Now, you should understand how it works, and let’s fix the export value together.  First of all, we need to find out which pipeline is for exporting the data into Excel. Luckily, It’s not so hard to find. It’s registered in the exportToExcel pipeline:

image

Next is to customize the ExportFormDataToExcel function, here is the code snippets

Finally, if you export data into Excel again, the wired URL is fixed with a valid media item URL!. 

0 Comments

In my previous post – Leverage Sitecore xDB fro newsletter subscription I wrote last year, I talked about how to use EXM segment list to create newsletter subscription function.  If you haven’t read yet,  I recommend to read it first before starting to read this article.  In this article, I’m going to explain how to update user subscriptions by creating a form with WFFM and sending an EXM confirmation email with WFFM.


Recap the requirement

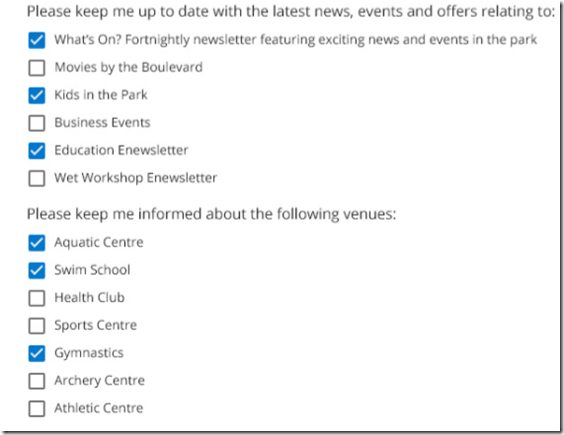
I’m going to start with a recap of the requirement.  Basically, client wants to manage their newsletter  subscriptions within Sitecore, and allows users to update their newsletter subscriptions on the website.

image


What has been architected

I created a form with WFFM for updating user newsletter subscriptions, and content editor is allowed to update the opt ins  i.e. Kids in the park (shown in screenshot above) as well as to map the opt ins with the custom newsletter subscription facets so as to automatically segmented user into corresponding email group. How to segment users  in EXM is not part of the scope of this post, but you can always refer back to my previous post.


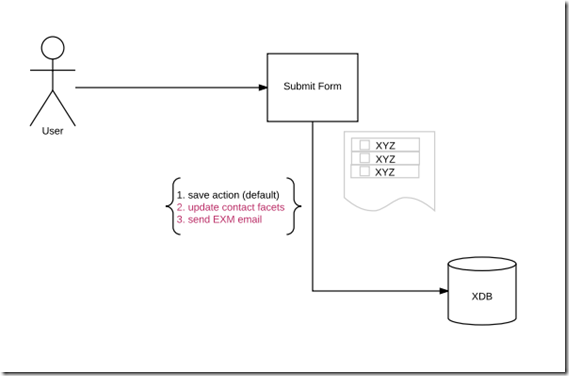
Also, I created a custom action for sending the confirmation email which is defined within EXM, as well as a custom save action for updating contact subscriptions facets.

Here is the overview workflow diagram

image


Three Main Challenges

  • Initial form value based on contact subscription profiles on form loading.
  • Allow content editor to map option in with subscription facets in xDB.
  • Send confirmation email that defined in EXM.

image

Solutions for achieving each of the above listed challenges

  • Initial form value based on contact subscription profiles on form loading.

By default, WFFM allows you to initial the field value by passing value in query string. But we think it’s not best solution for rendering value with query string as :

  1. Potential safety issue
  2. Limitations in the length of query string
  3. Limitations in the filed type of WFFM

Therefore, we come up with the solution by creating custom field rules. How to create custom rule is not in scope, but you can find information on Sitecore documentation portal and it was also explained by Jeff Darchuk in here.

image
  • Allow content editor to map option in with subscription facets in xDB.

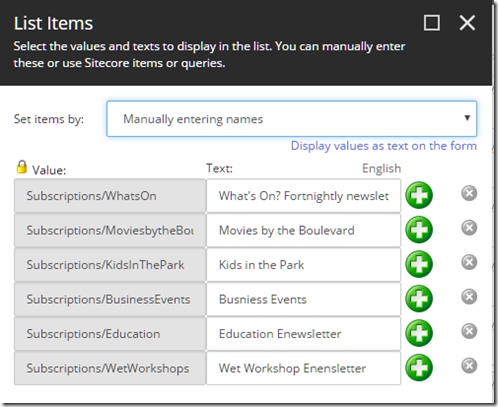
For mapping the optins, we create custom checklist field and utilizing the values as text feature for mapping the contact facets with each of the options in the checkbox list.

image

  • Send confirmation email that defined in EXM

A custom action has been created and here is the sample code for sending the EXM messages programmatically.

image

0 Comments
This Date format issue I am going to talk about is in WebForm for marketers module 2.4. for Sitecore. Recently, a client reports the date format of datepicker is incorrect.

By looking into that, I found there literally has three different issues/things we need to understand, before we can make the datepicker formatting work.

First issue
Parameters for datepicker called "DateFormat" is always overwritten when it gets initial. For example, the parameter the client configured in the form is <DateFormat>dd-MM-yyyy</DateFormat>. and then it gets overwritten as "yy-mm-dd".

Second issue
It's related to the parameters, take the above example that <DateFormat>dd-MM-yyyy</DateFormat>. Initially I thought dd-MM-yyyyis the format. However, it is not. It is the Item Name of a Date Format item in sitecore. the the format that datepicker applied is the value of that Date Format Item.

Third issue
Due to the fact that the datepicker is using JQuey datepicker, the date format is different from the standard date and time format defined by Microsoft. the Jquery datepicker format is as below

$.datepicker.formatDate( format, date, options )

Format a date into a string value with a specified format.

The format can be combinations of the following:

  • d - day of month (no leading zero)
  • dd - day of month (two digit)
  • o - day of the year (no leading zeros)
  • oo - day of the year (three digit)
  • D - day name short
  • DD - day name long
  • m - month of year (no leading zero)
  • mm - month of year (two digit)
  • M - month name short
  • MM - month name long
  • y - year (two digit)
  • yy - year (four digit)
  • @ - Unix timestamp (ms since 01/01/1970)
  • ! - Windows ticks (100ns since 01/01/0001)
  • '...' - literal text
  • '' - single quote
  • anything else - literal text

Conclusion
So, to walk around the issue that the client is having. I just update the value of the Date Format Item (as explained above, it will be always "yy-mm-dd" item) with the Jquery date format. i.e. d-mm-yy


References
1. https://api.jqueryui.com/datepicker/