0 Comments

In my previous post, I explained how to create custom facets and store them in xDB. In this post, I’m going to show you how to display custom facets in Experience Profile.

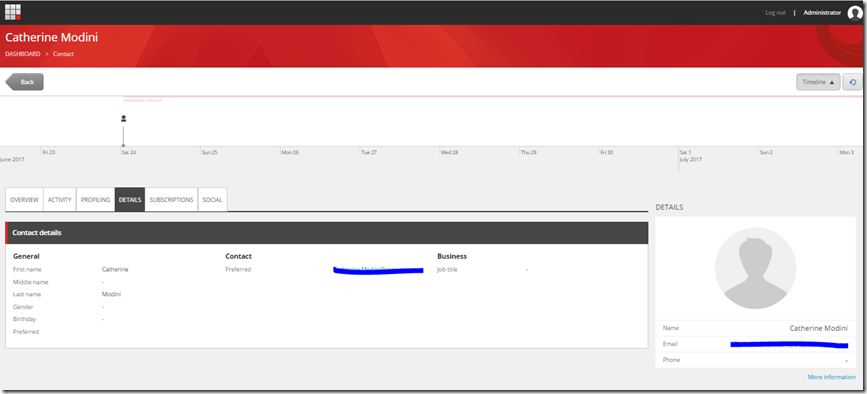
Experience profile lets you monitor the behaviour of contacts that have interacted with the website. It allows you to search a specific contact, either via either name or email. 

If you click on the contact, then you will be able to view the contact profile as shown in below.  This is cool right?!, however, you may find that Sitecore does not automatically display custom facets. 

image

In order to to achieve this, custom code is required. Therefore, I’m going to show you how to create a custom tab in the contact profile and display custom facets step by step.

STEPOne – Create custom facets

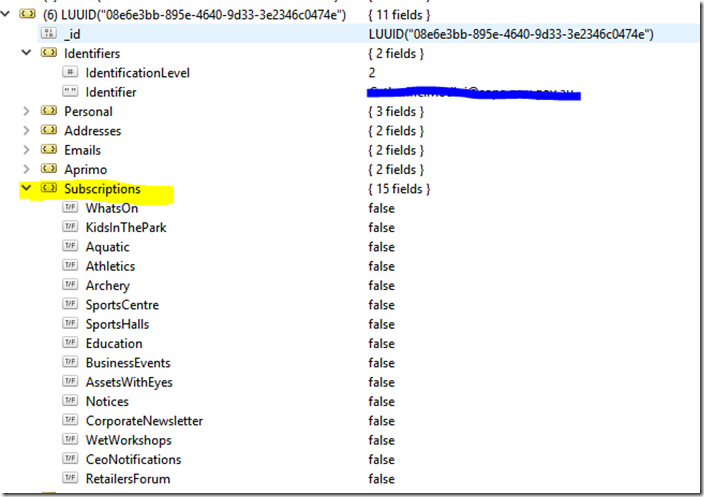
In my previous post, I’ve created a newsletter subscriptions facets and stored in xDB.

image

However, creating custom facets is not the scope of this post, if you want to learn how to create custom facets, you can refer to my previous post here.

STEP Two – Create Web API for retrieving the facets by contact id

This is much like any other WebAPI you will have created, and I would recommend applying access restrictions to the API for security reasons, you can apply Sitecore’s existing security filter called AuthorizedReportingUserFilteruse, which is defined in Sitecore.Cintel.dll.

Here is an example code:


Once you complete the implementation of your API, the next step is to register the API in route.

image


STEPThree – Create SPEAK script; this will call our API

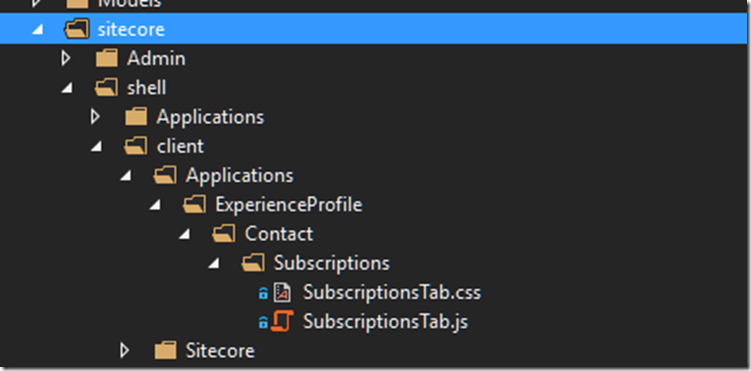
  • Firstly, I’m going to create a folder called “Subscriptions” under /sitecore/shell/client/Applications/ExperienceProfile/Contact/Subsriptions
  • Next, I will add subscriptionsTab.js and subscriptionsTab.css under the folder. (as shown as below)

image

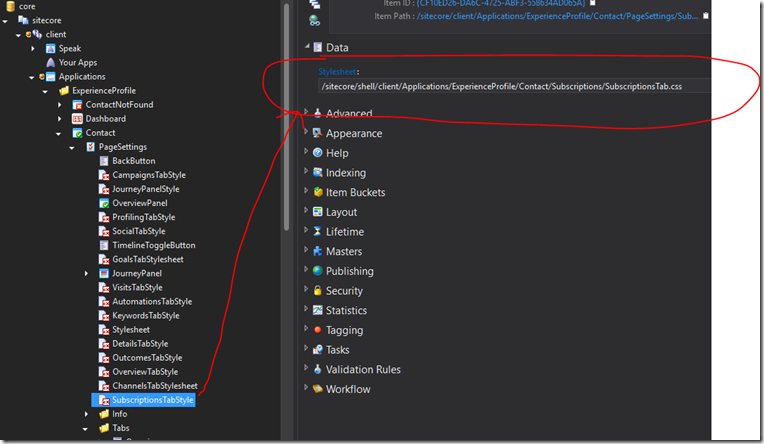
  • Associate the created CSS in core database

you will need to add style item in core database and point at the css file.  The defined css will be loaded automatically, when contact profile page is loading.

image

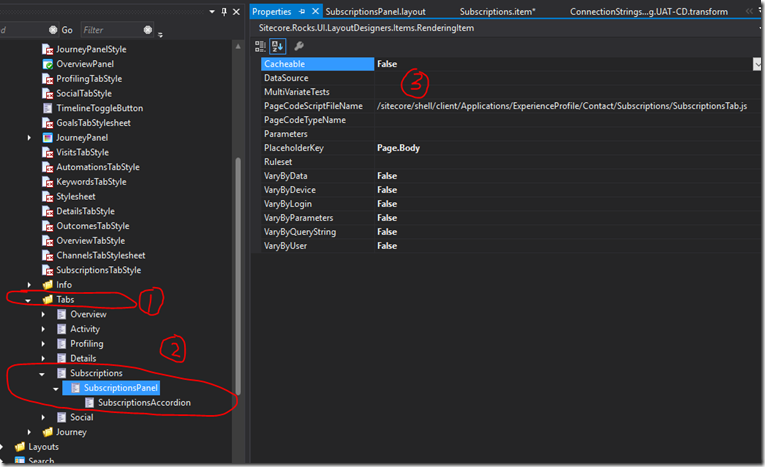
  • Associate the created JavaScript in core database

In this step, I created a new custom Tab, called “SubscriptionPanel” and PageCodeScriptFileName is where you should associate with the JavaScript we just created above.

 image

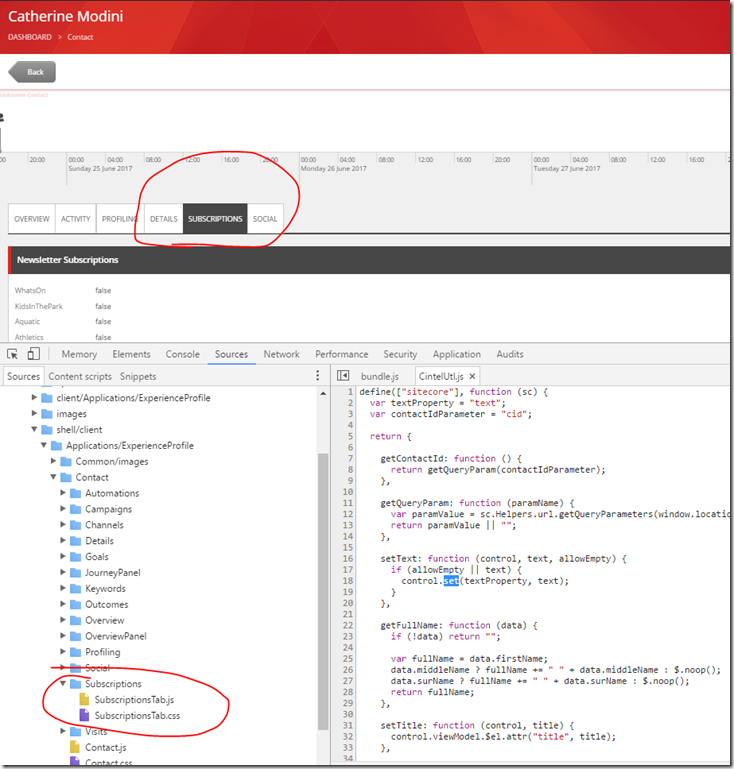
In order to verify what you’ve done so far is correct.  you should be able to see the new custom tab “Subscription”, and  both subscriptionsTab.js and subscriptionsTab.css are loaded, after contact profile page is loaded.

image

The next step is to write a script for retrieving the data via the custom API you created above. Sitecore use SPEAK as a framework for developing Sitecore application with a consistent interface.  The syntax is very simple to follow and extend.

Here is the sample code for calling the API and return Json.

STEPFour – Binding Json object to the controller on the custom Tab

The last step is to display the Json data on the custom Tab.

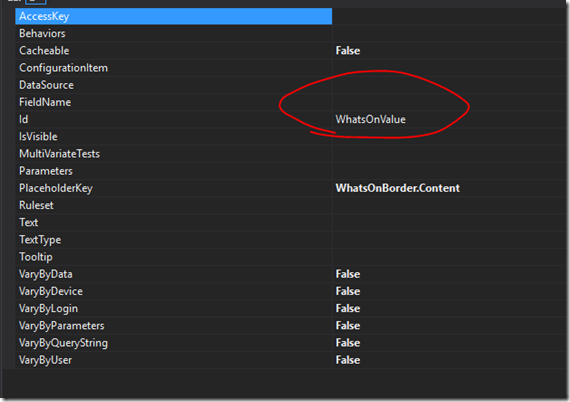
In the above code snippet,  you will find this code cintelUtil.setText($that.WhatsOnValue, jsondata.WhatsOn, true);.  this sets TextBox “WhatsOnValue” within the controller, so it contains the Json value.  Then, the next question is how to define the “WhatsOnValue” textbox in Sitecore?  Don’t fret, I will show you how this can be done!.

  • Add Text rendering (Note: because I’m using SPEAK 1.1 framework,  I will have to select the Text rendering under SPEAK 1-1)

image 

  • Set the ID to “WhatsOnValue”, this is the ID where the cintelUtil.setTextto function is referring to.

image

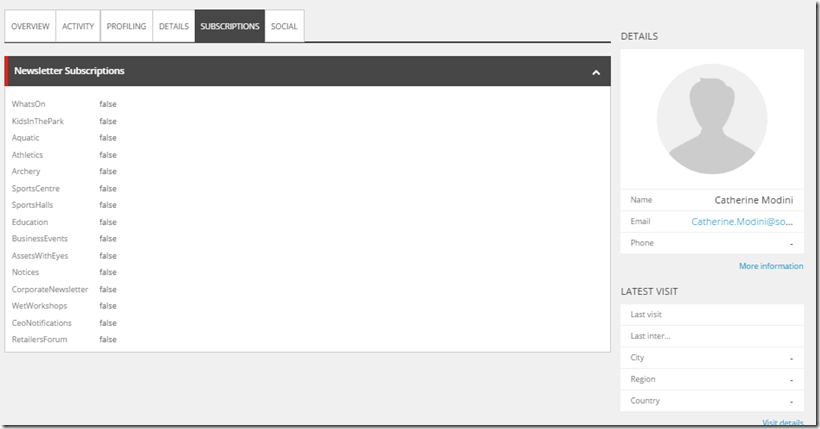
Congratulation!! you’ve done all the code and configuration.  Now let’s check out the result,  The “subscriptions” tab should display in the contact profile page as well as the custom facets associating with the contact.

image

Hope you found this post is useful, and enjoyed this article.
0 Comments

In my previous post – Leverage Sitecore xDB fro newsletter subscription I wrote last year, I talked about how to use EXM segment list to create newsletter subscription function.  If you haven’t read yet,  I recommend to read it first before starting to read this article.  In this article, I’m going to explain how to update user subscriptions by creating a form with WFFM and sending an EXM confirmation email with WFFM.
 

Recap the requirement

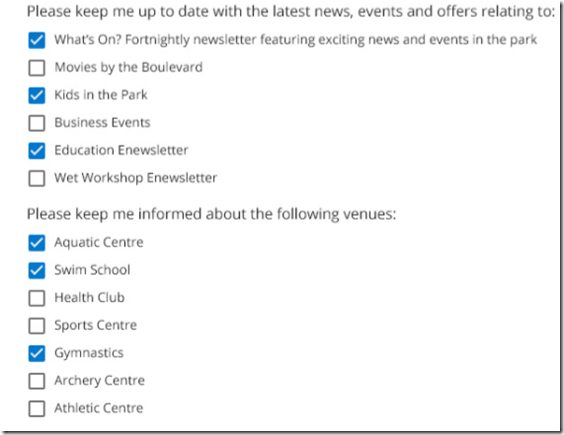
I’m going to start with a recap of the requirement.  Basically, client wants to manage their newsletter  subscriptions within Sitecore, and allows users to update their newsletter subscriptions on the website.

image


What has been architected

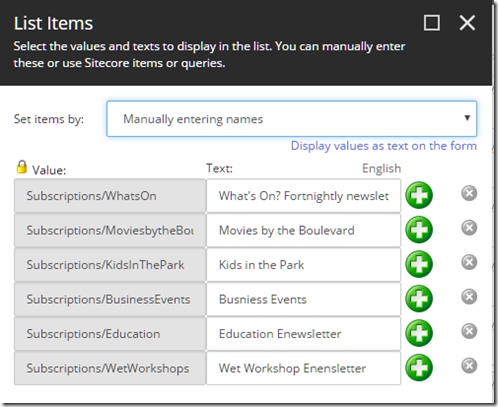
I created a form with WFFM for updating user newsletter subscriptions, and content editor is allowed to update the opt ins  i.e. Kids in the park (shown in screenshot above) as well as to map the opt ins with the custom newsletter subscription facets so as to automatically segmented user into corresponding email group. How to segment users  in EXM is not part of the scope of this post, but you can always refer back to my previous post.


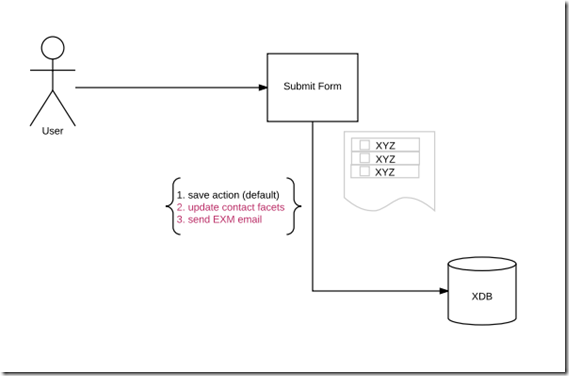
Also, I created a custom action for sending the confirmation email which is defined within EXM, as well as a custom save action for updating contact subscriptions facets.

Here is the overview workflow diagram

image


Three Main Challenges

  • Initial form value based on contact subscription profiles on form loading.
  • Allow content editor to map option in with subscription facets in xDB.
  • Send confirmation email that defined in EXM.

image

Solutions for achieving each of the above listed challenges

  • Initial form value based on contact subscription profiles on form loading.

By default, WFFM allows you to initial the field value by passing value in query string. But we think it’s not best solution for rendering value with query string as :

  1. Potential safety issue
  2. Limitations in the length of query string
  3. Limitations in the filed type of WFFM

Therefore, we come up with the solution by creating custom field rules. How to create custom rule is not in scope, but you can find information on Sitecore documentation portal and it was also explained by Jeff Darchuk in here.

image
  • Allow content editor to map option in with subscription facets in xDB.

For mapping the optins, we create custom checklist field and utilizing the values as text feature for mapping the contact facets with each of the options in the checkbox list.

image

  • Send confirmation email that defined in EXM

A custom action has been created and here is the sample code for sending the EXM messages programmatically.

image

0 Comments

Requirement

Newsletter subscription is a common requirement for most for website. Never really think about this function properly, until now client wants to send a scheduled newsletters to all subscribed users.  It sounds simple, isn’t it?  However, when you started to think about a bit in deep, you will probably start to ask questions like below:

  • Who are these users? 

The user must be contacts.  A contact represents an individual who interacts with or may potentially interact with the website.

  • How do I know whether or not the contact subscribed newsletter?

Then you started to realize you need a attributes on contact profile, which means you will most likely need to create a custom contact facet.

  • How to create a dynamic contact list?

Once a contact subscribed newsletter on the website, the contact need to be automatically added into your newsletter subscription contact list.  The answer is simply to use segment list.  Then you realized “damn, I need to create a custom rule”  for segmenting contacts based on the custom facets.


Solution

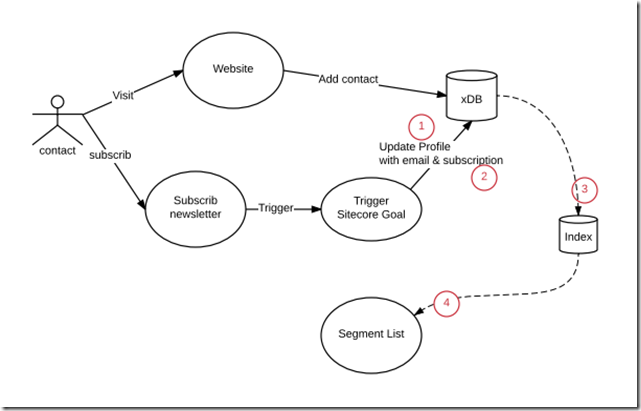
To interoperate the requirements into technical requirements, I drew a  kind data flow diagram, and highlighted custom functions we need to achieve the above requirement.

  1. custom contact facet
  2. programmatically update contact in xDB
  3. Add custom contact facet into contact index.
  4. custom rule condition


image


Implementation

In this section, I will demo the implementation. The demo code is supported Sitecore 8.1 (upgrade-3 or above).

custom contact facet

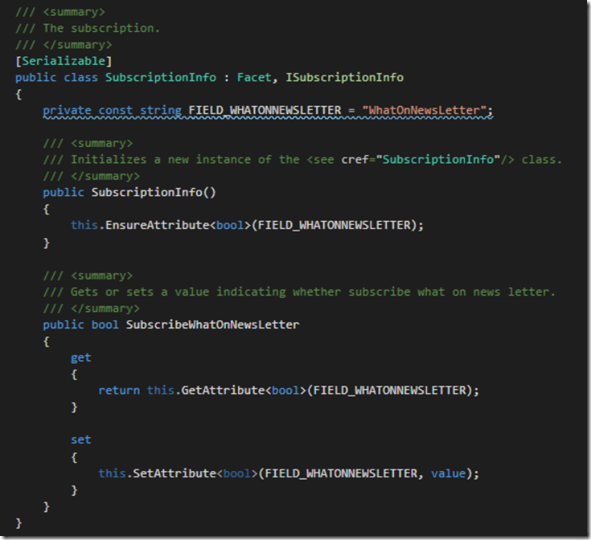
Sitecore well documented how to create a custom contact facet.   Based on the document I created SubscriptionInfo facet.

Here is the example:

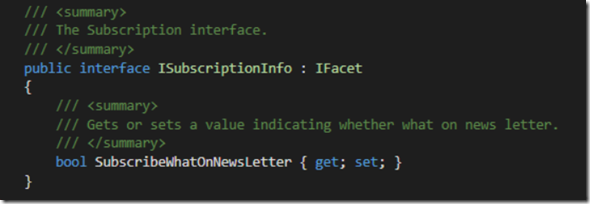
  • Create an Interface

image

  • Create a Facet class

image

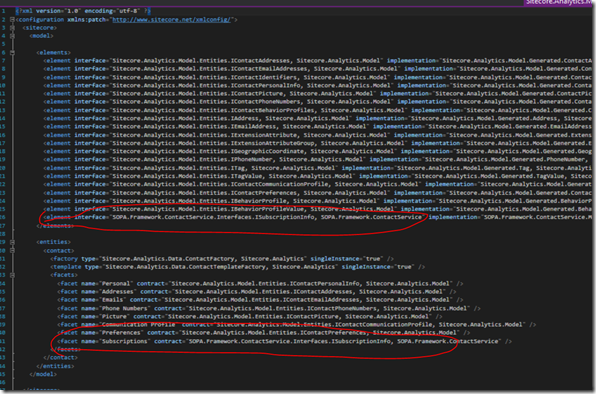
  • Register in Analytic Model

image


programmatically update contact

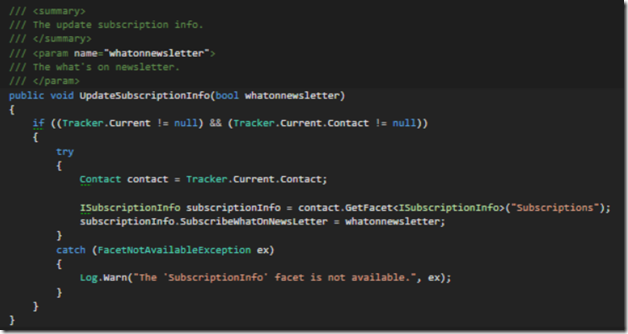
Once you’ve create custom facet, next step is to update contact.

Here is the example:

image

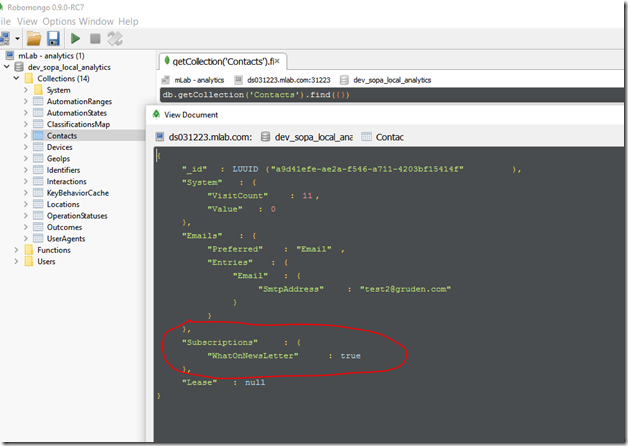
Submitting a newsletter subscription, then you can verify the data in xDB

image


Add custom contact facet into contact index

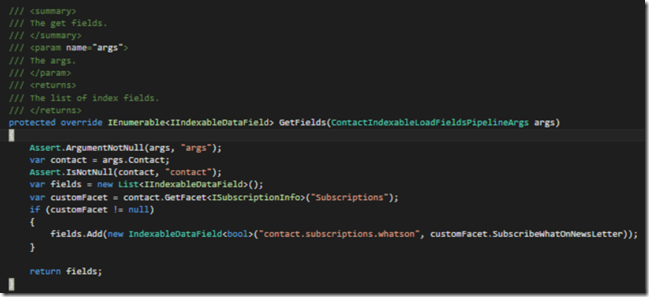
In order to use the segment condition, you will need to add the custom facet into index.  Luckily, Sitecore provide a good guide about how to index these custom contact facets during aggregation process.  All you will need to do is to extend the contactindexable.loadfields pipeline.

Here is the example:

image

custom rule condition

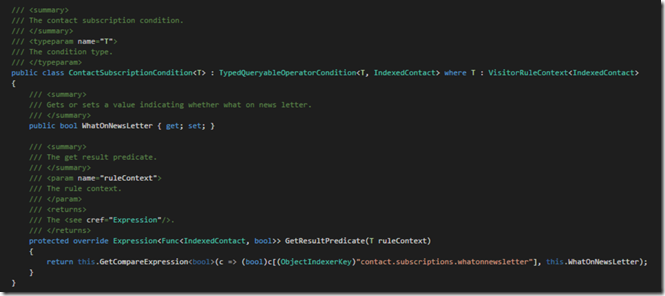
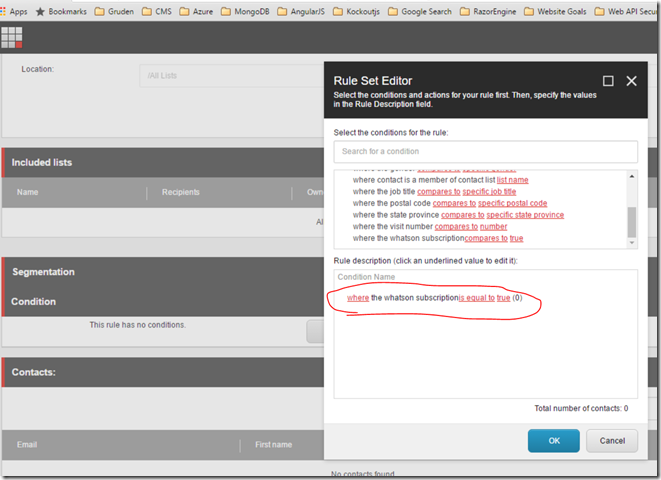
Last thing left is to create a custom segment condition, which allows you to check whether or not the contact subscribe the newsletter.

image


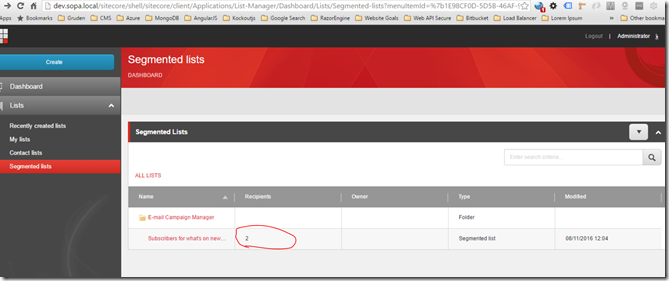
Once you completed all above, you can now go to List manager and create your segment

image


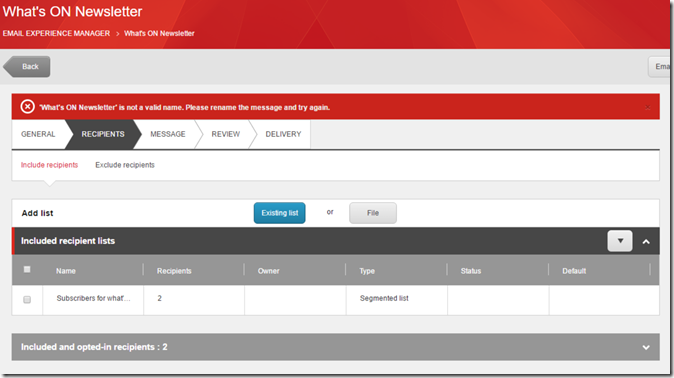
Contacts will be dynamically added into your contact list, which allows newsletters to be sent to the segmented contacts easily.

image\

image

Conclusion

It’s not complicate right?  Hopefully, you will enjoy creating your own facets and rock and roll =P.

References

  1. https://doc.sitecore.net/sitecore_experience_platform/setting_up__maintaining/xdb/contacts/index_custom_contact_facets
  2. https://doc.sitecore.net/sitecore_experience_platform/setting_up__maintaining/xdb/contacts/contacts
  3. https://doc.sitecore.net/sitecore_experience_platform/digital_marketing/the_list_manager/creating_lists/create_a_contact_list_or_a_segmented_list