0 Comments

I have to admit that the most painful process for setting up Sitecore solution is to configure CD/CM on each of the environments, and most worse case is you will have to do it again and again.  It’s not only time consumed, but also causing unexpected errors if you accidently disabled configuration which shouldn’t have been disabled. Then you will be like this

image

It could take up to an hour to configure each of the server. Imagine you have UAT (CDx2 and CM), PROD (CDx2 and CM), then you will probably spend half day just configuring these files.

Therefore, I decided to create a PowerShell script to automate the whole process.  Here is the example, but you can find the entire script on Github.

The current script is for Sitecore 8.2.2 based on Sitecore official documentation, I will continuously update the script to support more version of Sitecore.  If you think it’s a good idea and also would like to contribute for specific version,  please feel free to make a pull request.

The “SCRIPT SETTINGS” is global settings, you can integrate with Octopus variables for automatically configure different environments.

0 Comments

Thanks Azadeh Khojandi who encouraged me to present and share experience & solution in the Sitecore Sydney meetup group.  We did a dual presentation and it’s my first public presentation.

It was definitely great experience and it was successful and people understood and like the solution.  For those who did not be able to attend that night.  You can still view the PPT shared online with the link below:

https://docs.google.com/presentation/d/1NFhT4Ou6x5yQwfH_A4be56O_hkGYLVIlCyvU4O-V6uM

Thanks for anyone who attended the meetup.  Hope you all enjoyed.

0 Comments

In my previous post – Leverage Sitecore xDB fro newsletter subscription I wrote last year, I talked about how to use EXM segment list to create newsletter subscription function.  If you haven’t read yet,  I recommend to read it first before starting to read this article.  In this article, I’m going to explain how to update user subscriptions by creating a form with WFFM and sending an EXM confirmation email with WFFM.


Recap the requirement

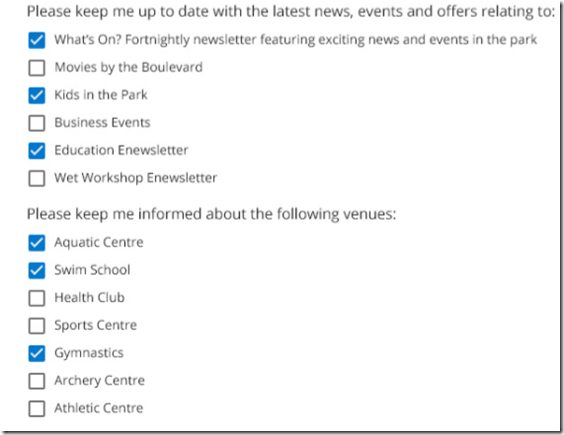
I’m going to start with a recap of the requirement.  Basically, client wants to manage their newsletter  subscriptions within Sitecore, and allows users to update their newsletter subscriptions on the website.

image


What has been architected

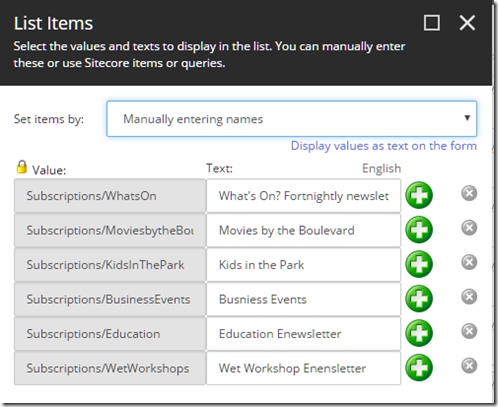
I created a form with WFFM for updating user newsletter subscriptions, and content editor is allowed to update the opt ins  i.e. Kids in the park (shown in screenshot above) as well as to map the opt ins with the custom newsletter subscription facets so as to automatically segmented user into corresponding email group. How to segment users  in EXM is not part of the scope of this post, but you can always refer back to my previous post.


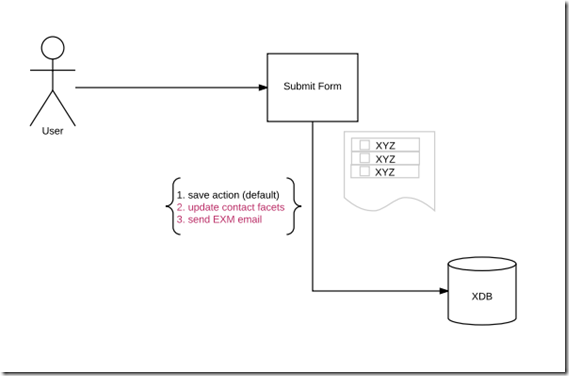
Also, I created a custom action for sending the confirmation email which is defined within EXM, as well as a custom save action for updating contact subscriptions facets.

Here is the overview workflow diagram

image


Three Main Challenges

  • Initial form value based on contact subscription profiles on form loading.
  • Allow content editor to map option in with subscription facets in xDB.
  • Send confirmation email that defined in EXM.

image

Solutions for achieving each of the above listed challenges

  • Initial form value based on contact subscription profiles on form loading.

By default, WFFM allows you to initial the field value by passing value in query string. But we think it’s not best solution for rendering value with query string as :

  1. Potential safety issue
  2. Limitations in the length of query string
  3. Limitations in the filed type of WFFM

Therefore, we come up with the solution by creating custom field rules. How to create custom rule is not in scope, but you can find information on Sitecore documentation portal and it was also explained by Jeff Darchuk in here.

image
  • Allow content editor to map option in with subscription facets in xDB.

For mapping the optins, we create custom checklist field and utilizing the values as text feature for mapping the contact facets with each of the options in the checkbox list.

image

  • Send confirmation email that defined in EXM

A custom action has been created and here is the sample code for sending the EXM messages programmatically.

image

0 Comments

Heard Sitecore Connector long time back, but never really got a chance to use it for any client solutions until now.  The settings are quite straightforward, and the main purpose for this article is to demo how to setup Facebook account with the Social Connector Module.


Steps for settings social accounts

  • Going to System-> Social (shown as below)

image

Firstly, I created Applications for staging production separately, so that I can switch to the correct application easily after deploying to the target environment.  There are three fields on the Application template

  • Application ID
  • Application Secret
  • Public API Key (ONLY for Google+)

Next, I created account which will be used when post a message.  To create a specific account i.e. Facebook Account, you will have to select the corresponding Application that you just created in the previous step.  and select a page you wish to post to.

image

image

Once you’ve done above, select a page in Content tree, and click Message button in Publish Tab.  Create a message and post it.

image

There are more about how to track the campaign performance and how to setup the workflow etc. These will be all addressed in the future blog.