0 Comments

Heard Sitecore Connector long time back, but never really got a chance to use it for any client solutions until now.  The settings are quite straightforward, and the main purpose for this article is to demo how to setup Facebook account with the Social Connector Module.


Steps for settings social accounts

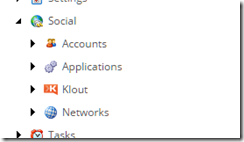
  • Going to System-> Social (shown as below)

image

Firstly, I created Applications for staging production separately, so that I can switch to the correct application easily after deploying to the target environment.  There are three fields on the Application template

  • Application ID
  • Application Secret
  • Public API Key (ONLY for Google+)

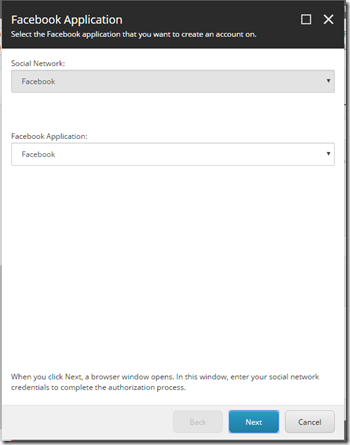
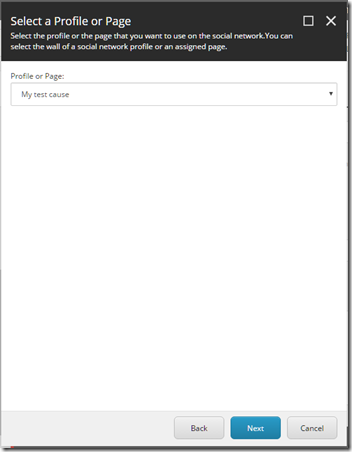
Next, I created account which will be used when post a message.  To create a specific account i.e. Facebook Account, you will have to select the corresponding Application that you just created in the previous step.  and select a page you wish to post to.

image

image

Once you’ve done above, select a page in Content tree, and click Message button in Publish Tab.  Create a message and post it.

image

There are more about how to track the campaign performance and how to setup the workflow etc. These will be all addressed in the future blog.

0 Comments

Thanks Gruden for sending me to this great conference, It wasn’t too technical, but really inspired me with not only the improvements Sitecore have been working,  but the exciting vision that Sitecore has. I want to share some of the key points from today’s session for those that missed it.

What’s new

  • Sitecore Experience Accelerator

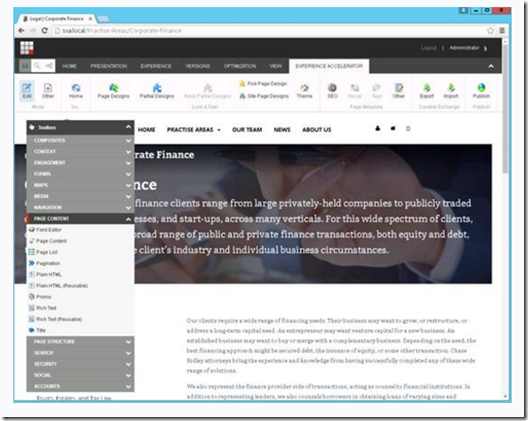
It provides reusable, templated UX layouts and components to help developers to speed up their development life cycle.

It is accessible directly from the experience editor, which allows you to drag-and-drop to the page easily.  It also offers import and export HTML features, which allows front-end developer to create more themes. You can find more details from www.Sitecore.net

image 

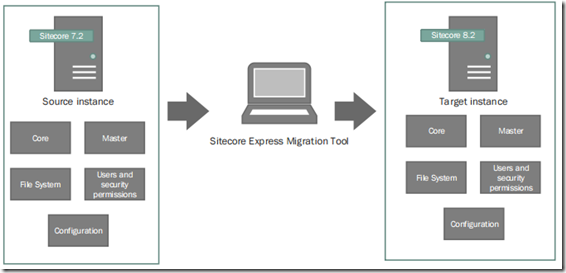
  • Express Migration tool  1.0

The express migration tool supports migration of any version of Sitecore 7.2 to the initial release of the Sitecore 8.2.  You can download from here.

image

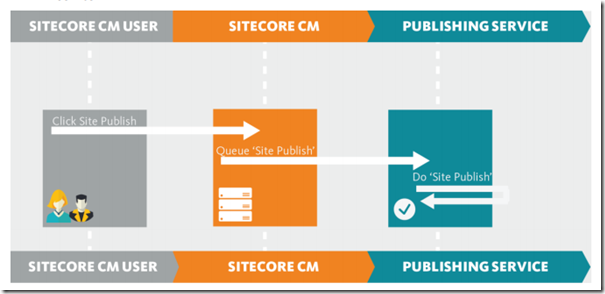
  • New Publishing service with significant performance improved

The new publishing service is build on .NET Core and works only with 8.2. It’s an optional replacement for the existing Sitecore publishing engine.  It provides much faster publishing service, which offers greater data consistency and reliability. Once the publish service is installed it will automatically replace the existing publishing engine.

You can find the installation here.

image

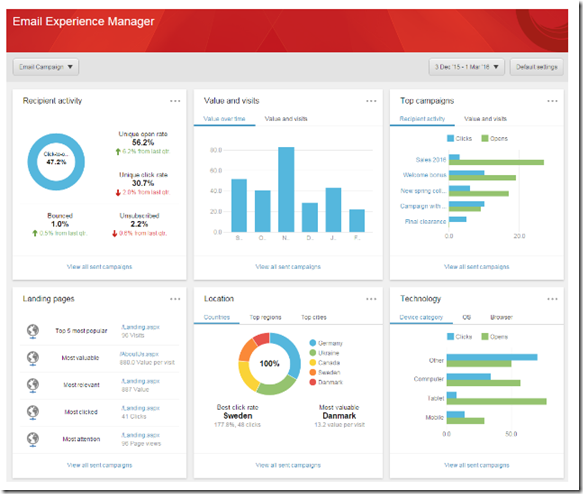
  • New EXM 3.4 (combined campaign management with email experience management)

image

  • New Sitecore Commerce

As we known, Sitecore commerce has three models Sitecore commerce , Sitecore commerce connect, and  Sitecore commerce server. Sitecore is going to reduce the complexity and provide an all-in-one service.

  • New Sitecore Dynamics

Offering a seamless experience between online and brick-and-mortar channels, Sitecore Commerce powered by Microsoft Dynamics lets retailers analyse and personalize online experiences from the Sitecore Experience Platform (XP) in real time, while also delivering advanced back-office capabilities from Microsoft Dynamics, like support for loyalty programs, gift cards, call centre management, and order management.

Future

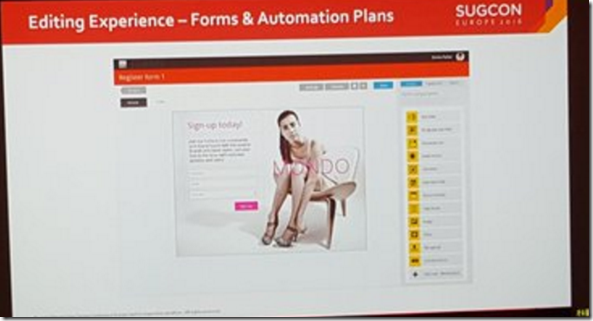
In future versions, forms capabilities will be built in and supercharged.

image

1 Comments

Recently we’ve started to using Octopus deploy in an AWS EC2 environment.  The challenge we are having is automatic tentacle registration on Auto Scale.  After a couple of hours, we’ve found the solution.   Noticed some people are asking the same questions on Octopus deploy support portal .  But didn’t give a clear solution, therefore I decided to share founds we had.


The solution we are having is to install and register the tentacle with commend line.

Step 1 Install tentacle

image

Step 2 configure tentacle

image

Step 3 octo promote-release

image

Hopefully, this is helpful.

0 Comments

Requirement

Newsletter subscription is a common requirement for most for website. Never really think about this function properly, until now client wants to send a scheduled newsletters to all subscribed users.  It sounds simple, isn’t it?  However, when you started to think about a bit in deep, you will probably start to ask questions like below:

  • Who are these users? 

The user must be contacts.  A contact represents an individual who interacts with or may potentially interact with the website.

  • How do I know whether or not the contact subscribed newsletter?

Then you started to realize you need a attributes on contact profile, which means you will most likely need to create a custom contact facet.

  • How to create a dynamic contact list?

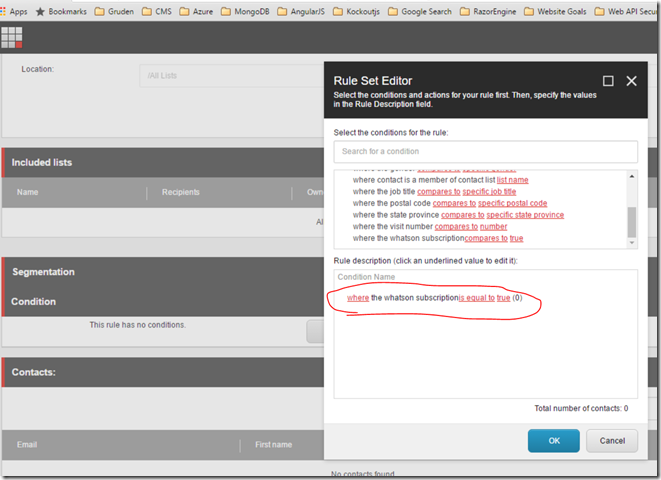
Once a contact subscribed newsletter on the website, the contact need to be automatically added into your newsletter subscription contact list.  The answer is simply to use segment list.  Then you realized “damn, I need to create a custom rule”  for segmenting contacts based on the custom facets.


Solution

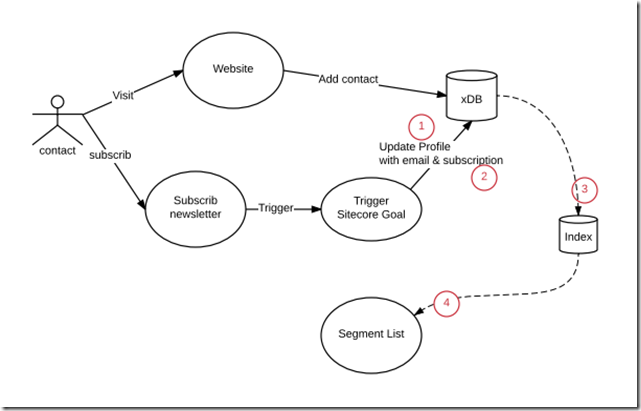
To interoperate the requirements into technical requirements, I drew a  kind data flow diagram, and highlighted custom functions we need to achieve the above requirement.

  1. custom contact facet
  2. programmatically update contact in xDB
  3. Add custom contact facet into contact index.
  4. custom rule condition


image


Implementation

In this section, I will demo the implementation. The demo code is supported Sitecore 8.1 (upgrade-3 or above).

custom contact facet

Sitecore well documented how to create a custom contact facet.   Based on the document I created SubscriptionInfo facet.

Here is the example:

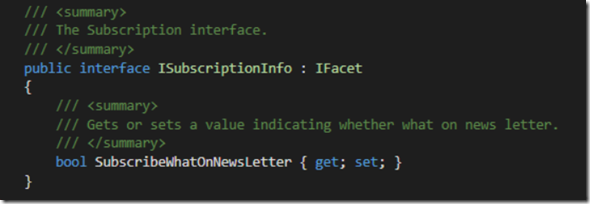
  • Create an Interface

image

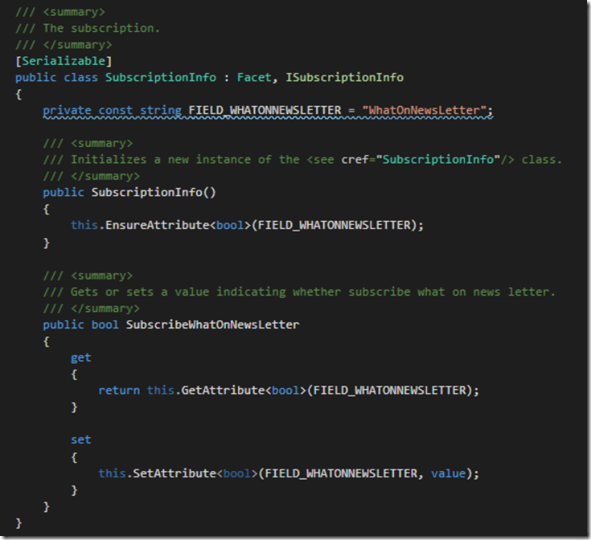
  • Create a Facet class

image

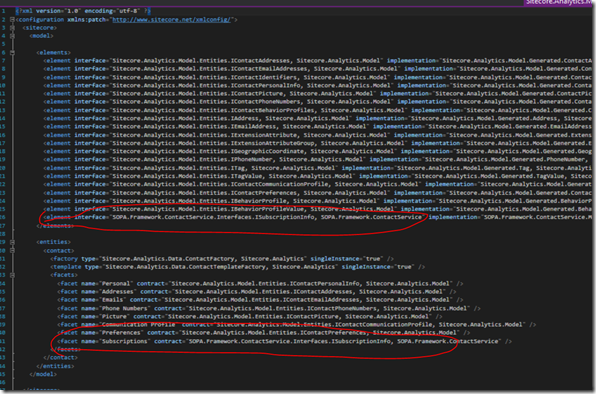
  • Register in Analytic Model

image


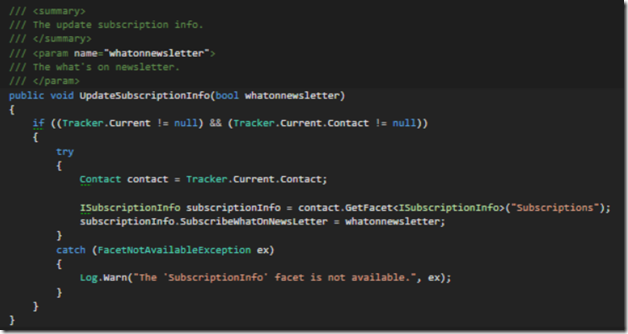
programmatically update contact

Once you’ve create custom facet, next step is to update contact.

Here is the example:

image

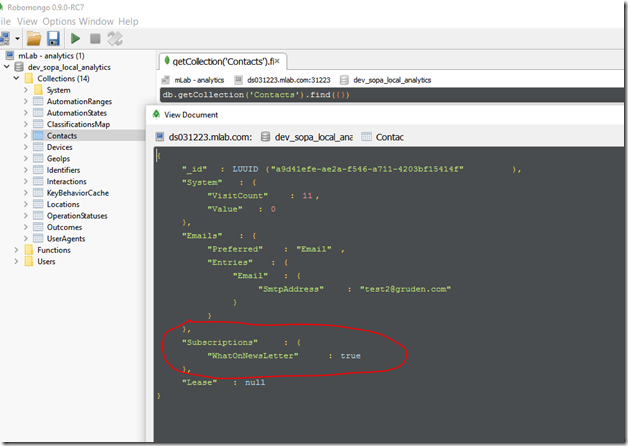
Submitting a newsletter subscription, then you can verify the data in xDB

image


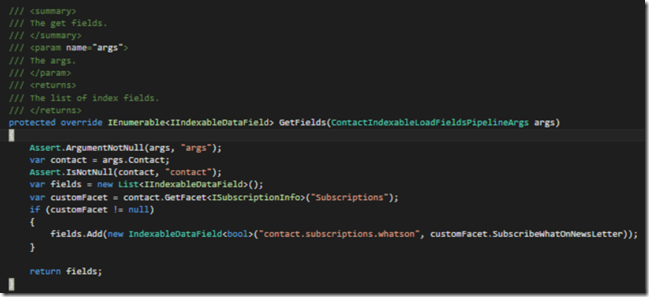
Add custom contact facet into contact index

In order to use the segment condition, you will need to add the custom facet into index.  Luckily, Sitecore provide a good guide about how to index these custom contact facets during aggregation process.  All you will need to do is to extend the contactindexable.loadfields pipeline.

Here is the example:

image

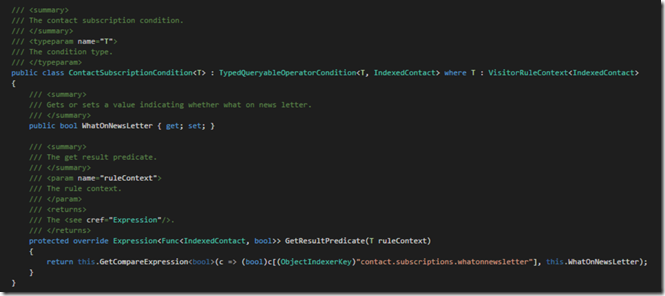
custom rule condition

Last thing left is to create a custom segment condition, which allows you to check whether or not the contact subscribe the newsletter.

image


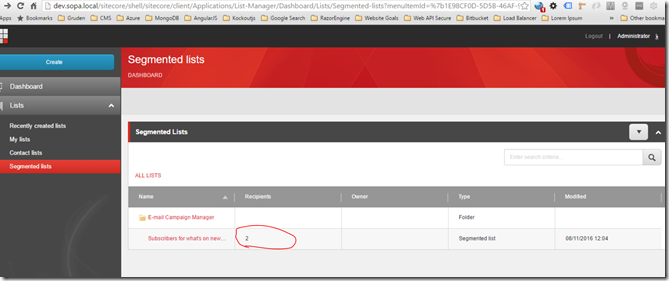
Once you completed all above, you can now go to List manager and create your segment

image


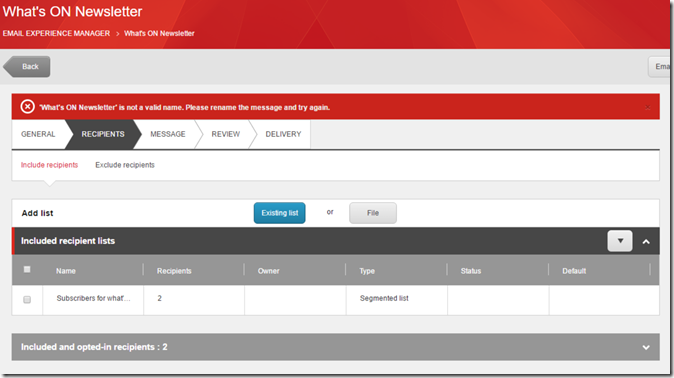
Contacts will be dynamically added into your contact list, which allows newsletters to be sent to the segmented contacts easily.

image\

image

Conclusion

It’s not complicate right?  Hopefully, you will enjoy creating your own facets and rock and roll =P.

References

  1. https://doc.sitecore.net/sitecore_experience_platform/setting_up__maintaining/xdb/contacts/index_custom_contact_facets
  2. https://doc.sitecore.net/sitecore_experience_platform/setting_up__maintaining/xdb/contacts/contacts
  3. https://doc.sitecore.net/sitecore_experience_platform/digital_marketing/the_list_manager/creating_lists/create_a_contact_list_or_a_segmented_list

0 Comments

Today, one of the colleague asked me a question about how to post a form with a complex object.  It is actually a bit tricky. This is because of the nature of HTML form [1].  When a form is submitted for processing, some controls have their name paired with their current value and these pairs are submitted with the form.  Those controls for which name/value pairs are submitted are called “successful controls”


HTML defines the following control types:

checkbox– When a form is submitted, only “on” checkbox controls can become “successful control”

Radio button – Radio button are like checkbox.

Input– the input text becomes the control’s current value.

hidden controls– Authors may create controls that are not rendered but whose values are submitted with a form. it generally sued for storing information between client/server exchanges. The Input element is used to create a hidden control.


The problem my colleague had is that  he wants to pass the view model to his controller by submitting the form.   However, the model is a complex model, after submitting the form. Only those simple type property has values, but value of the property like ICollection is null.  As explained above,  This is because that it is not a name/value pair value.  For solving this issue, we think  what if we convert the complex object into a serialized object and set it as a hidden control value.  So, after submitting the form, the value will be passed to the server.

Thus, we added the code as below :

@using(Html.BeginForm(…))

{

     @Html.Hidden("reportViewModel", JsonConvert.SerializeObject(Model))

}

Then, the action parameter is expecting a string. However, we still want to use a strong type object.  In order to do that, we end up with creating a custom model binder. Thanks to Mike Stall.


Follow the steps below to create custom model binder:

Step 1 – Create Model Binder

public class ReportViewModelBinder : IModelBinder
{
    public object BindModel(ControllerContext controllerContext, ModelBindingContext bindingContext)

{
     string key = bindingContext.ModelName;
     ValueProviderResult val = bindingContext.ValueProvider.GetValue(key);

if (val != null)
{
        string s = val.AttemptedValue as string;

        if (s != null){

               return JsonConvert.DeserializeObject<ReportViewModel>(s);
      }
             }
             return null;
         }
}

Step 2 – Add [ModelBinder] attribute on the parameter’s signature

public FileContentResult ReportSpreadshee([ModelBinder(typeof(ReportViewModelBinder))]ReportViewModel reportViewModel){

}

After all the efforts, we finally can pass the complex object with post method, when submitting a form.  Please feel free to make a comment, if you have an optimised solution.

References

[1]https://www.w3.org/TR/REC-html40/interact/forms.html#successful-controls

[2]https://blogs.msdn.microsoft.com/jmstall/2012/04/20/how-to-bind-to-custom-objects-in-action-signatures-in-mvcwebapi/