0 Comments

Sitecore provides many recommendation and tips about optimization of CD/CM.  For sure, you can find some of them online by googling them.  However, they are separated and it’s time consumed to search and read all the documentation.  So, I think it would be handy, if I can summarize them into one big checklist.

Security

  Protect Admins Pages

  1. Cache (/Sitecore/admin/cache.aspx)
  2. Database Browser (/stecore/admin/dbbrowser.aspx)
  3. Serialization (/stecore/admin/serialization.aspx)
  4. Show Config (/sitecore/admin/showconfig.aspx)
  5. Size Status (/sitecore/admin/sizestatus.aspx)
  6. Stats (/sitecore/admin/stats.aspx)
  7. Unlock Admin (/sitecore/admin/unlock_admin.aspx)
  8. Installation wizard (/sitecore/admin/UpdateInstallationWizard.aspx)

  Turn on custom Errors

Update production web.config

<customErrors mode="RemoteOnly" />
  Reset admin password.
    It would be embarrassing to go live with password "b" =)
  Ensure replace develop license file before going live

Performance

  Configure Keep-Alive

<agent type="Sitecore.Tasks.UrlAgent" method="Run" interval="00:15:00">
        <param desc="url">/sitecore/service/keepalive.aspx</param>
        <LogActivity>true</LogActivity>
</agent>

  Disable WebDAV

Sitecore recommends disabling WebDAV on the production content delivery servers to reduce the number of log files being created. Also, Sitecore recommends disabling WebDAV on the content management servers if the WebDAV functionality is not being used.

  1. Disable logging

    <!--<appender name="WebDAVLogFileAppender" type="log4net.Appender.SitecoreLogFileAppender,
    Sitecore.Logging">
     <file value="$(dataFolder)/logs/WebDAV.log.{date}.txt" />
     <appendToFile value="true" />
     <layout type="log4net.Layout.PatternLayout">
     <conversionPattern value="%4t %d{ABSOLUTE} %-5p %m%n" />
     </layout>
     </appender>--> 
      
    <!--<logger name="Sitecore.Diagnostics.WebDAV" additivity="false">
        <level value="INFO"/>
        <appender-ref ref="WebDAVLogFileAppender"/>
      </logger>-->
  2. Disable webserver

    <!--<remove name="WebDAVModule" />-->
     <!--
    <add name="WebDAVRoot" path="*" verb="OPTIONS,PROPFIND" modules="IsapiModule"
    scriptProcessor="%windir%\Microsoft.NET\Framework\v2.0.50727\aspnet_isapi.dll"
    resourceType="Unspecified" preCondition="classicMode,runtimeVersionv2.0,bitness32" />
     <add name="WebDAVRoot64" path="*" verb="OPTIONS,PROPFIND" modules="IsapiModule"
    scriptProcessor="%windir%\Microsoft.NET\Framework64\v2.0.50727\aspnet_isapi.dll"
    resourceType="Unspecified" preCondition="classicMode,runtimeVersionv2.0,bitness64" />
     <add verb="*" path="sitecore_webDAV.ashx"
    type="Sitecore.Resources.Media.WebDAVMediaRequestHandler, Sitecore.Kernel"
    name="Sitecore.WebDAVMediaRequestHandler" />
    -->
  3. Disable httphandler

     <!--
     <add verb="*" path="sitecore_webDAV.ashx"
    type="Sitecore.Resources.Media.WebDAVMediaRequestHandler, Sitecore.Kernel" />
     -->

  Disable Performance Counters

Performance counters create a minor overhead and is recommended to be enabled only when running in troubleshooting mode

 <setting name="Counters.Enabled" value="false" />

  Disable Memory Monitor

Sitecore recommends disabling the Memory Monitor in production environments, and only enabling it for troubleshooting memory related issues.

 <setting name="Counters.Enabled" value="false" />
<!--<hook type="Sitecore.Diagnostics.MemoryMonitorHook, Sitecore.Kernel">
 <param desc="Threshold">800MB</param>
 <param desc="Check interval">00:00:05</param>
 <param desc="Minimum time between log entries">00:01:00</param>
 <ClearCaches>false</ClearCaches>
 <GarbageCollect>false</GarbageCollect>
 <AdjustLoadFactor>false</AdjustLoadFactor>
 </hook>-->

  Ensure sufficient cache size

SEO

  Title Tag

The <strong>title</strong> tag is required in all HTML documents and it defines the title of the document. This tag displays the page title in browsers toolbar and in the search-engine results (SERPs). It also provides a title for the page when it is added to favorites. A descriptive <strong>title</strong> tag is important in helping search engines determine the web page's relevancy for certain keywords.

  Meta Description

The meta description tag is meant to be a short and accurate summary of your page content. This description can affect your search engine rankings and can also show up directly in search engine results (and affect whether or not the user clicks through to your site).


  <h1> Headings Status

This indicates if any H1 headings are used in your page. H1 headings are HTML tags than can help emphasize important topics and keywords within a page.

  <h2> Headings Status

This indicates if any H1 headings are used in your page. H1 headings are HTML tags than can help emphasize important topics and keywords within a page.


  Check Robots.txt

Check if your website is using a robots.txt file. Search engines send out tiny programs called spiders or robots to search your site and bring information back so that your pages can be indexed in the search results and found by web users. If there are files and directories you do not want indexed by search engines, you can use the "robots.txt" file to define where the robots should not go.

These files are very simple text files that are placed on the root folder of your website: www.yourwebsite.com/robots.txt.

There are two important considerations when using "robots.txt":

- the "robots.txt" file is a publicly available file, so anyone can see what sections of your server you don't want robots to use;

- robots can ignore your "robots.txt", especially malware robots that scan the web for security vulnerabilities;


  Check Sitemap

a sitemap is an XML file that lists URLs for a site along with additional metadata about each URL (when it was last updated, how often it usually changes, and how important it is, relative to other URLs <g class="gr_ gr_9 gr-alert gr_gramm undefined Grammar multiReplace" id="9" data-gr-id="9">in</g> the site) so that search engines can more intelligently crawl the site.

  Image Alt Test

Check images on your webpage for required alt attributes. If an image cannot be displayed (wrong source, slow connection, etc), the alt attribute provides alternative information. Using keywords and human-readable captions in the alt attributes is a good SEO practice because search engines cannot really see the images. For images with a decorative role (bullets, round corners, etc) you are advised to use an empty alt or a CSS background image.


0 Comments

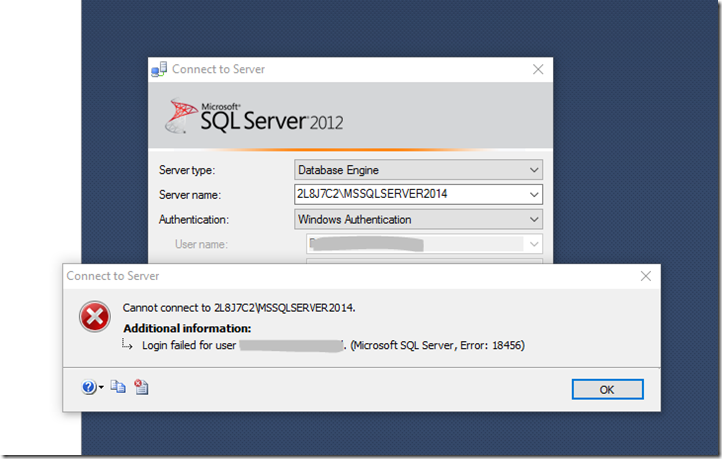
Yesterday I got a new computer from IT, and they installed most of the essential tools/software for me which is good.  But when I tried to login into SQL Server, I had trouble with the login.  I spent an hour to fix it and I think it’s worth to share.

Background

Firstly, I tried to login with the “Windows Authentication account”,but failed shown me the error as below.  then I tried using “sa” account same error.

image


Troubleshooting

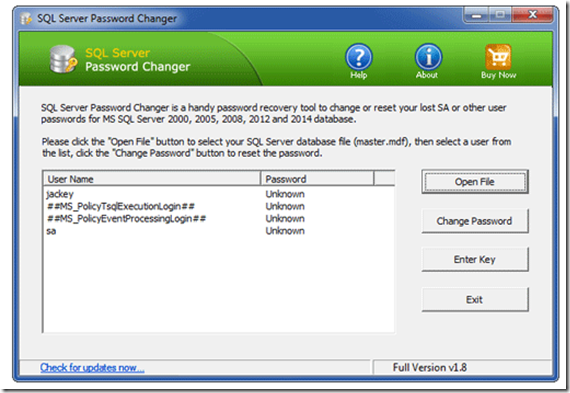
I think it might be because of the wrong password, then I emailed to IT to confirm the “sa” password. They sent me password but still the same password.  Just making sure it’s not a probably with the password, I found a tool (http://www.top-password.com/guide/reset-sql-server-password.html) to reset “sa” password.  SQL Server Password Changer is super easy to use.  All you need to do is only 3 steps really:

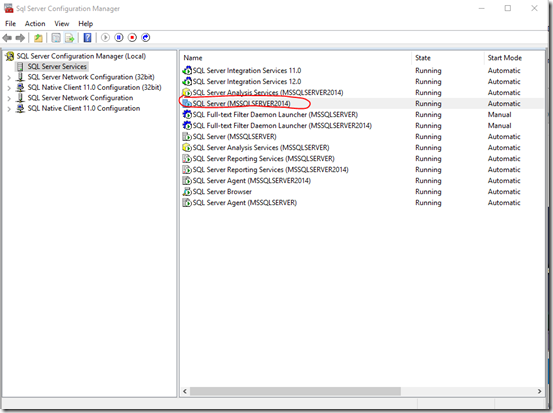
  • Step 1: Stop service via Sql Server Configuration Manager

image

  • Step 2:Open master.mdf filer under “C:\Program Files\Microsoft SQL Server\MSSQL12.MSSQLSERVER2014\MSSQL\DATA” Folder, and then change password

image

  • Step 3:Restart the service that we turned off in Step 1.

Unfortunately, after resetting the password, it was still the same error.  I was convinced that it’s not caused by wrong password.  Then I think it can be because of that the mix mode hasn’t been enabled. At the end,  I found a solution to enable the max mode without login to SQL.  Thanks to stackoverflow for this solution. 

Use 2 instead of 1 for mixed authentication. You'll have to restart SQL Server after changing this setting. You can't do that from T-SQL. From the command prompt, it's something like net stop mssqlserver then net start mssqlserver.

EXEC xp_instance_regwrite N'HKEY_LOCAL_MACHINE', 
    N'Software\Microsoft\MSSQLServer\MSSQLServer', N'LoginMode', REG_DWORD, 1


After enabling the mixed mode,  I can login with “SQL Server Authentication account” successfully, although I still don't know why the “windows account” doesn’t work.  But at least i can continue my work.

0 Comments

Sitecore Azure Module provides an integrated user interface to manage the cloud delivery infrastructure and simplify the deployment of your website to the Microsoft Azure cloud.  It would be a good start to read “Getting started with Sitecore Azure”, before you install.  It gives you an overview about what is the Sitecore Azure and why you will need Sitecore Azure, and examples about how both the content editing and content delivery environments run in the Microsoft Azure cloud etc. There are quite many guidance on getting started with using Sitecore Azure Module, but not so much how it actually working.  This article will start with the introduction of Sitecore Azure, then will talk about how it actually work in the 2nd part.  If you already know what Sitecore Azure module is and how get it installed, you can probably jump into 2nd part.


Why Sitecore Azure

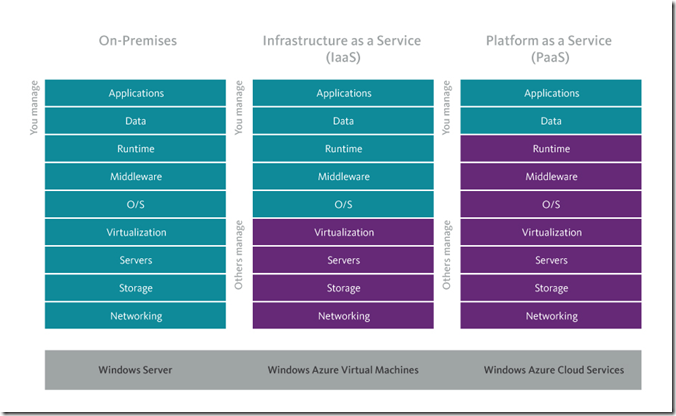
The traditional software development deploy web application on On-Premises, which requests companies to purchase all elements of infrastructure and operating system as well as teams to maintain and deploy. with the introduce of cloud and its natural advantages – less maintenance cost and running cost, it becomes more and more adoptable and acceptable. Here is the comparison between different type of services
image

Because of this, Sitecore introduced Sitecore Azure module which allows you to deploy and manage Sitecore powered websites on Microsoft Azure utilizing PaaS deployment in a matter of minutes. With out-of-the-box functionality, deployment of web servers and SQL databases to the cloud are automated based on set optimization structures simplifying any deployment headaches.


How to install Sitecore Azure Module

Following the following steps to install Sitecore Azure and Deploy to Azure:

Step One

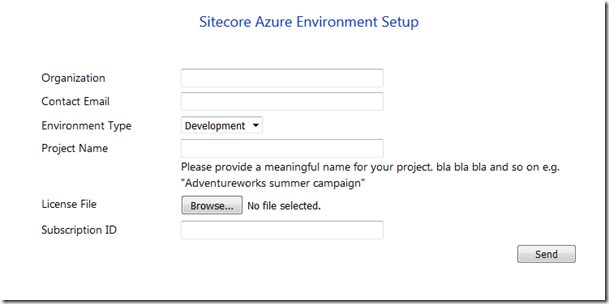
Apply Environment.xml file from http://scazureenvironments.trafficmanager.net/. It’s only taking 10 mins (initially it did take 1-2 business days to receive the Environment.xml, but nowadays they do it faster)
 

image


Step Two

There are two options for establishing to Azure Option A is a very fast and simple method offered by Microsoft. you can generate publishsettings from this link and then follow the instructions on the Microsoft site to get the file, then upload the file for Sitecore. Alternatively, for advanced users, you many choose Option B in which you either use an existing certificate or generate a self-certificate. Upload the .pfx for Sitecore. Once you have selected either a .publishsettings or .pfx file , you will have to provide a password for uploading to Sitecore.


Step Three

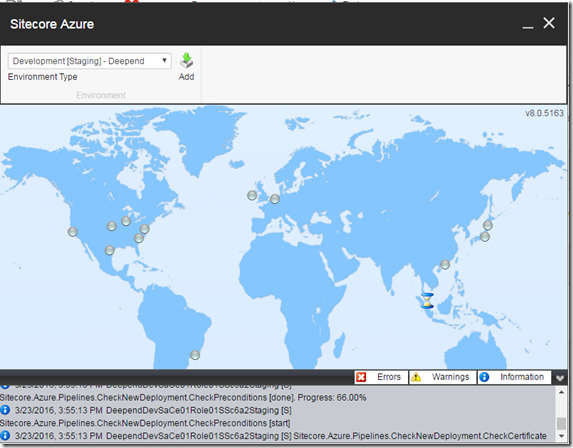
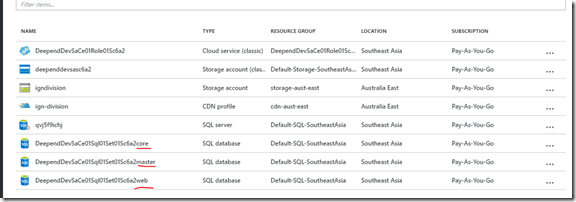
When deploying to azure, it allows you to monitor the real-time progress.
image

All you need to do now is to take a cup of tea and waiting for Sitecore to create all the webapp, database on Azure.
image


Troubleshoot

You might got 500 error after you first deploy to Azure, this is caused by oversize web.config.  For solving the error, you can update the web.cofing under AzurePackages folder by replacing Sitecore section with <sitecore configSource="App_config\Sitecore.config" />


References

https://doc.sitecore.net/cloud/azure/getting_started_with_sitecore_azure
0 Comments

Umbraco allows you to write a custom converter for the datatype, so as to you can use strong type object. For example the standard Umbraco Core "Content Picker" stores a nodeId as String type. However if you implement a converter it could return a IPublishedContent object.


What is Property Value Converter

A property value converter converts a property editor database stored value to a strong type. The converted value can be accessed from MVC Razor or any other Pulished Content API, defined by Umbraco.

How to create a custom property converter

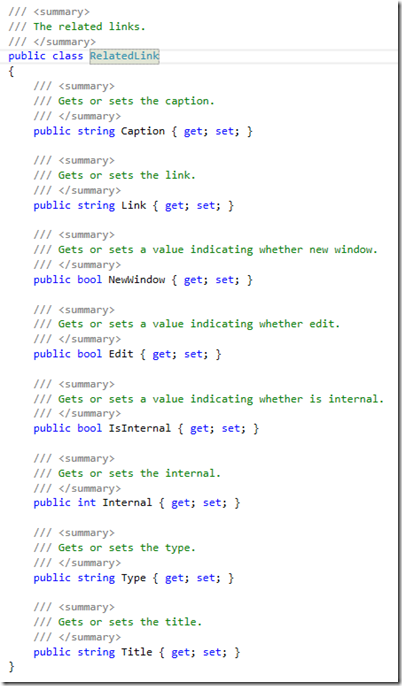
Here is an example to convert RelatedLink value into a IList<RelatedLink> object.

RelatedLink object looks like this

image


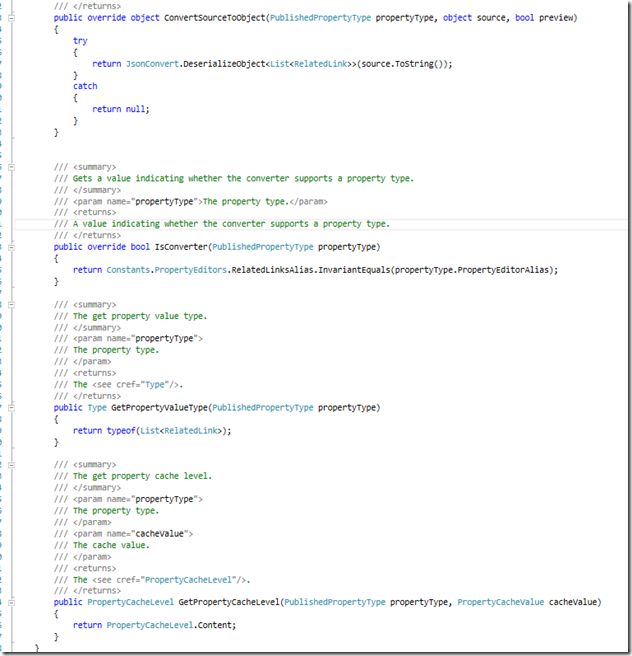
Implement custom converter RelatedLinksPropertyConverter by inheriting from PropertyValueConverterBase, and IPropertyValueConverterMeta. The custom converter looks like this

image

NOTE: the custom converter need to follow name convention  [DateType]PropertyConverter

References

https://our.umbraco.org/documentation/extending/property-editors/value-converters

0 Comments


Since IE9, async and defer have a good support for <script> element.  And it’s really awesome and useful.

What is async & defer exactly?

image

<script async> downloads the file during HTML parsing and will pause the HTML parser to execute it when it has finished downloading.

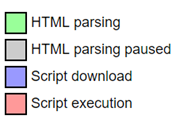
Green is

image[7]

<script defer> downloads the file during HTML parsing and will only execute it after the parser has completed.  defer scripts are also guaranteed to execute in the order that they appear in the document.

image


What is the difference from the normal script element

<script>HTML will wait for the script file to be loaded and executed.

image