0 Comments

Recently I’ve been working on Azure AD B2C SSO. The business requirement is to improve the user experience by personalizing the UI based on user roles.  Personalization will be easily implement in Sitecore with virtual user roles.


One of the challenge with the above user journey we had was that the roles are not included in the claims by default with Azure B2C basic policy. 

So I had a discussion with the team (Simon and Ivan), and come up with two potential solutions:

- Using Azure Identity Experience Framework (custom policy) to include roles

- Using Microsoft Graph API for retrieving user roles

Based on the discussion, I did the POC for option 2.  So, I’m going to walk you through how to I achieved.


Terminologies

Before diving into details, here are the terminologies that will be used in the below article:

Azure AD B2C

Azure Active Directory (Azure AD) B2C is a cloud identity management service that enables your applications to authenticate your customers. This white-label service is customizable, scalable, and reliable, and can be used on iOS, Android, and .NET, or any other platform


OpenID Connector

OpenID Connect is a simple identity layer built on top of the OAuth 2.0 protocol. OAuth 2.0 defines mechanisms to obtain and use access tokens to access protected resources, but they do not define standard methods to provide identity information. OpenID Connect implements authentication as an extension to the OAuth 2.0 authorization process. It provides information about the end user in the form of an id_token that verifies the identity of the user and provides basic profile information about the user.


Microsoft Graph API

Microsoft Graph is a RESTful web API that enables you to access Microsoft Cloud service resources. After you register your app and get authentication tokens for a user or service, you can make requests to the Microsoft Graph API.


Solution (options 2)

As mentioned above, option 2 is to make a call with MS Graph API for retrieving group membership information. So we updated the user follow by introducing step 7 and step 8 (shown in the below diagram.)


In order to make a call to MS Graph API, you will have to create an app Azure and assign essential access permission to the app.

Register application  in B2C tenant

Here is the steps for creating an app in Azure:

  1. Sign in to the Azure portal using either a work or school account or a personal Microsoft account.

  2. If your account gives you access to more than one tenant, select your account in the top right corner, and set your portal session to the Azure AD tenant that you want.

  3. In the left-hand navigation pane, select the Azure Active Directoryservice, and then select App registrations > New registration.

  4. Once you created, click on “certificates & secrets” for creating client secret which you will be used in your code.

  5. Last step is to assign permissions

    • In the Required permissions menu, click on Windows Azure Active Directory.
    • In the Enable Access menu, select the Read and write directory data permission from Application Permissions and click Save.
    • Finally, back in the Required permissions menu, click on the Grant Permissionsbutton.

Build Application

Add the below configuration to your app

Make HTTP request and add roles into claim

Display Roles

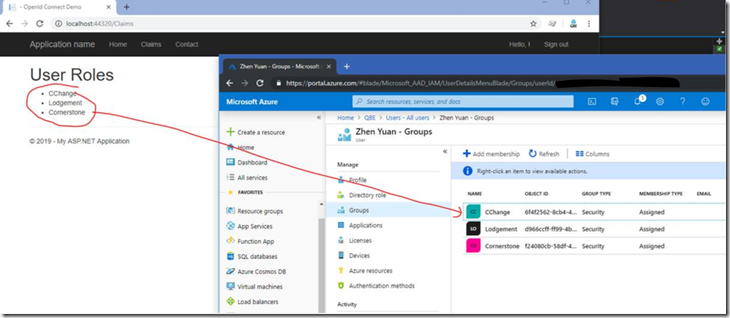
I create a few groups in Azure and assigned them to my profile. After login, I can see which groups have been assigned to me.

Capture

Sitecore Virtual User

Since the user are not stored in Sitecore, we will need to create a virtual user for assigning these roles.

0 Comments

Image result for headless cms


Headless CMS enabled architect to  separate the content from the display layer or the front-end user experience. It is rising in popularity in the development world.  This model allows breakthrough user experience by giving developers the great flexibility to innovate, as well as empowering architects to design the most scalable, decoupled solution.  So, as a developer, are you ready for taking the challenge? 

If not, skill up yourself and get ready!  In this article, I’m going to explain some of the essential/popular technologies and tools for you.


NPM/Yarn

Image result for NPM yarn


NPM stands for Node Package Manager. If you are a .net backend developer, it’s similar to Nuget package which keeps track of all the packages and their versions. It allows the developers to easily update/remove them from the solution. Yarn is similar to NPM but with high performance. Yarn install packages in parallel. 

Babel

Image result for Babel frontend

Bable is a JavaScript transpiler that converts new JS code into old ones i.e. convert ES6 code into ES5, which allows developers to use latest JS specifications without worrying about the browser’s compatibility


Webpack

Image result for webpack

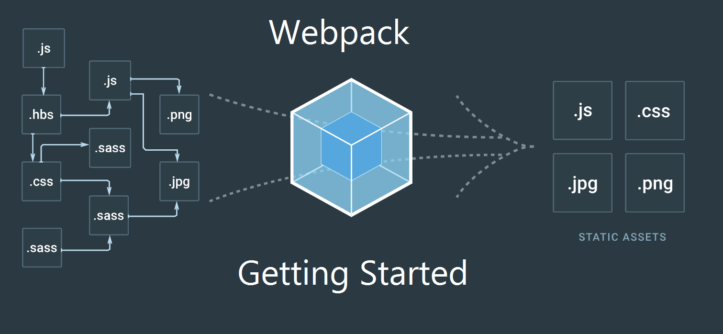
Webpack is used to compile JavaScript modules, used for managing assets, styles, and compilation. it supports Sass, postCSS, UglifyJs etc.


ES6

Image result for ES6

JavaScript ES6 brings new syntax and new awesome features to make your code more modern and more readable. It allows you to write less code and do more. Learn more ES6 from here http://es6-features.org/

Sitecore JSS

Image result for sitecore jss

Sitecore JavaScript Services (JSS) is a complete SDK for JavaScript developers that enables you to build full-fledged solutions using Sitecore and modern JavaScript UI libraries and frameworks.

JSS is comprised of a series of APIs and services. At a fundamental level JSS extends Sitecore's dynamic, component-based layout model to the frontend. Whereas in a traditional JS application each route tends to host known components, in a JSS app a route's components and their data are defined dynamically by Sitecore (or disconnected data when in disconnected mode).

Driving layout dynamically enables JSS apps to support content editor driven layouts and support data-driven personalization and multivariate testing - all the power of Sitecore with all the flexibility of a headless deployment model.

JSS Sitecore Integration and Data Flow

0 Comments

image

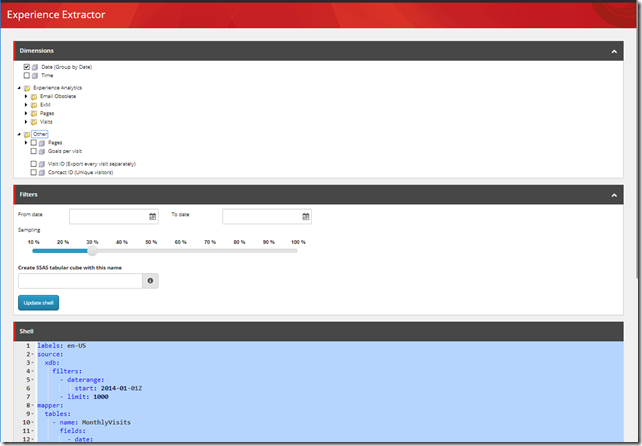
Recently, I’m working on Sitecore analytics project, and I found a useful tool for exporting the interactions data from xDB. That’s why I would like to share it with you.  It’s an open source project and the source code is stored here https://github.com/Sitecore/experience-extractor.  It does exactly the same job as Sitecore analytics, but allows us to export in details which you can use in below scenarios:

  • Analyze, present and share Sitecore data with external tools such as Excel, Power BI, R and Tableau
  • Prepare and shape data for machine learning
  • Integrate Sitecore Experience Data in other big data solutions

The shell section is the configuration for the export in Json format which consists of

  • Source
  • Mapper
  • And optionally post-processors

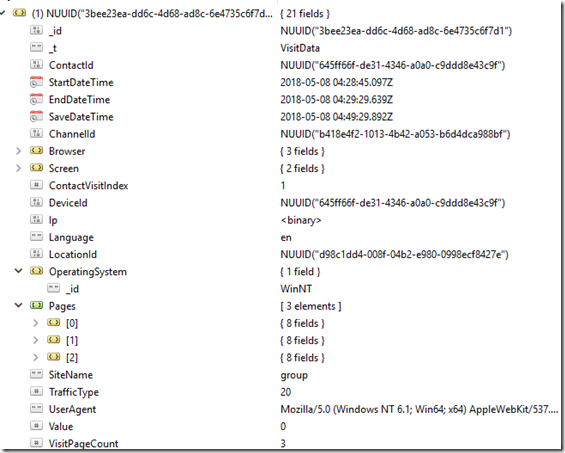
The source is the “Interactions” table in xDB. If you look into the integration table schema, it tells you what data Sitecore is capturing i.e. StartDateTime, the Browser, Location, Device etc. These fields can be the facets for your report.

image

There are more information about the dimension, filter and mapper can be found here https://github.com/Sitecore/experience-extractor/wiki


0 Comments

Image result for sitecore powershell

Recently I’m trying to export content from Sitecore with Sitecore PowerShell Module. If you have never used this module before, you can read the documents here.

I created a PowerShell script in Sitecore, and everything is working smoothly and fine, until I created a admin page for calling the scripts programmatically.  The scripts were triggered, however the file was not generated.  At very beginning I thought it was caused by insufficient permission for creating files.  So I tried to give everyone read/write permission.  Unfortunately, it was still failed with no exceptions.  

After investigating the logs, I found that it was throwing an error.  It was a bit strange to me, as if I run the scripts in Sitecore. It exports files successfully. However, if I run the scripts via the admin page I created, it fails (as shown in screenshot below)

image


The error message was a bit misleading.  After a few times trial and error , I realized that when the scripts are called from external application, Sitecore PowerShell doesn’t know the context.  Thus, I added “Set-Location” for all the scripts, and run “export” again, it started working!

 image

0 Comments


Before releasing a new website, it's always good to optimize your configuration for production. Here are some suggestions:

Security

ID

Items

    Image result for tickbox icon

    Protect Admins Pages

    1. Cache (/Sitecore/admin/cache.aspx)
    2. Database Browser (/stecore/admin/dbbrowser.aspx)
    3. Serialization (/stecore/admin/serialization.aspx)
    4. Show Config (/sitecore/admin/showconfig.aspx)
    5. Size Status (/sitecore/admin/sizestatus.aspx)
    6. Stats (/sitecore/admin/stats.aspx)
    7. Unlock Admin (/sitecore/admin/unlock_admin.aspx)
    8. Installation wizard (/sitecore/admin/UpdateInstallationWizard.aspx)

      Image result for tickbox icon

        Turn on custom Errors

        Update production web.config

        <customErrors mode="RemoteOnly" />

          Image result for tickbox icon

            Reset admin password. It would be embarrassing to go live with password "b" =)

              Image result for tickbox icon

                Ensure replace develop license file before going live

                Performance

                  Image result for tickbox icon

                    Configure Keep-Alive

                    <agent type="Sitecore.Tasks.UrlAgent" method="Run" interval="00:15:00">
                            <param desc="url">/sitecore/service/keepalive.aspx</param>
                            <LogActivity>true</LogActivity>
                    </agent>

                      Image result for tickbox icon

                        Disable WebDAV

                        Sitecore Recommendation

                        Sitecore recommends disabling WebDAV on the production content delivery servers to reduce the number of log files being created. Also, Sitecore recommends disabling WebDAV on the content management servers if the WebDAV functionality is not being used.


                        1.Disable logging

                        2.  <!--<appender name="WebDAVLogFileAppender" type="log4net.Appender.SitecoreLogFileAppender,
                        3.  Sitecore.Logging">
                        4.   <file value="$(dataFolder)/logs/WebDAV.log.{date}.txt" />
                        5.   <appendToFile value="true" />
                        6.   <layout type="log4net.Layout.PatternLayout">
                        7.   <conversionPattern value="%4t %d{ABSOLUTE} %-5p %m%n" />
                        8.   </layout>
                        9.   </appender>--> 
                        10.  
                        11.<!--<logger name="Sitecore.Diagnostics.WebDAV" additivity="false">
                        12.    <level value="INFO"/>
                        13.    <appender-ref ref="WebDAVLogFileAppender"/>
                          </logger>-->

                        14.Disable webserver

                        15.<!--<remove name="WebDAVModule" />-->
                        16. <!--
                        17.<add name="WebDAVRoot" path="*" verb="OPTIONS,PROPFIND" modules="IsapiModule"
                        18.scriptProcessor="%windir%\Microsoft.NET\Framework\v2.0.50727\aspnet_isapi.dll"
                        19.resourceType="Unspecified" preCondition="classicMode,runtimeVersionv2.0,bitness32" />
                        20. <add name="WebDAVRoot64" path="*" verb="OPTIONS,PROPFIND" modules="IsapiModule"
                        21.scriptProcessor="%windir%\Microsoft.NET\Framework64\v2.0.50727\aspnet_isapi.dll"
                        22.resourceType="Unspecified" preCondition="classicMode,runtimeVersionv2.0,bitness64" />
                        23. <add verb="*" path="sitecore_webDAV.ashx"
                        24.type="Sitecore.Resources.Media.WebDAVMediaRequestHandler, Sitecore.Kernel"
                        25.name="Sitecore.WebDAVMediaRequestHandler" />
                        -->

                        26.Disable httphandler

                        27. <!--
                        28. <add verb="*" path="sitecore_webDAV.ashx"
                        29.type="Sitecore.Resources.Media.WebDAVMediaRequestHandler, Sitecore.Kernel" />
                         -->

                          Image result for tickbox icon

                            Disable Performance Counters

                            Sitecore Recommandation

                            Performance counters create a minor overhead and is recommended to be enabled only when running in troubleshooting mode

                             <setting name="Counters.Enabled" value="false" />

                              Image result for tickbox icon

                                Disable Memory Monitor

                                Sitecore Recommandation

                                Sitecore recommends disabling the Memory Monitor in production environments, and only enabling it for troubleshooting memory related issues.

                                 <setting name="Counters.Enabled" value="false" />
                                <!--<hook type="Sitecore.Diagnostics.MemoryMonitorHook, Sitecore.Kernel">
                                 <param desc="Threshold">800MB</param>
                                 <param desc="Check interval">00:00:05</param>
                                 <param desc="Minimum time between log entries">00:01:00</param>
                                 <ClearCaches>false</ClearCaches>
                                 <GarbageCollect>false</GarbageCollect>
                                 <AdjustLoadFactor>false</AdjustLoadFactor>
                                 </hook>-->

                                  Image result for tickbox icon

                                    Ensure sufficient cache size

                                    SEO

                                    Image result for tickbox icon


                                    Title Tag

                                    The <strong>title</strong> tag is required in all HTML documents and it defines the title of the document. This tag displays the page title in browsers toolbar and in the search-engine results (SERPs). It also provides a title for the page when it is added to favorites. A descriptive <strong>title</strong> tag is important in helping search engines determine the web page's relevancy for certain keywords.


                                      Image result for tickbox icon

                                        Meta Description

                                        The meta description tag is meant to be a short and accurate summary of your page content. This description can affect your search engine rankings and can also show up directly in search engine results (and affect whether or not the user clicks through to your site).

                                          Image result for tickbox icon

                                            <h1> Headings Status

                                            This indicates if any H1 headings are used in your page. H1 headings are HTML tags than can help emphasize important topics and keywords within a page.

                                              Image result for tickbox icon

                                                <h2> Headings Status

                                                This indicates if any H1 headings are used in your page. H1 headings are HTML tags than can help emphasize important topics and keywords within a page.

                                                Image result for tickbox icon

                                                Check Robots.txt

                                                Check if your website is using a robots.txt file. Search engines send out tiny programs called spiders or robots to search your site and bring information back so that your pages can be indexed in the search results and found by web users. If there are files and directories you do not want indexed by search engines, you can use the "robots.txt" file to define where the robots should not go.

                                                These files are very simple text files that are placed on the root folder of your website: www.yourwebsite.com/robots.txt.

                                                There are two important considerations when using "robots.txt":

                                                - the "robots.txt" file is a publicly available file, so anyone can see what sections of your server you don't want robots to use;

                                                - robots can ignore your "robots.txt", especially malware robots that scan the web for security vulnerabilities;

                                                Image result for tickbox icon

                                                Check Sitemap

                                                a sitemap is an XML file that lists URLs for a site along with additional metadata about each URL (when it was last updated, how often it usually changes, and how important it is, relative to other URLs <g class="gr_ gr_9 gr-alert gr_gramm undefined Grammar multiReplace" id="9" data-gr-id="9">in</g> the site) so that search engines can more intelligently crawl the site.

                                                Image result for tickbox icon

                                                Image Alt Test

                                                Check images on your webpage for required alt attributes. If an image cannot be displayed (wrong source, slow connection, etc), the alt attribute provides alternative information. Using keywords and human-readable captions in the alt attributes is a good SEO practice because search engines cannot really see the images. For images with a decorative role (bullets, round corners, etc) you are advised to use an empty alt or a CSS background image.