Sitecore Azure AD B2C SSO
- Posted in:
- Sitecore
- Sitecore 9
- SSO
Recently I’ve been working on Azure AD B2C SSO. The business requirement is to improve the user experience by personalizing the UI based on user roles. Personalization will be easily implement in Sitecore with virtual user roles.
One of the challenge with the above user journey we had was that the roles are not included in the claims by default with Azure B2C basic policy.
So I had a discussion with the team (Simon and Ivan), and come up with two potential solutions:
- Using Azure Identity Experience Framework (custom policy) to include roles
- Using Microsoft Graph API for retrieving user roles
Based on the discussion, I did the POC for option 2. So, I’m going to walk you through how to I achieved.
Terminologies
Before diving into details, here are the terminologies that will be used in the below article:
Azure AD B2C
Azure Active Directory (Azure AD) B2C is a cloud identity management service that enables your applications to authenticate your customers. This white-label service is customizable, scalable, and reliable, and can be used on iOS, Android, and .NET, or any other platform
OpenID Connector
OpenID Connect is a simple identity layer built on top of the OAuth 2.0 protocol. OAuth 2.0 defines mechanisms to obtain and use access tokens to access protected resources, but they do not define standard methods to provide identity information. OpenID Connect implements authentication as an extension to the OAuth 2.0 authorization process. It provides information about the end user in the form of an id_token that verifies the identity of the user and provides basic profile information about the user.
Microsoft Graph API
Microsoft Graph is a RESTful web API that enables you to access Microsoft Cloud service resources. After you register your app and get authentication tokens for a user or service, you can make requests to the Microsoft Graph API.
Solution (options 2)
As mentioned above, option 2 is to make a call with MS Graph API for retrieving group membership information. So we updated the user follow by introducing step 7 and step 8 (shown in the below diagram.)
In order to make a call to MS Graph API, you will have to create an app Azure and assign essential access permission to the app.
Register application in B2C tenant
Here is the steps for creating an app in Azure:
Sign in to the Azure portal using either a work or school account or a personal Microsoft account.
If your account gives you access to more than one tenant, select your account in the top right corner, and set your portal session to the Azure AD tenant that you want.
In the left-hand navigation pane, select the Azure Active Directoryservice, and then select App registrations > New registration.
Once you created, click on “certificates & secrets” for creating client secret which you will be used in your code.
Last step is to assign permissions
- In the Required permissions menu, click on Windows Azure Active Directory.
- In the Enable Access menu, select the Read and write directory data permission from Application Permissions and click Save.
- Finally, back in the Required permissions menu, click on the Grant Permissionsbutton.
Build Application
Add the below configuration to your app
Make HTTP request and add roles into claim
Display Roles
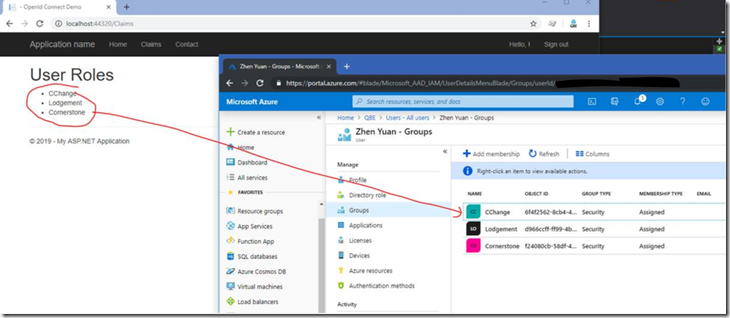
I create a few groups in Azure and assigned them to my profile. After login, I can see which groups have been assigned to me.
Sitecore Virtual User
Since the user are not stored in Sitecore, we will need to create a virtual user for assigning these roles.
