0 Comments

Today while doing self-testing, I found that OTB facet filter component doesn't work as expected. After digging into the code, it is surely a Sitecore SXA bug.  Therefore,  I decided to share this and hope this can help you to understand the issue and quickly solve it.   

What’s the issue?

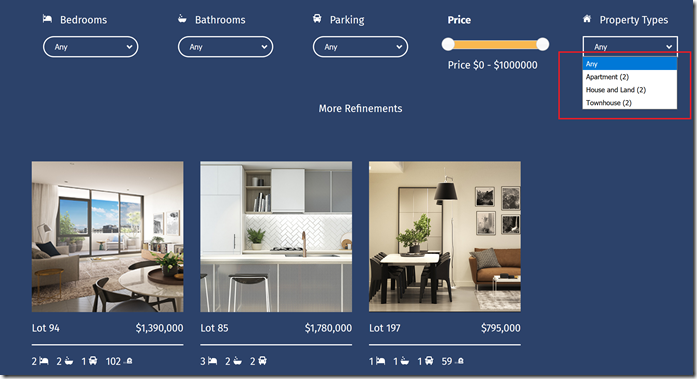
The screenshot below, it has 3 properties, and I assigned different property type for each of them (for testing purpose).  The expected result would be Apartment(1), House and Land(1) and Townhouse (1). However, it is indicating (2) items per type?  Why?!

image

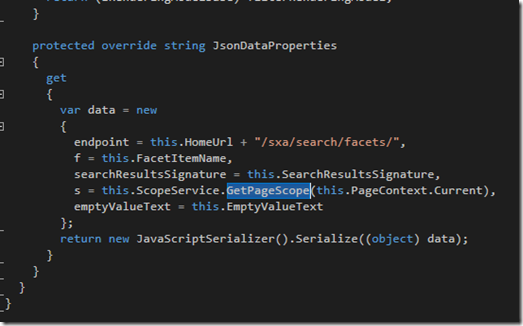
My first question was that is this because of multi-languages? After looking into the code, I found the answer, it’s because the facet component ONLY takes the search scope as its search criteria, which means the results contains multiple items with different language.

image

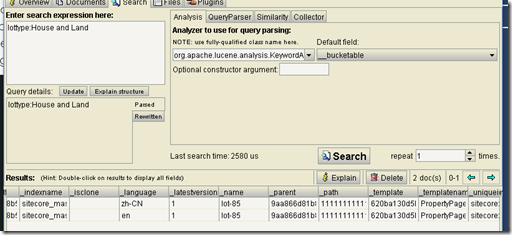
Here is the screenshot for the index,  As you can see It has two items with the lottype equals to “House and Land”, one is Chinese version and the other is English version.  That’s why the facet indicates (2) items per type in the example above. This bug could cause the discrepancy between search results and facet filtering, if you are implementing multi-language website.

image

Fortunately, This bug has been fixed in SXA 1.6, for all previous version please create a ticket in support portal for  requesting the patch for your SXA version.

0 Comments

Creating a static 500 error page is not something new. SXA provides this feature out of the box.  However, when the first time seeing the settings in SXA, I was thinking why SXA 500 page is configured in CMS. 500 error could be caused by an server error, or database error which means CMS may not be accessible.  Why?  Today,  one of the colleagues asked me the same question, and

Unfortunately, Rare information can be found on the Sitecore documentation site.  After spending an hour looking into the code, we totally understand how it was designed. 

image

Here are the steps to make 500 error page working in SXA:

  1. Configure the Server Error Page – Linking to error page item
  2. Select the “Site Definition” item
    image
  3. Once you click on the Site definition item, the “Error handling” menu will appear in the ribbon
    image
  4. Click on “Generate static error page” button (as shown above)
  5. It will popup an confirmation dialog
    image
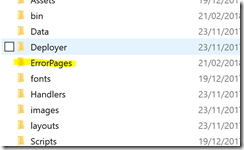
  6. Click “Ok” then going to the root of your website in which you can find “ErrorPages”, and the static error page is automatically generated in this folder.
    image


When an error occurs, user will be redirected to this static error page. This magic can be found the ErrorHandling pipelines.

image

Overall, I will say it is well designed, although there is a bit of flaw in the above code -  it doesn’t handle the response status.  The Server.TransferRequests does not change the status code, it passes control of the request on to another page without telling the client.  However you can always manually set the status code to 500 by overriding the flaw Process method.

0 Comments

SXA provides the ability for optimizing CSS styles and JavaScript via SXA Asset Optimizer. If you want to know more about what the Asset Optimizer is you can check out here.

However,  we found a bug in the Asset Optimizer, which stripes out the key/reserved words i.e. (switch, for, imports etc..) in CSS styles during minifying in all the versions of SXA, apart from SXA 1.6.

Given the complexity for fixing this issue, Stiecore support suggested to either disable the optimizer or upgrade to SXA 1.6, if you are facing the same issue.

0 Comments

blog

Finally Sitecore commerce 9 (SXC9) is released! Like everyone else, I’m getting excited about the new release.


Yay-clipart-free-download-clip-art-on-4

It’s not a secret that the previous Sitecore commerce is super hard to use, as it relies on a legacy system – the RIP commerce server.No more Commerce Server!Thisis one of the most exciting news for Sitecore commerce. I believe everyone is happy that we no longer needs to deal with the commerce server. Secondly, it supports SXA, which should really speed up the implementation of the commerce site from the ground up.


Getting started

Now, let’s start to spin up a Sitecore 9 commerce site together.

Before starting to install SXC 9, please make sure you have Sitecore 9(XP0) update-1 installed. If you don’t know how to install Sitecore 9, you can read my previous post here.

Preparation

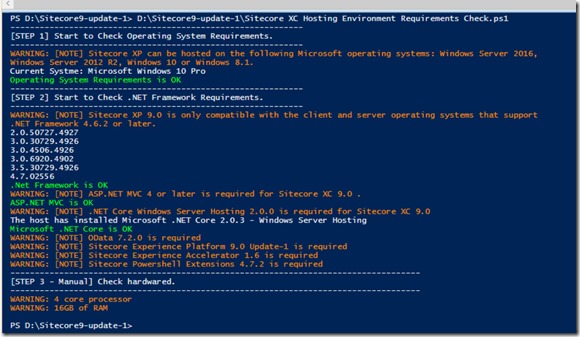
Once Sitecore XP0 installed, the next step is to check the environments includes system requirements, framework requirements etc. I wrote PowerShell script for checking all the required bits and pieces that listed in the Sitecore commerce 9 installation guideline.  you can just simply follow the official documentation.
blog-2

Installing commerce 9

In this section, I’m going to explain the steps for installing Commerce 9 as well as the issues you may encounter during this process.

Ready? Okay, let’s get stared.

[Step One]

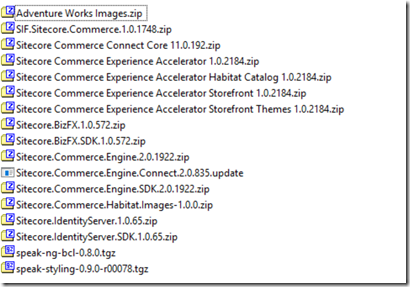
Download package from Here.  The package I'm using for this demo is the On Premises  version.  Please feel free to use the azure version, if you are more comfortable with Azure environment.

Once you downloaded the package, unzip the package.
image

[Step Two]

Create a deploy Folder, and copy the above files into the “deploy” folder you just created.  Then unzip the the zip files as listed below:

  • SIF.Sitecore.Commerce.1.0.1748
  • Sitecore.BizFX.1.0.572
  • Sitecore.Commerce.Engine.2.0.1922
  • Sitecore.Commerce.Engine.SDK.2.0.1922
  • Sitecore.IdentityServer.1.0.65

If you read the Stiecore official installation guideline, you will probably notice that Sitecore.Commerce.Engine.2.0.1922  and Sitecore.IdentityServer.1.0.65are not listed in the list, why here I’m asking you to unzip those two?

blog-5

This is because the default connection string for both Sitecore Identity Server and Commerce Engine are using “.”. Therefore, If your SQL server instance name is different from the default value, you most likely get these errors.
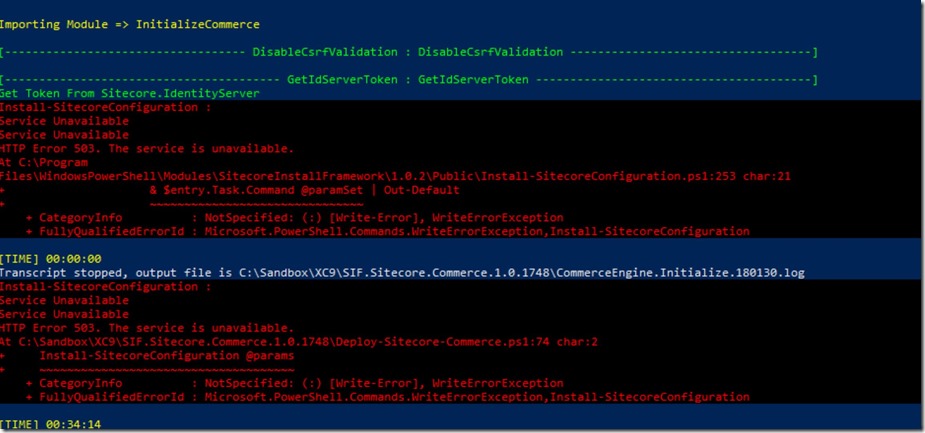
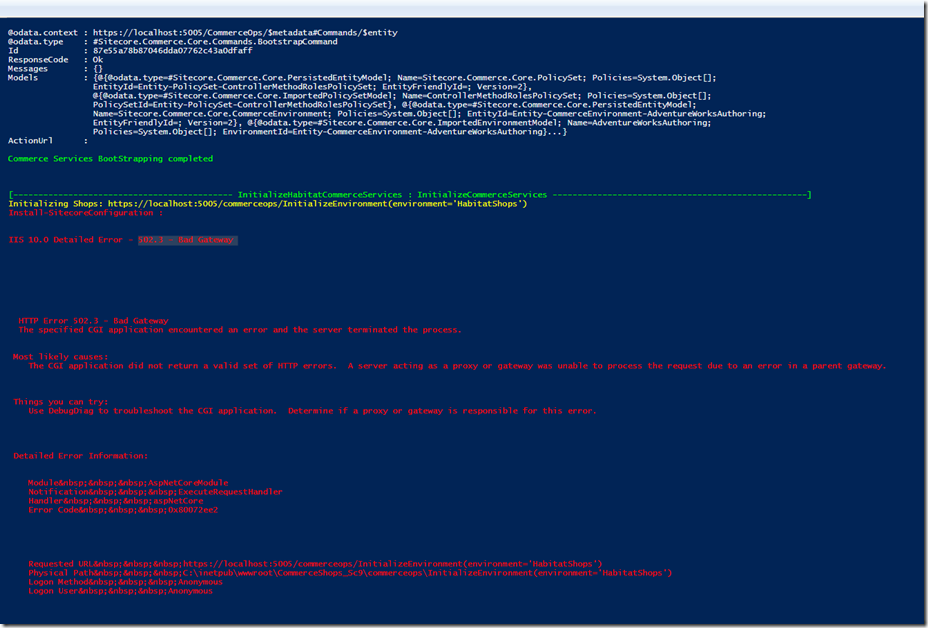
error-1

image

Update the server in the connection string in both the “appsettings.json” and the environments *.json files as well as global.json.

The global.json connection string is used to tell that engine role how to access the Global database that contains the environment information.
All of the environment data is declared in json files on disk, which are then read into the Global DB when you execute the BootStrap command.

Once you’ve done above, replace the vanilla zip files with the ones you updated.

[Step Three]

Open “Deploy-Sitecore-Commerce.ps1” in “SIF.Sitecore.Commerce.1.0.1748” Folder, and update the configuration as per your environment.

Here is an example
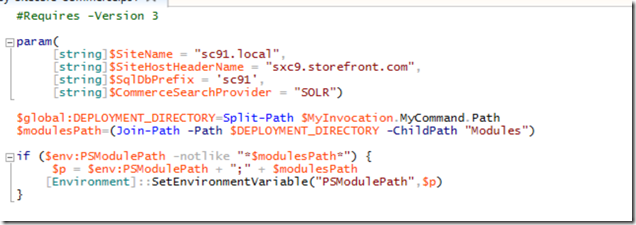
image

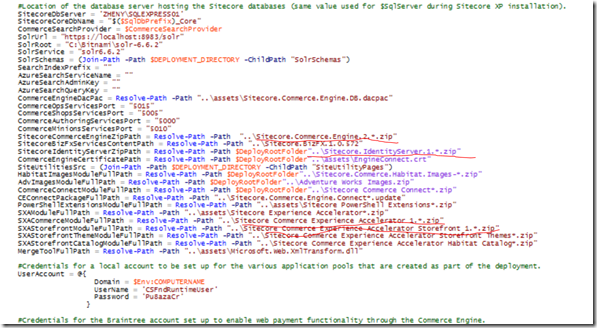
There are a few issues in the default script, for avoiding the runtime error, please change the value as highlighted in the screenshot below.
image

Otherwise, you may encounter an error as below

error-2

[Step Four]

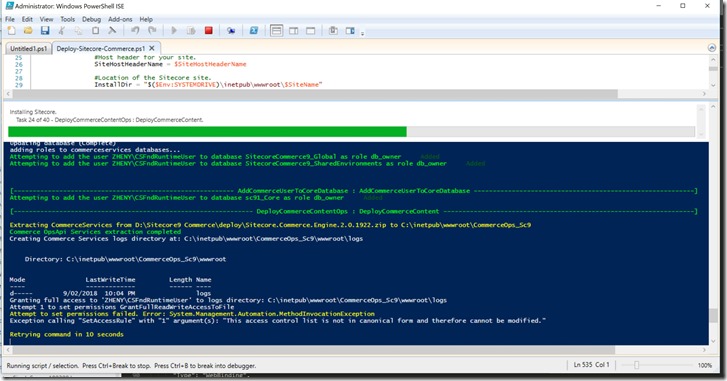
Finally, let’s run the script.  The whole installation takes about 30-40 mins.
Capture


[Step Five]

After it is successfully installed. you will need to follow the post installation steps in Chapter 4 of the installation guide.  

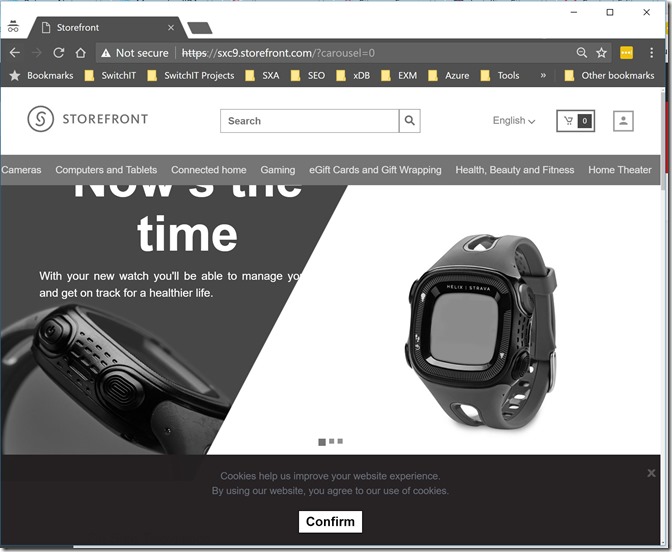
Finish? Congas! your Sitecore commerce SXA site is successfully installed.
blog-3

Thanks to Rob Earlam for explaining the concept, so that I’m able to troubleshoot the issues.  I hope this post can ultimately help you as well with the installation.
0 Comments

variant

In this post,  I'm going to explain some advanced features of SXA – Rendering Variant as well as how to apply custom rules for a variant field.

What is rendering variant?

Out-of-box Sitecore SXA provides a set of variants that come with renderings that support them. In the past, if a component, e.g. carousel, are rendering differently in design, most likely you will create a different rendering controller in back-end.  Fortunately, SXA solved this issue perfectly with rendering variants.  Rendering variants allows you to create one controller with many variants.  For example, the list rendering can have different variants for: detailed lists, thumbnails list, and a carousel.  For more details you can find here.


How to create rendering variant?

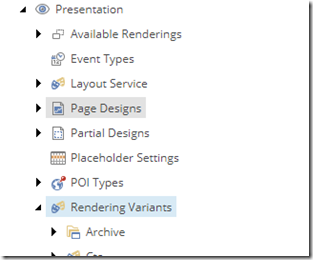
Out-of-box rendering variants are located under “/sitecore/content/Mirvac/RetailLeasing/HelloSydney/Presentation/Rendering Variants”

image

Each of the variant components has its own associated variants. The variant is associated with component by name convention. i.e. component “Search Results” is associating with “Search Results” variants.

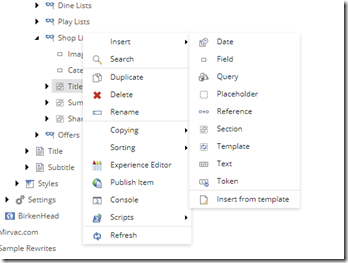
Out-of-box Stiecore allows you add 9 types of variant fields which includes Date, Field, Query, Placeholder, Reference, Section, template Text, and Token. To keep it simple, I’m going to use “Field” variant field. Once you are familiar with rendering variant, I will explain the more advanced fields i.e. template, reference, token, in my future post =).

image

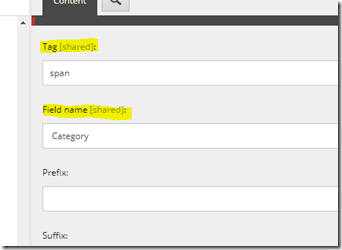
There are two important fields for adding a “Field” variant field, which are “Tag” and “Field name”. Tag is the html tag for the specific field. Field name is the field name of the data you want to rendering on the page. For instance, you want to render  title in a div on the page, the Tag will be “Div”, and Field name will be “Title”.

image


How to Apply rendering variant to component?

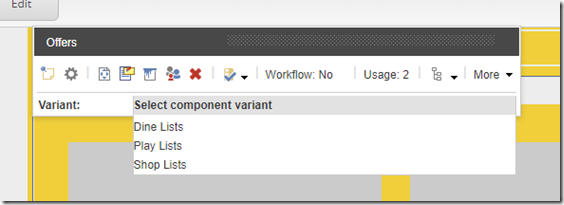
Once you finished creating your variant, the next step is to associate with the component on the page. In the dropdown list, select the one you would like to apply to the current page.

image


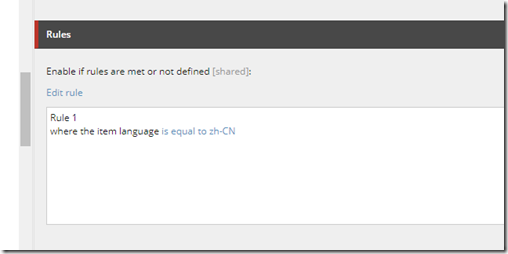
That’s all you need, simple right? In some cases, you might want to show/hide the field based on a certain condition. For instance, only showing a filed on Chinese site.  What you can do is to apply a rule for the rendering field. In the rest of the post, I will explain how to apply a custom rule to a variant field.

How to apply custom rule for a variant field?

Of course, for applying a rule, you will need a rule first. If there is no existing rules fits your requirement, you can create your own rules. It’s same as the way you used to create rules for personalization.

Here is the steps for creating a custom rule:

  1. Create a “Rules context folder” under /sitecore/system/Settings/Rules.
  2. Create a “Element Folder” under /sitecore/system/Settings/Rules/Definitions/Elements.
  3. Create a condition under the “Element Folder”  created above.
  4. Find “Default” tags definition under the “Element Folder” and select the tags you want to associated with i.e. Fields, GeoIP etc..
  5. Find “Default” tags definition under “Rules context folder”, and select the tags selected above.

Once you’ve done the steps, you will need to find the variant field that  you want to apply the rule as an example shown in below screenshot. After that, the field will be rendering based on the rule condition.

image